
Share access for your SmartAccess Modul or door with family, friends and employees. With the SmartAccess App you can easily invite new users to control the SmartAccess Module and manage their access permissions. An individual key is added and assigned for each user of the SmartAccess Module.
Different types of keys can be added and assigned, such as AppKeys, SmartAccessKeys or FingerprintKeys.
Note: To set the user’s access permissions assign the user a profile with the desired permissions or create a new profile. For more information on how to add and edit profiles, see chapter Profiles.
Key capacity & the Owner Key
A SmartAccess Module stores a limited number of keys, shown live in the app. Current firmware supports up to 100 keys (older firmware: 25 keys). Every credential uses one slot — each AppKey, each SmartAccessKey, and each enrolled fingerprint. When the storage is full, no new key can be added until one is removed.
The Owner Key does not count toward this limit — it is stored separately and stays available on both current (100-key) and legacy (25-key) firmware. A 100-key Module therefore holds up to 100 user credentials plus the Owner Key.
The Owner Key can always create a new key by scanning the Module’s Master QR code — a recovery path if the key storage is full or all other keys are lost.
Add AppKeys
AppKeys are digital keys that enable doors and other electronic locking systems to be opened. With an AppKey, doors can be opened manually via the SmartAccess App or, if the KelessGo or AutoUnlock function is activated, simply by approaching the door.
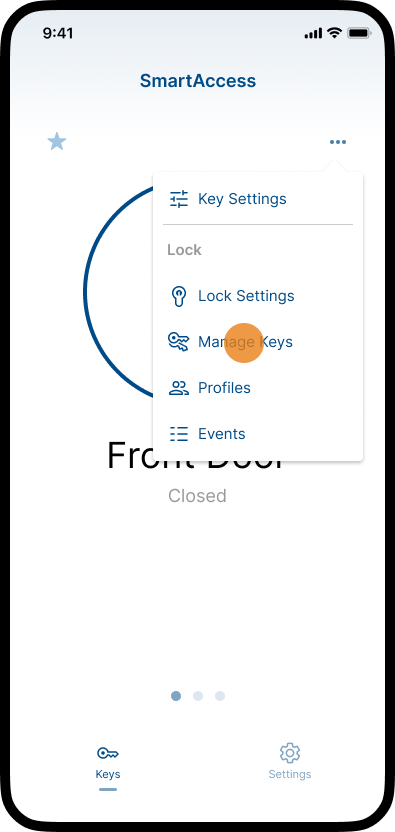
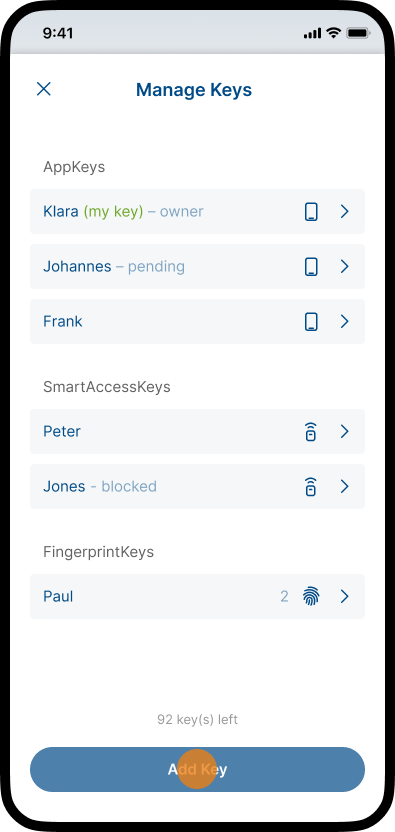
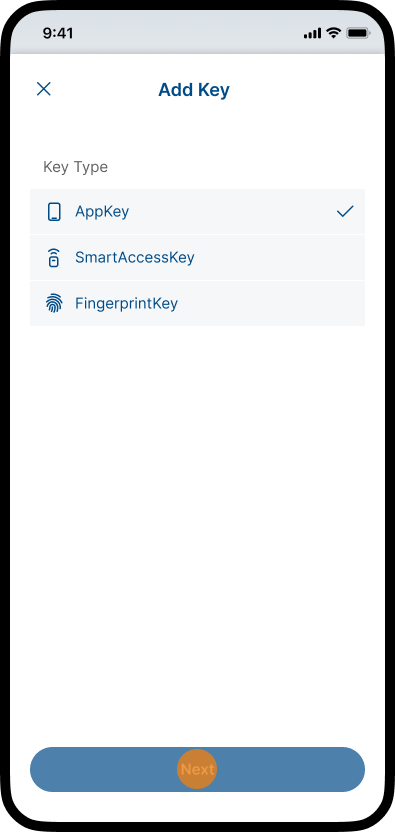
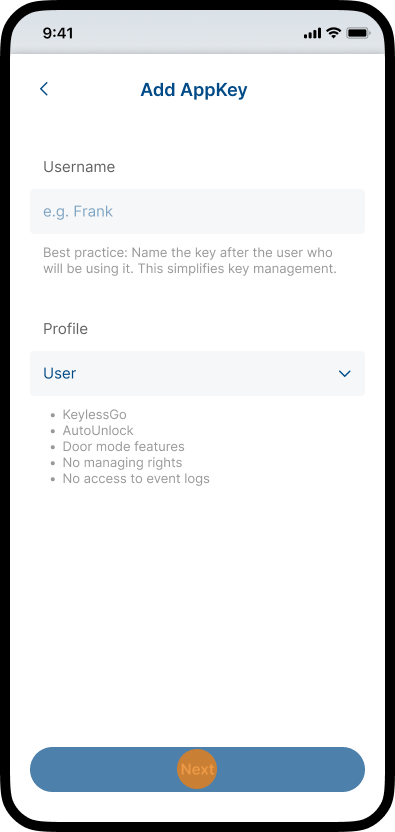
- Tap the three dots icon in the top right corner and choose Manage Keys.
- Tap Add Key.
- Select the key type AppKey and Tap Next.
- Assign a Username and choose a Profile.
To add the key tap Next.
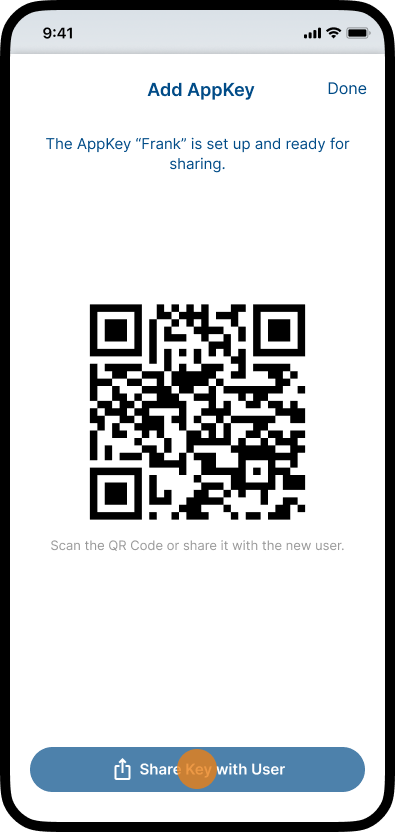
Note: For more information on how to add and edit profiles, see chapter Profiles. - The key can be shared by having the recipient scan the displayed QR code directly with their smartphone or by tapping Share Key with User.
Note: The “share” menu of your smartphone will now open. Choose which service (messages, mail, messenger, etc.) you want to use to send the invitation.
Tap Done to complete the process.
Note: As long as a user has not yet accepted the invitation to use an AppKey or the QR code has not yet been scanned, the key is assigned the status “pending”. You can resend the invitation at any time or display the QR code for scanning by selecting the corresponding key under Manage Keys.
Add SmartAccessKeys
SmartAccessKeys are battery-powered electronic keys for remote control and access authorization. SmartAccessKeys enable manual opening of up to four doors via the transmit buttons. Individual access authorizations can be assigned for each of the four buttons.
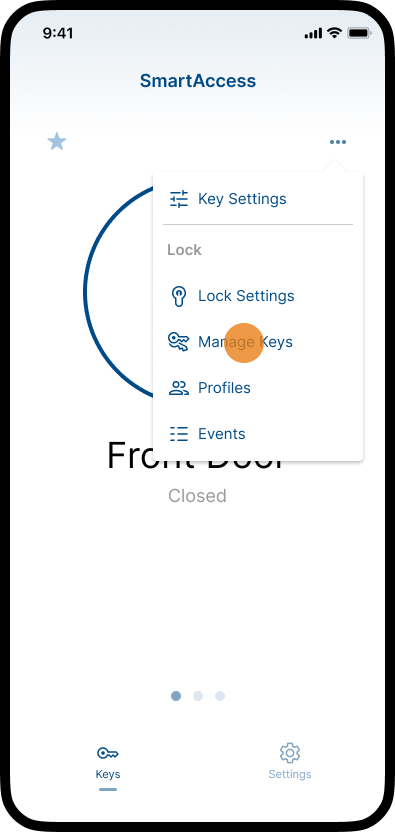
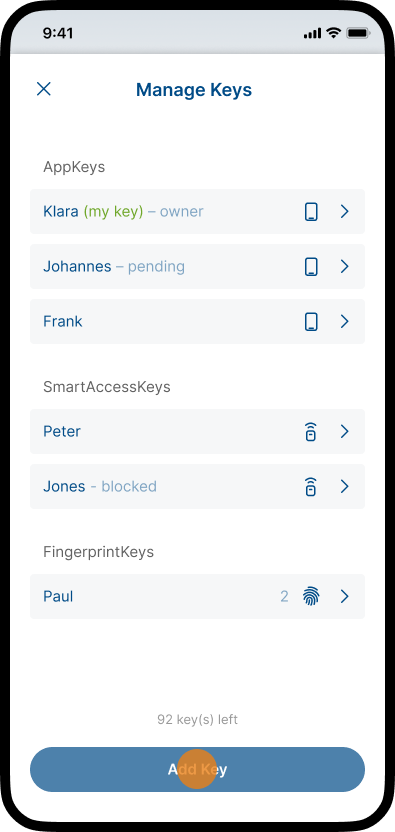
- Tap the three dots icon in the top right corner and choose Manage Keys.
- Tap Add Key.
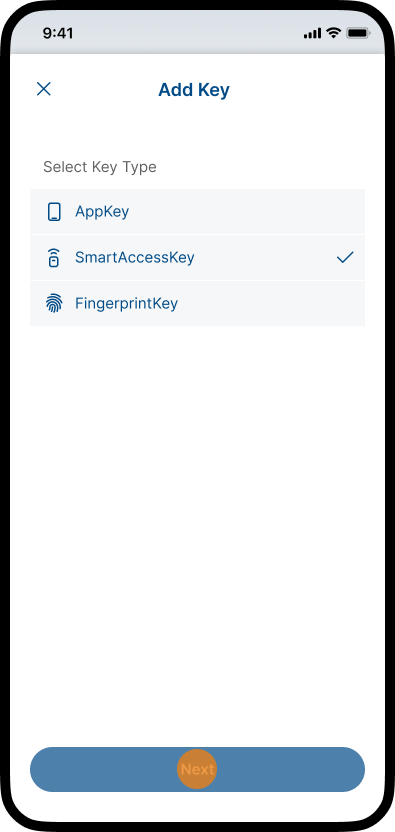
- Select the key type SmartAccessKey and Tap Next.
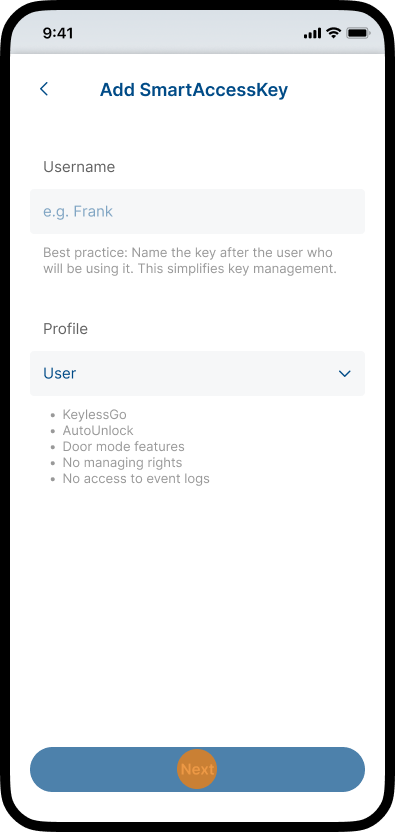
- Assign a Username and choose a Profile.
To add the key tap Next.
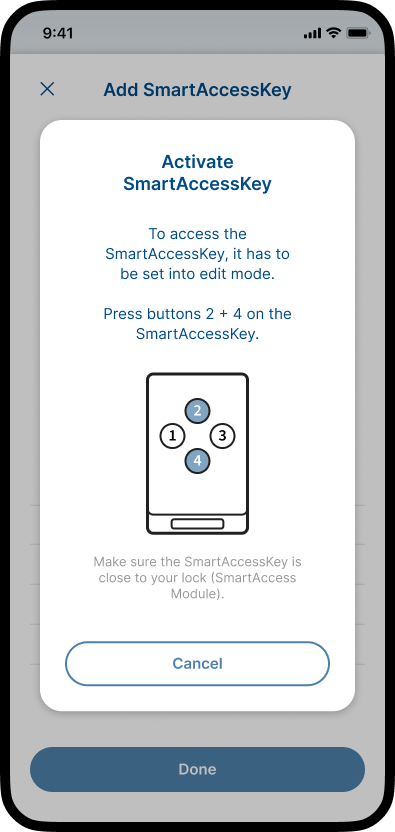
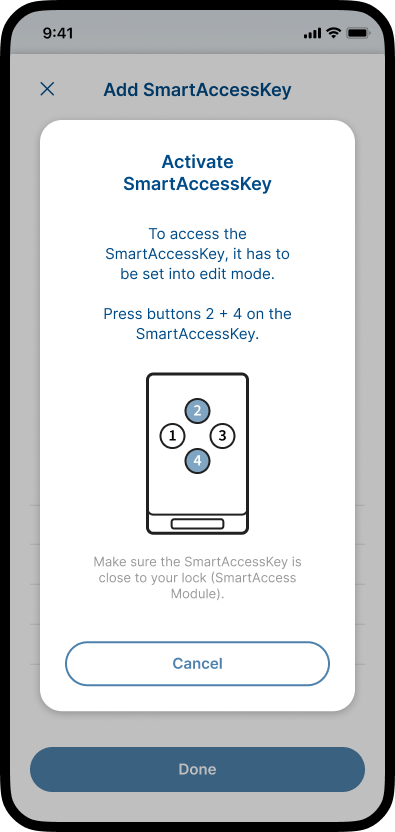
Note: For more information on how to add and edit profiles, see chapter Profiles. - To access the SmartAccessKey, it has to be set to edit mode.
To set the SmartAccessKey to edit mode:
1. Make sure the SmartAccessKey is located near your SmartAccess Module.
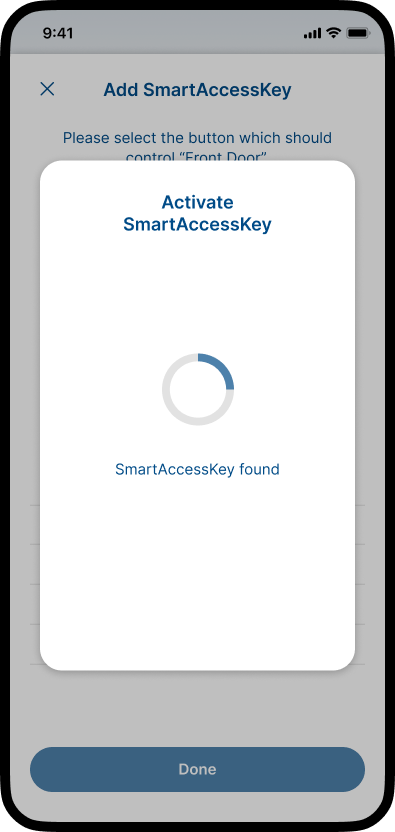
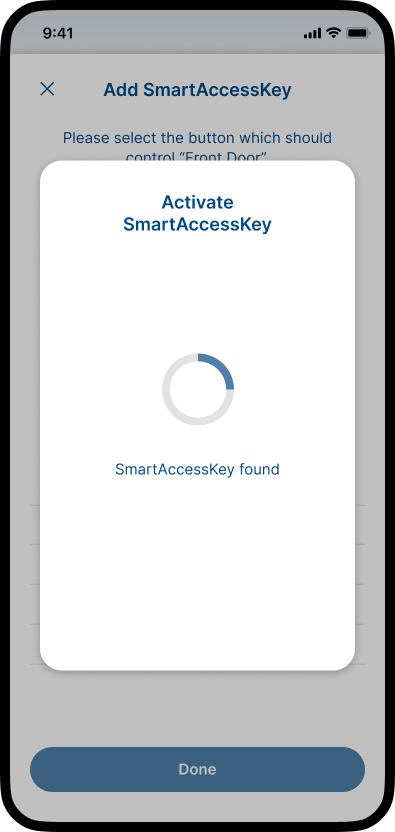
2. Press buttons 2 and 4 on the SmartAccessKey. - Wait until the SmartAccessKey is activated.
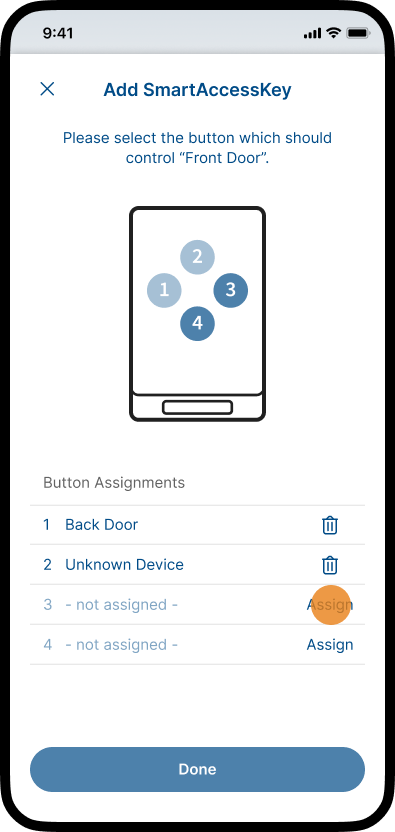
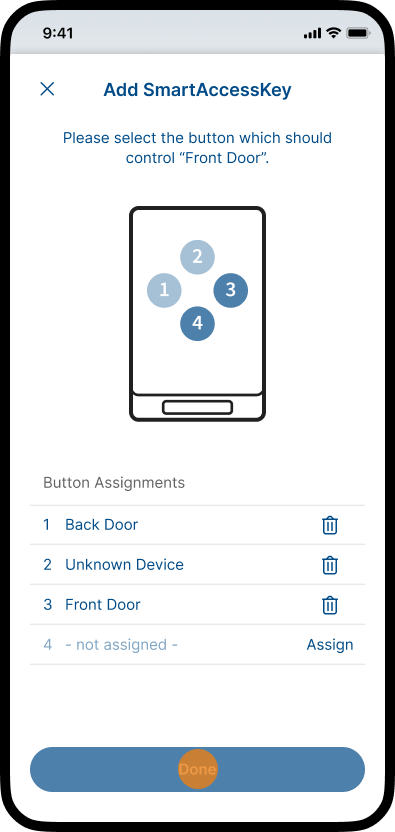
- The button assignments of the SmartAccessKey are displayed.
Select an unassigned button for controlling the SmartAccess Module or delete an existing button assignment first.
To delete an existing button assignment, tap on the corresponding delete icon.
To select an unassigned button, tap on the corresponding button in the graphic or on Assign. - Tap Next.
- To complete the process the SmartAccessKey has to be set to edit mode again.
To set the SmartAccessKey to edit mode:
1. Make sure the SmartAccessKey is located near your SmartAccess Module.
2. Press buttons 2 and 4 on the SmartAccessKey. - Wait until the SmartAccessKey is activated.
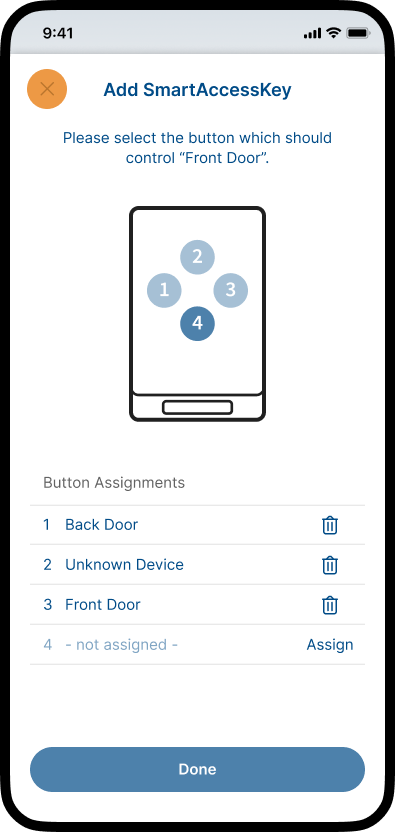
- The button assignment has been successfully assigned.
Tap the close icon in the top left corner to complete the process.
Note: The button assignments of SmartAccessKeys can be individually adjusted. For more information about SmartAccessKeys, see chapter SmartAccessKeys.
Add FingerprintKeys
FingerprintKeys are biometric access authorizations that allow users to open a door with an enrolled finger via the SmartAccess multiscan fingerprint sensor. Individual FingerprintKeys can be assigned to users and managed through the SmartAccess app. The fingerprint sensor can also act as a SmartTouch trigger for KeylessGo.
Note: A FingerprintKey can only be added when a multiscan SmartAccess sensor is paired and connected. If no sensor is paired, the FingerprintKey type is hidden. You need at least 2 free key slots to add a FingerprintKey (each enrolled finger uses one slot).
For more information about FingerprintKeys, see chapter multiscan & FingerprintKeys.
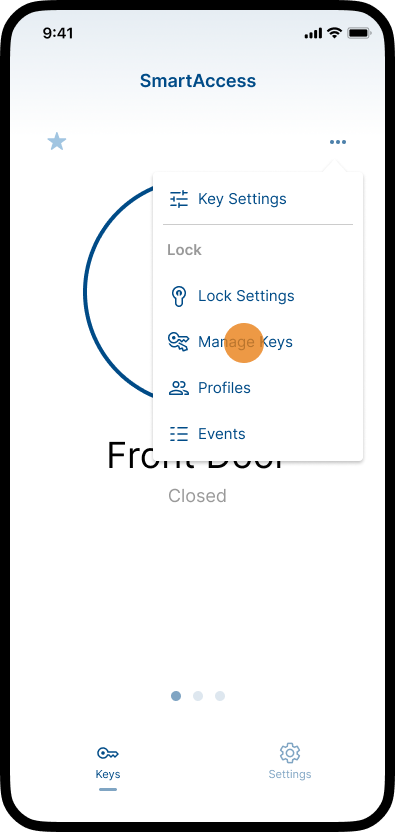
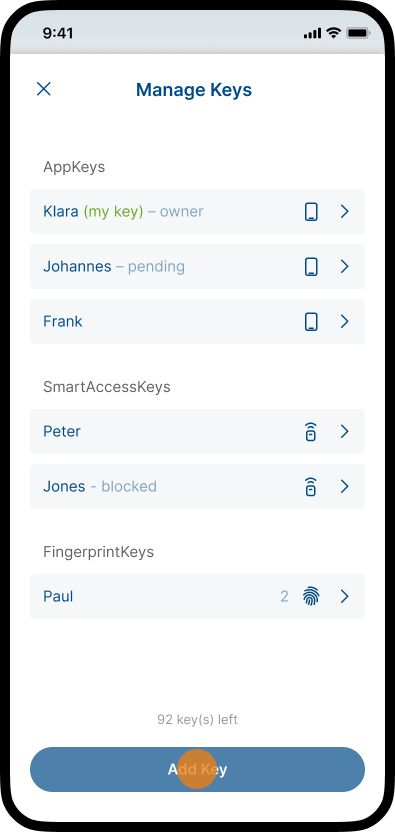
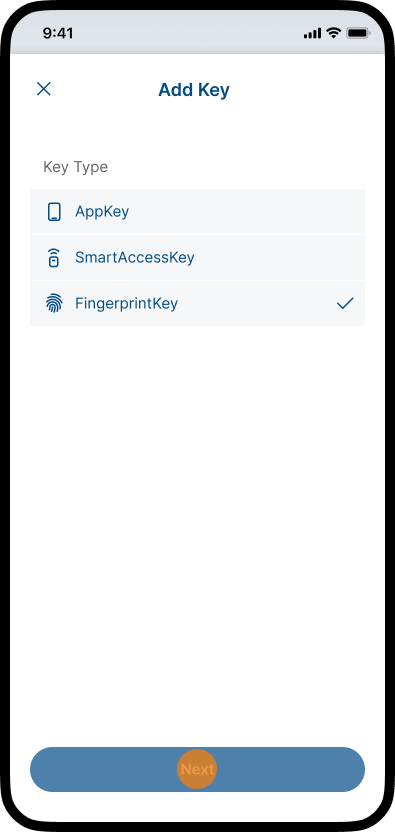
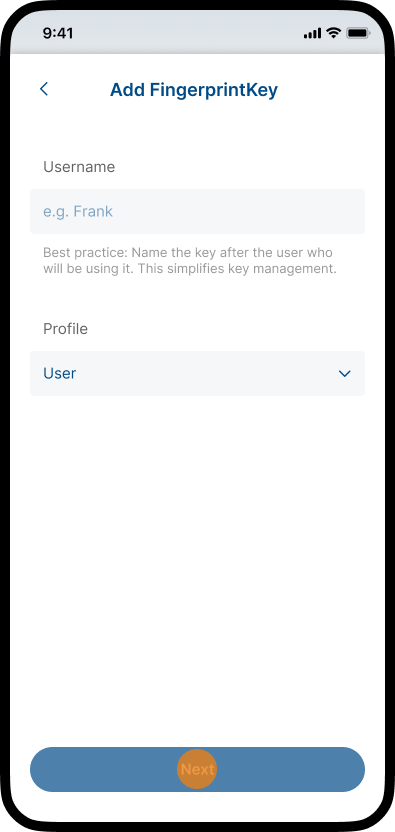
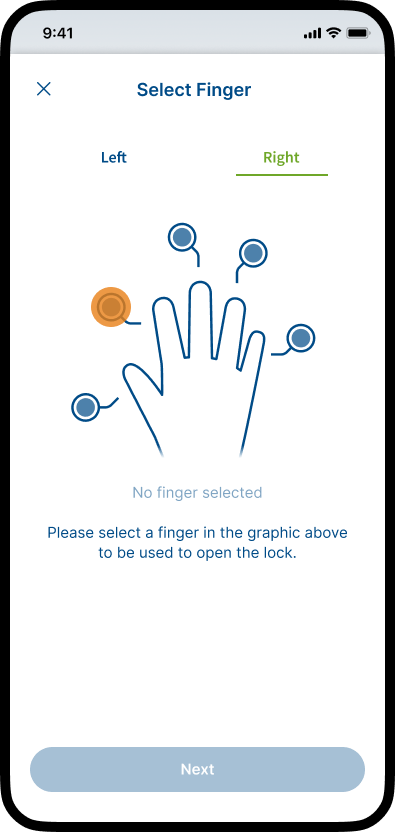
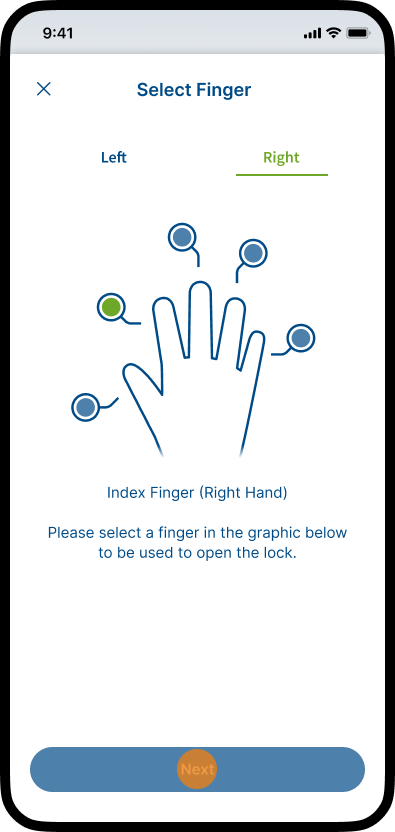
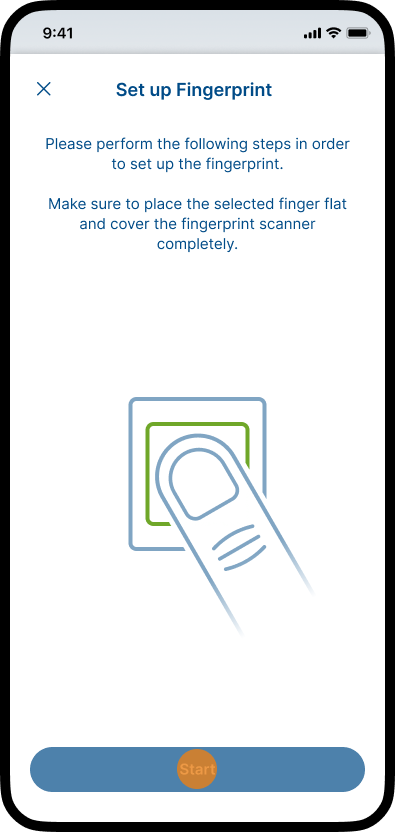
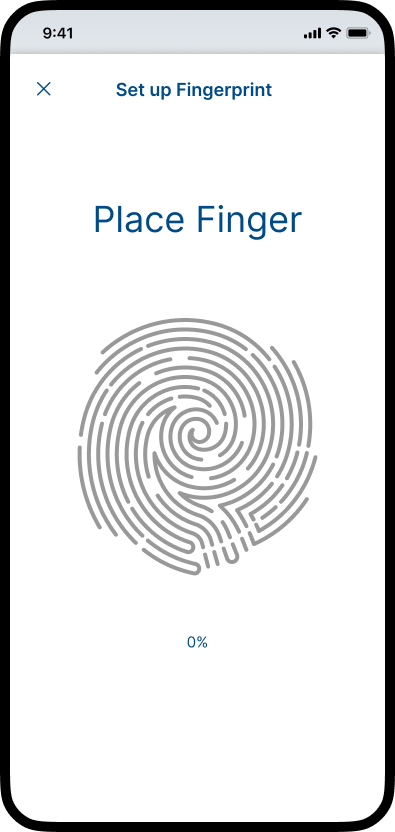
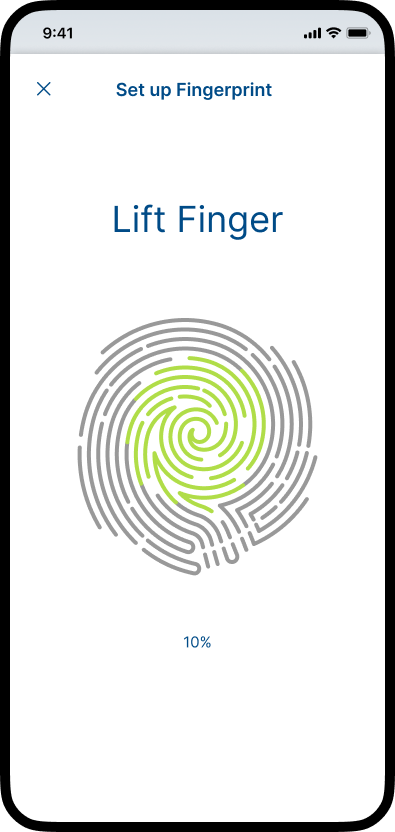
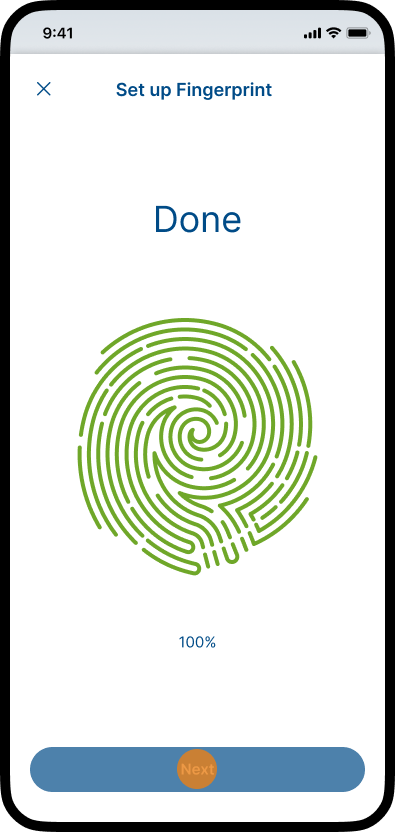
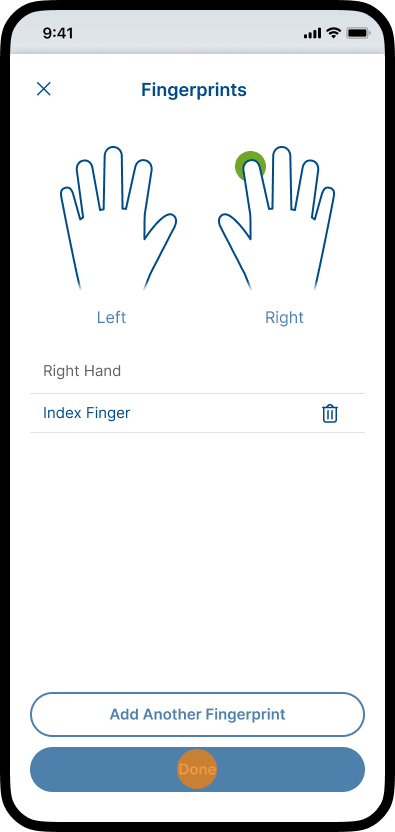
- Tap the three dots icon in the top right corner and choose Manage Keys.
- Tap Add Key.
- Select the key type FingerprintKey and tap Next.
- Assign a Username and choose a Profile.
To add the key tap Next.
Note: For more information on how to add and edit profiles, see chapter Profiles. - Choose left or right hand and select a finger in the graphic to be used to open the lock.
- Tap Next.
- Tap Start.
- Place your previously selected Finger on the fingerprint sensor.
- Lift and re-place the same finger. The print fills green as coverage grows.
Lift & place your Finger until the enrollment process is complete. - Tap Next.
- Tap Add another finger to add another finger to the key or tap Done to complete the process.
Note: If scanning fails, the app shows a clear reason (e.g. finger too small, finger too wet, change finger position) so you can try again.
For more information about FingerprintKeys, see chapter multiscan & FingerprintKeys.
Edit Keys
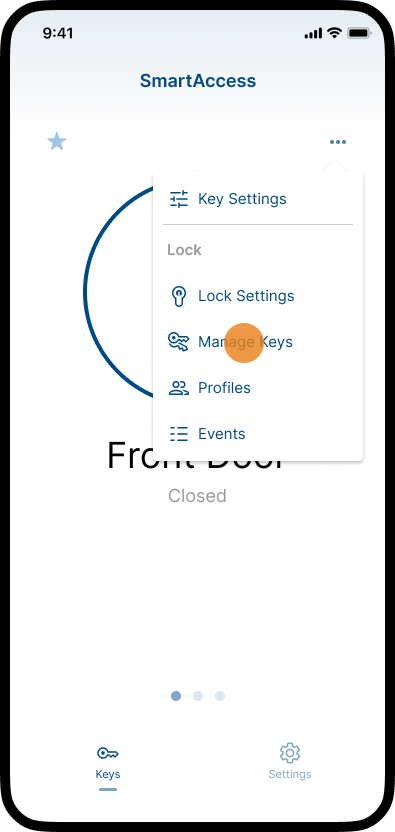
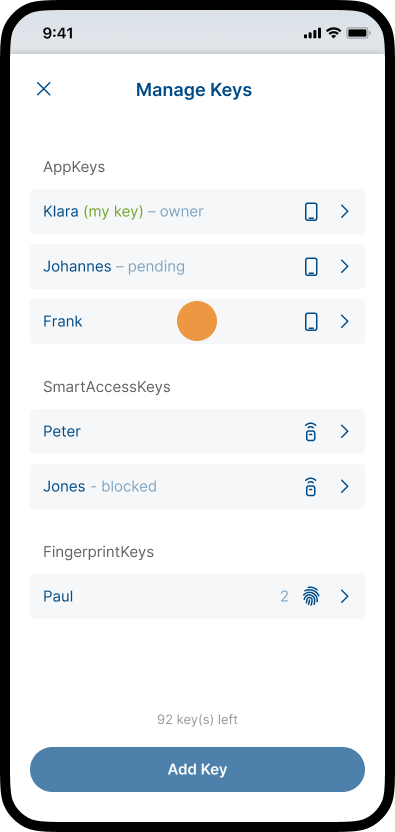
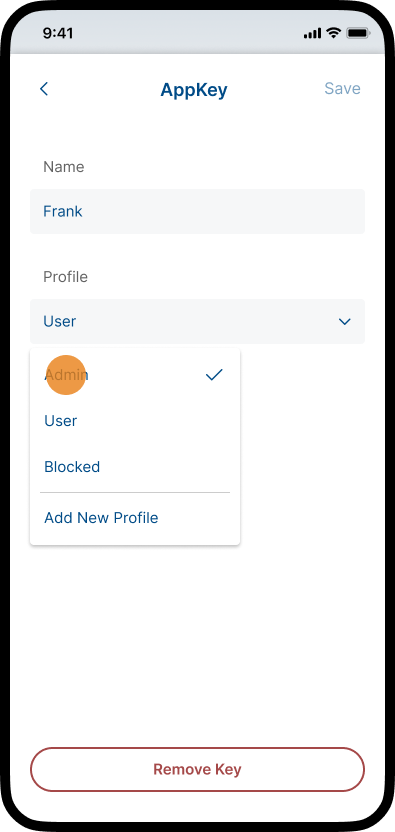
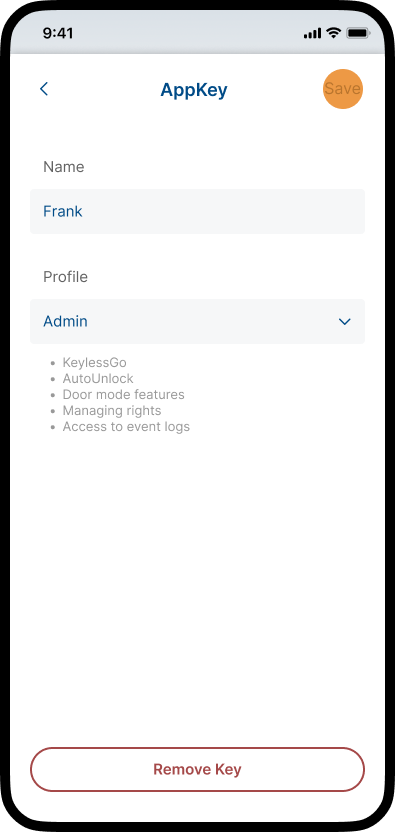
- Tap the three dots icon in the top right corner and choose Manage Keys.
- All keys of the SmartAccess Module are listed here.
Select the key you want to edit. - You can now change the Name or assign a different Profile to the key.
Make your adjustments. - To save the changes you made, tap Save in the top right corner.
Note: For more information about FingerprintKeys, including adding, editing, and managing enrolled fingerprints, see chapter multiscan & FingerprintKeys.
Remove Keys
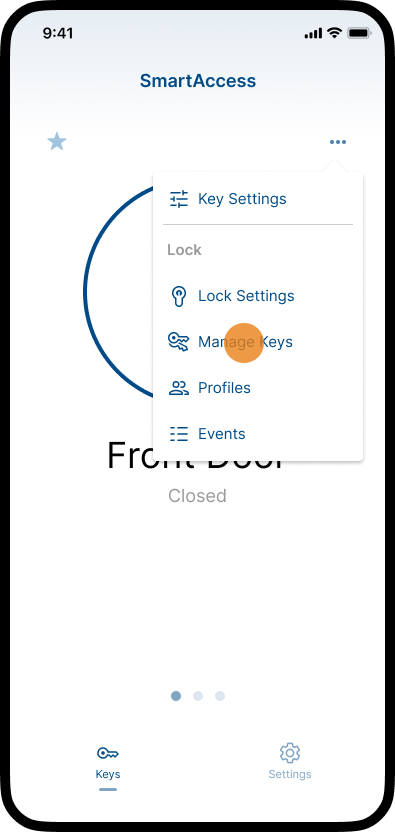
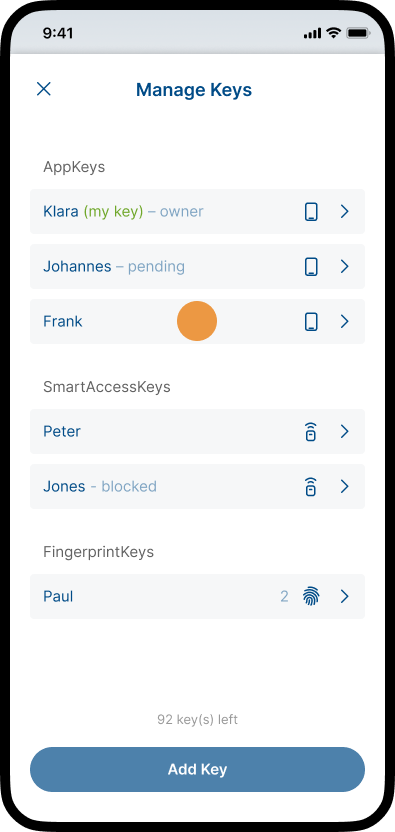
- Tap the three dots icon in the top right corner and choose Manage Keys.
- All keys of the SmartAccess Module are listed here.
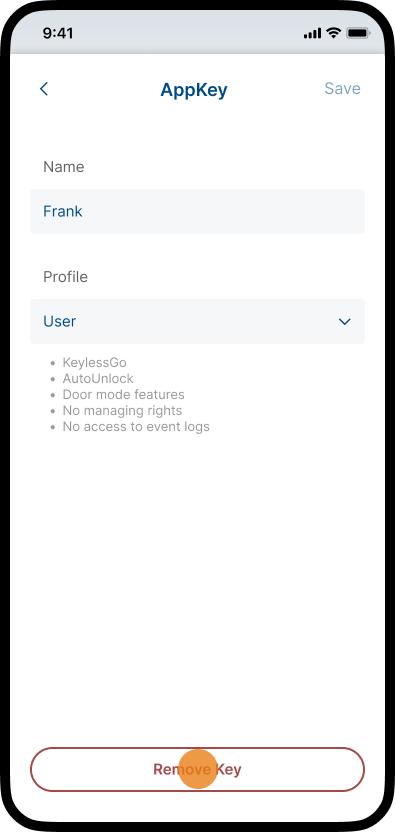
Select the key you want to remove. - To remove the key tap Remove Key at the bottom.
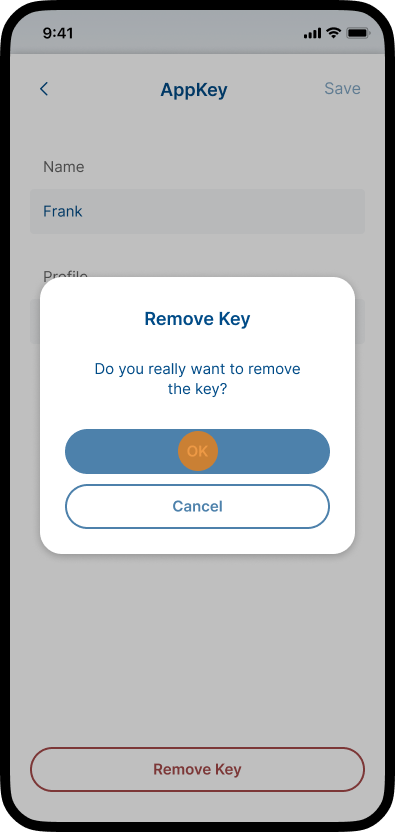
- Confirm the pop-up by tapping OK.