Thank you for choosing SmartConnect easy. With the SmartConnect easy you can operate your FUHR motor lock and many other devices via your smartphone. In conjunction with the SmartConnect app, your home will easily become a smart home.
SmartConnect easy controls and communicates via Wi-Fi. With the intuitive SmartConnect app, you can operate the FUHR multi-point lock and query the state of your door. In addition, lighting, garage door, roller shutters and much more, can be operated anywhere via the app. As an administrator, you authorise and block users, doors and terminal devices, and keep track of all applications in the Logfile, also optionally on the Internet, at any time and in any location. With SmartConnect easy you always have your property in view.
Installing the SmartConnect easy is quick and easy and can be retrofitted at no extra cost. In this operation manual, all topics are explained step by step. In an overview, you will find compatible products that you can use for a wide variety of applications. Further application examples can be found on www.smart-door.net.
For your safety, all data is stored securely on your SmartConnect easy – not on the Internet!
With the SmartConnect easy you can easily operate your FUHR multi-point lock and query the state of your door via your smartphone. The intelligent control system of the SmartConnect easy also allows further applications. Ignore darkness or rain: operate the garage door or the Lighting directly from your car via smartphone.
Additional components for modern living are already available: electric door opener, plug-in radio gong, switchable radio sockets and universal radio receivers for garages, courtyard gates or shutters. SmartConnect easy – ideas for living comfort beyond the door opening. After all, one of the leading German manufacturers of quality multi-point locks is behind the access system.
General Information
Scope of delivery
SmartConnect
QuickStartGuide
Optional
Smart radio module
SmartTouch master transponder
Safety instructions for the SmartConnect
For the correct use of the SmartConnect, please read the operating instructions carefully before using the product. Follow the instructions given and follow the described instructions. Failure to comply with the information and instructions, no warranty for the proper functioning of the product can be given. Do not disconnect the SmartConnect from the mains during configuration or updating. The resulting data loss can lead to the failure of the device and requires the submission to the service partner. The SmartConnect is intended for private indoor use only and must be protected against moisture and tampering. Any other use than that described in this manual is not intended and will result in exclusion of warranty and liability. This also applies to conversions and changes to the device. Do not open this device under any circumstances! It contains no user-serviceable parts. If an error occurs, send the SmartConnect to the responsible service unit.
Safety instructions for the smartphone
Be sure to keep the virus scanner and firewall of your smartphone up to date. Only in this way can you be protected against attacks from the Internet. Regularly check if your software is up-to-date and install the available updates. For your safety, use good passwords and change them at certain intervals. Recommendations for secure passwords can be found, for example, at the Federal Office for Information Security in the area of Recommendations: www.bsi-fuer-buerger.de.
Notes on radio operation
The radio transmission takes place on a non-exclusive transmission path. This can lead to interference from other radio applications. Switching operations, electric motors or defective electrical appliances can also cause interference. The transmission power and reception characteristics of the SmartConnect depend heavily on constructional and ecological conditions. Thus, the range in the open field differs from that in buildings. Also, the signal is transmitted differently at high humidity than at lower humidity.
SmartConnect complies with the requirements and regulations of Directive 1999/5/EC. The Declaration of Conformity can be found at www.smart-door.net.
Please make sure that in the case of a data interruption, for example due to a power failure, relevant applications such as door locks can be operated differently (e.g. mechanically with a cylinder key).
SmartConnect ecosystem
SmartConnect easy and SmartConnect door
The SmartConnect provides the connection between the applications, e.g. your FUHR multi-point lock in the front door, and your smartphone. The communication between smartphone and SmartConnect is done via Wi-Fi and optionally via the Internet (see Network Configuration in the chapter Administrator settings). Whereas the communication between SmartConnect and the individual components, such as the radio socket, is done using 868MHz radio.
For use, connect the SmartConnect to a suitable power supply (SmartConnect easy: 110 – 230V AC (Schuko socket) / SmartConnect door: 12 – 24V DC) and install the corresponding SmartConnect app on your smartphone (see chapter Set up the SmartConnect).
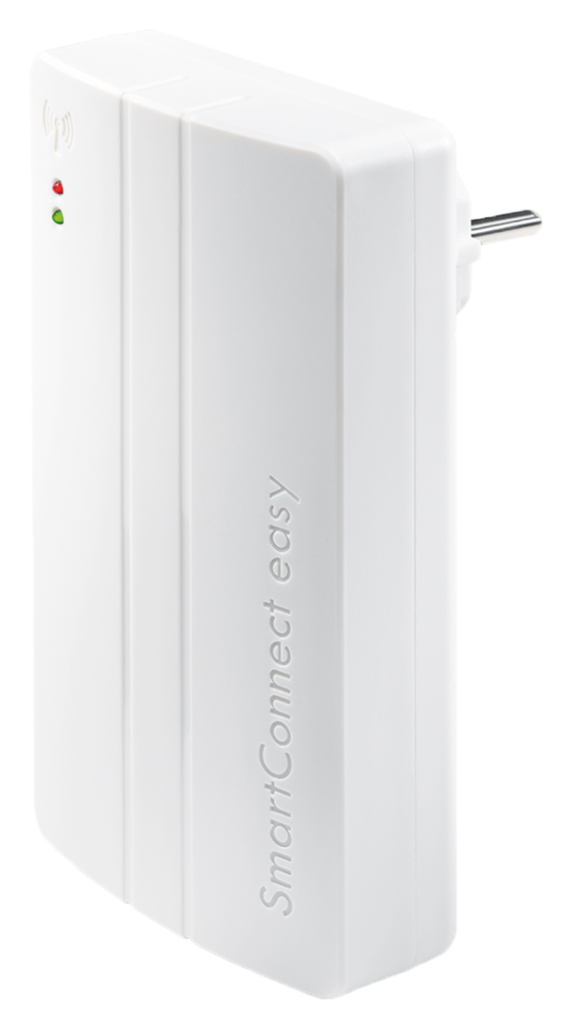
SmartConnect easy
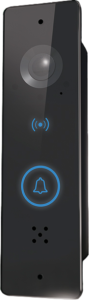
SmartConnect door
SmartConnect App
The smartphone communicates with your SmartConnect through the SmartConnect app. This allows you to control the individual applications, such as the opening of the FUHR multi-point lock, and query the state of the device (if your application allows feedback). It is also possible to create additional users and assign them – also temporary – authorisations for applications (user administration). For a list of compatible applications, see www.smart-door.net.
The SmartConnect app can be found in the following app stores:
If you have any questions, you will find many answers in the chapter FAQ.
SmartConnect App
Additional components
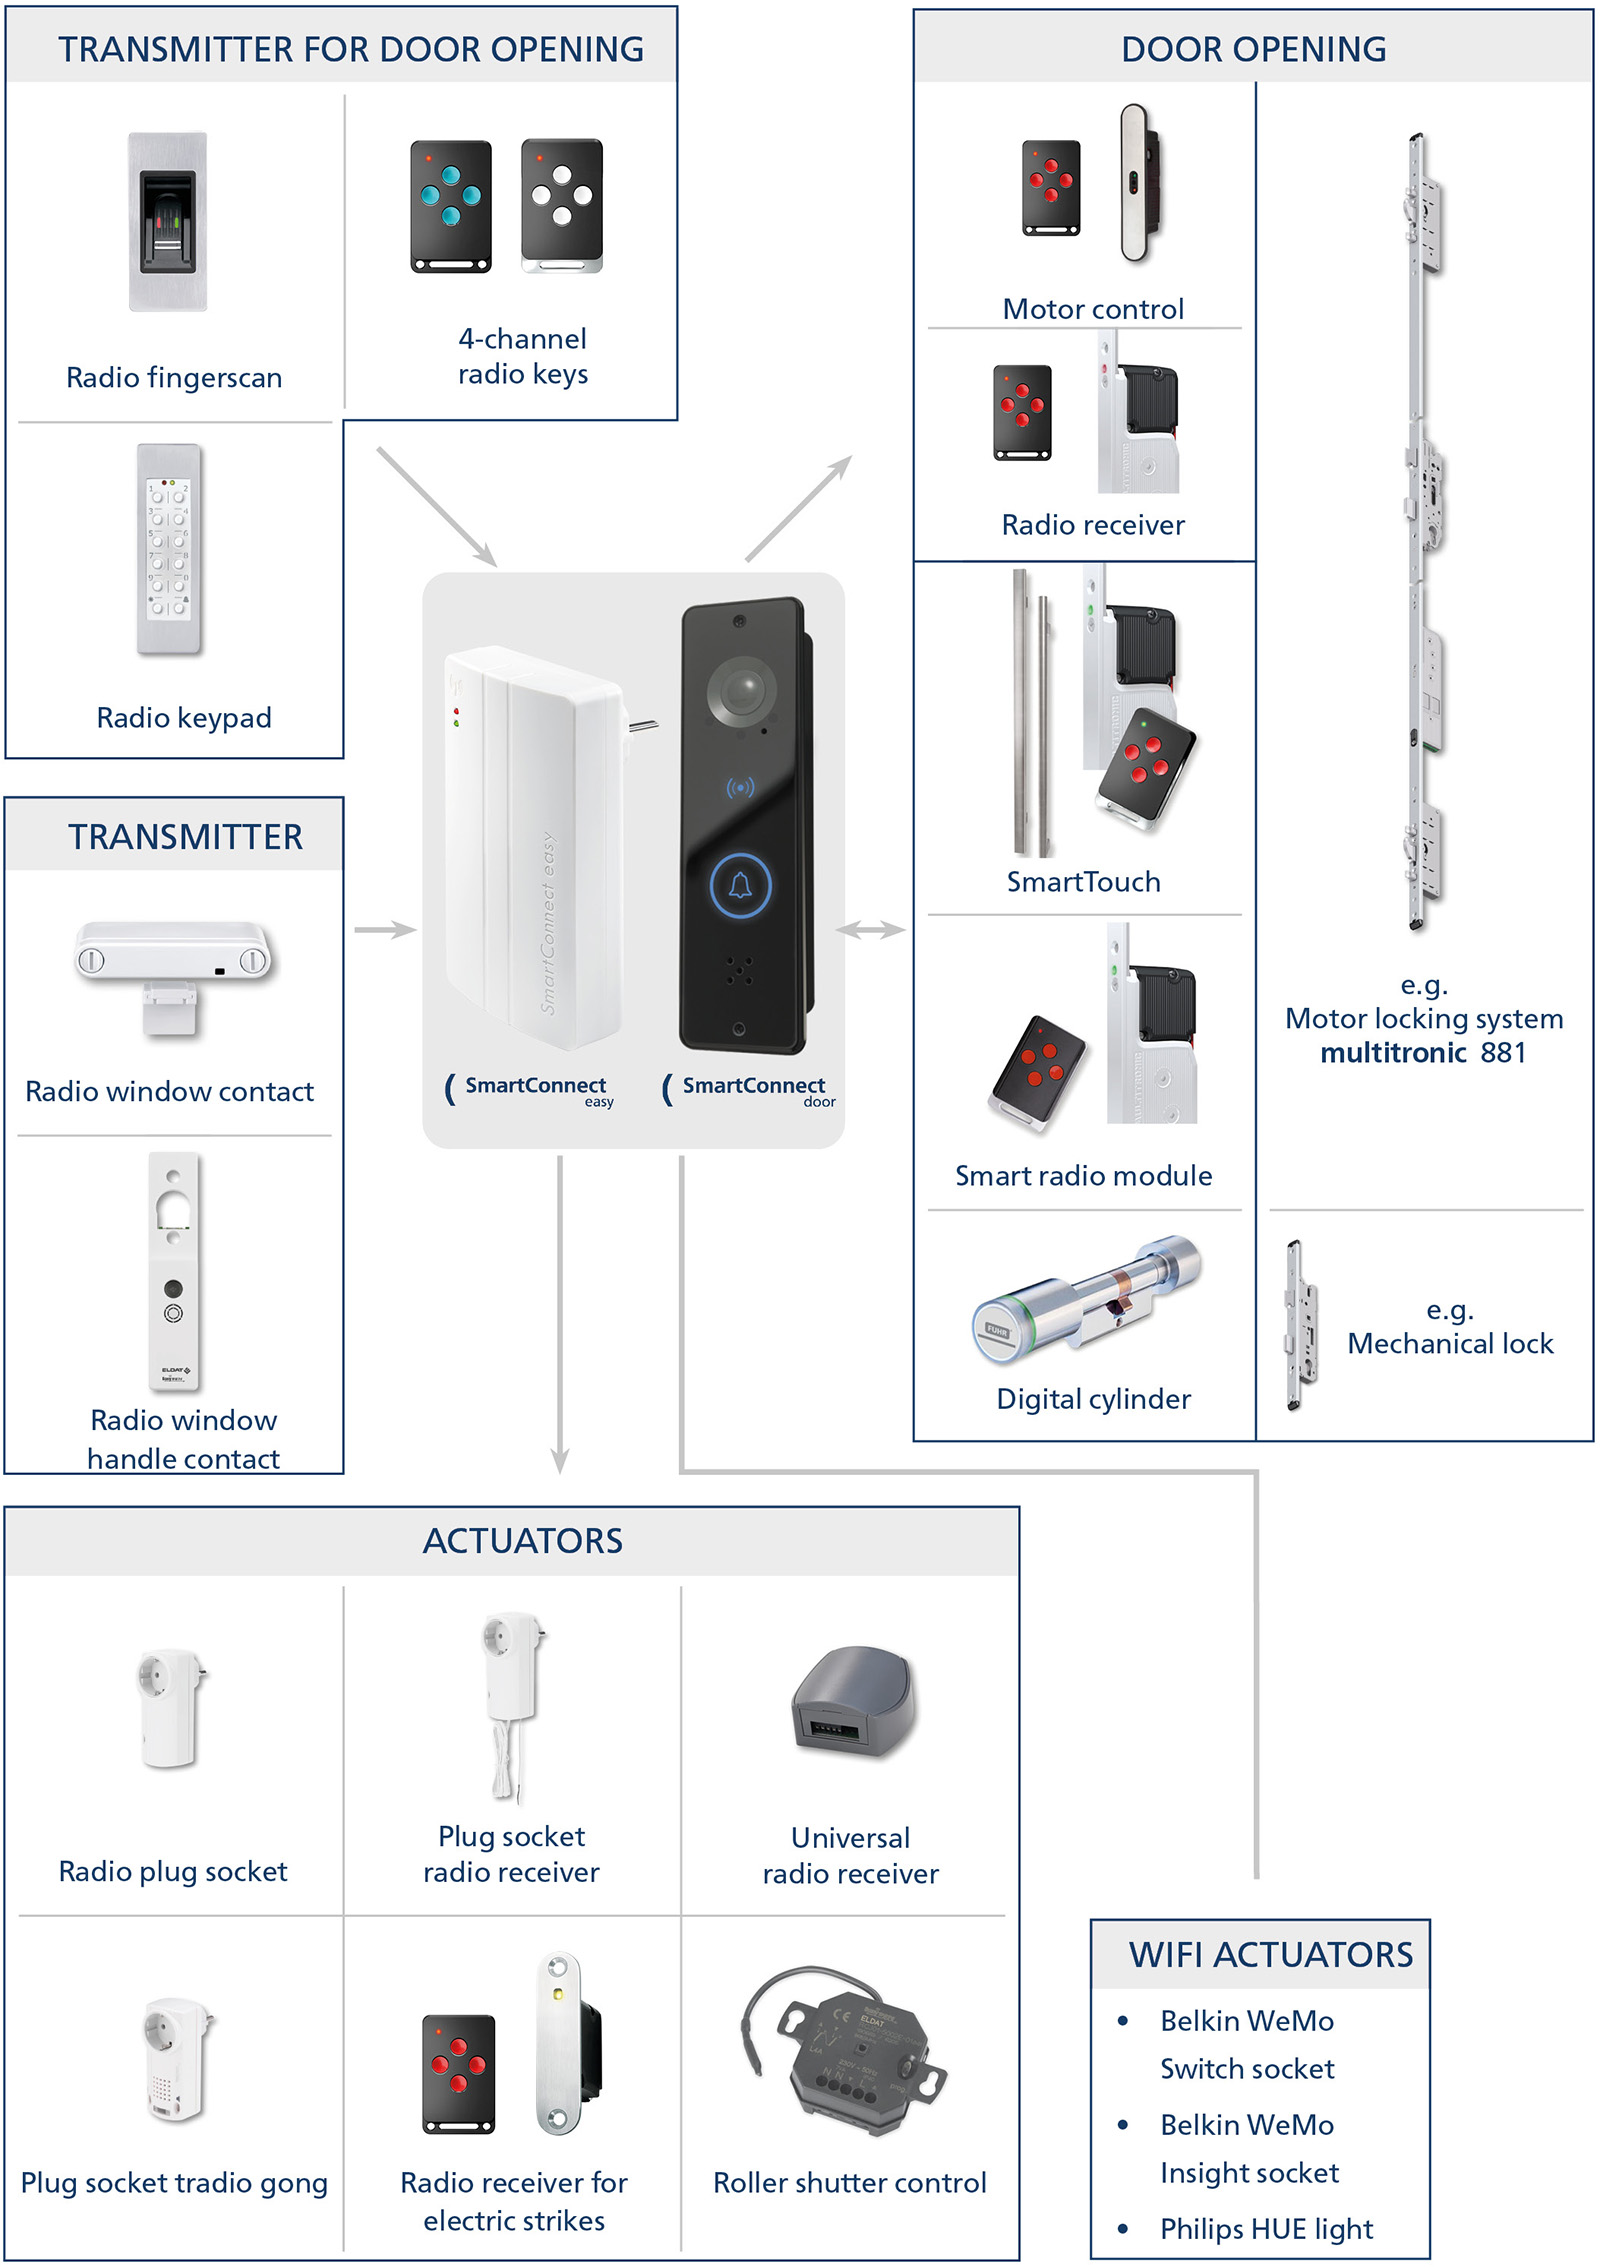
With SmartConnect, you can control applications and query their state. For the SmartConnect to be able to receive, forward and trigger actions, special transmitters and receivers are required. Below you will find which components you need exactly for your desired applications.
To open the door by smartphone, you need a motorised FUHR multi-point locking system autotronic 834/834P or multitronic 881, which is usually equipped with a control or a radio reception module. If you also need the feedback on your smartphone, a smart radio module is needed to see if your door is open or closed. This can be ordered individually or alternatively with the comfort access SmartTouch, which allows you a non-contact KeylessGo opening of the door. If you would like to retrofit your existing lock (mortise lock or multi-point lock) for the door control via smartphone, we recommend the FUHR digital cylinder.
With additional transmitters or actuators, many other possibilities of SmartHome control are available. For example, you can monitor the condition of your casement windows (open or closed) via the app or open your garage door with your smartphone. Roller shutters can also be opened and closed.
DOOR OPENING TRANSMITTER – It transmits a radio signal to the SmartConnect
4-channel radio key
To operate up to 4 applications with only one radio key, for example front door, side entrance and garage door, the SmartConnect allows you to manage both channels and assign a time profile. FUHR art. no. VNZ80319 (4-channel radio key)
Radio fingerprint scanner
For a convenient, biometric door opening of 2 applications, via the SmartConnect, you can manage both channels and assign a time profile. FUHR art. no. VNZ80178A
Radio keyboard
For a convenient door opening of 2 applications by number code, via the SmartConnect you can manage both channels and assign a time profile. FUHR art. no. VNB702N
TRANSMITTER – It transmits a radio signal to the SmartConnect
Radio window contact
For monitoring the sash position of windows, doors or gates The status change is transmitted by radio to the SmartConnect app. FUHR art. no. VNB0127001F
Radio window handle contact
For monitoring window handles The status change is transmitted by radio to the SmartConnect app. FUHR art. no. VNB0127002F
DOOR OPEN – To receive a SmartConnect radio signal to open the door
Motor control
To open the door, the signal from the SmartConnect is received and fed to the motor lock, the radio receiver is integrated in the control. FUHR art. no. depending on the version
Radio receiver module
To open the door, it receives the signal from the SmartConnect and directs it to the motor lock, the radio reception module is plugged onto the motor. FUHR art. no. VNBFP490
SmartTouch
For a convenient door opening by touching the handle bar or the activation button, including the Master SmartKey and Smart radio module It is plugged into the motor, it receives the signal from the SmartConnect and forwards it to the motor lock, the door status can be queried via the SmartConnect app. FUHR art. no. depending on the version
Smart radio module
To open the door, it is plugged onto the engine, it receives the signal of the SmartConnect and passes it on to the motor lock The door status can be queried via the SmartConnect app. FUHR art. no. VNBFP931R
Digital cylinder
For retrofitting doors with mechanical locks For a convenient door opening via smartphone, manageable via the SmartConnect, it gives feedback about the battery status. FUHR art. no. VNZ80178A
ACTUATORS – They receive a radio signal from the SmartConnect and trigger an action
Radio socket
For controlling devices, e.g. lamp, pluggable between the socket and the device to be switched. FUHR art. no. VNZ80134
Plug-In radio receiver
For controlling existing external drives, such as garage doors. FUHR art. no. VNZ80088
Universal radio receiver
For controlling existing external drives with external power supply, such as garage doors. FUHR art. no. VNZ80023
Plug-In radio gong
To receive a bell signal. FUHR art. no. VNZ80122
Radio receiver for e-opener
For opening doors equipped with an electric door opener. FUHR art. no. VNBFP675
Rolling shutter control
For controlling roller shutters, radio receivers for flush mounting. ELDAT art. no. RCJ01-E5002-01-23K
WIFI-ACTUATOR – It receives the wireless signal of the SmartConnect
Belkin WeMo radio socket
For controlling devices, e.g. lamp, pluggable between the socket and the device to be switched. WeMo Switch Box: EAN 0722868905814 and WeMo Switch Insight Box: EAN 0722868992975
Philips HUE Lamp
To turn Philips Hue lamps on and off via the SmartConnect app. Philips art. no. depending on the version
Set up the SmartConnect
In order to be able to use your SmartConnect with your smartphone, it must be set up via the SmartConnect app. To do this, you need:
Your SmartConnect (easy or door)
Your smartphone or tablet
The SmartConnect app
if appropriate your network key (SSID+password)
Note that to install and operate the SmartConnect app, a smartphone must be secured with a PIN / password / pattern lock or biometric authentication. This protects you from unauthorised access to the SmartConnect or the door opening!
Integration
The SmartConnect can be used in different ways:
Wi-Fi Integration: Integration into existing Wi-Fi network (recommended for SmartConnect door and SmartConnect easy)
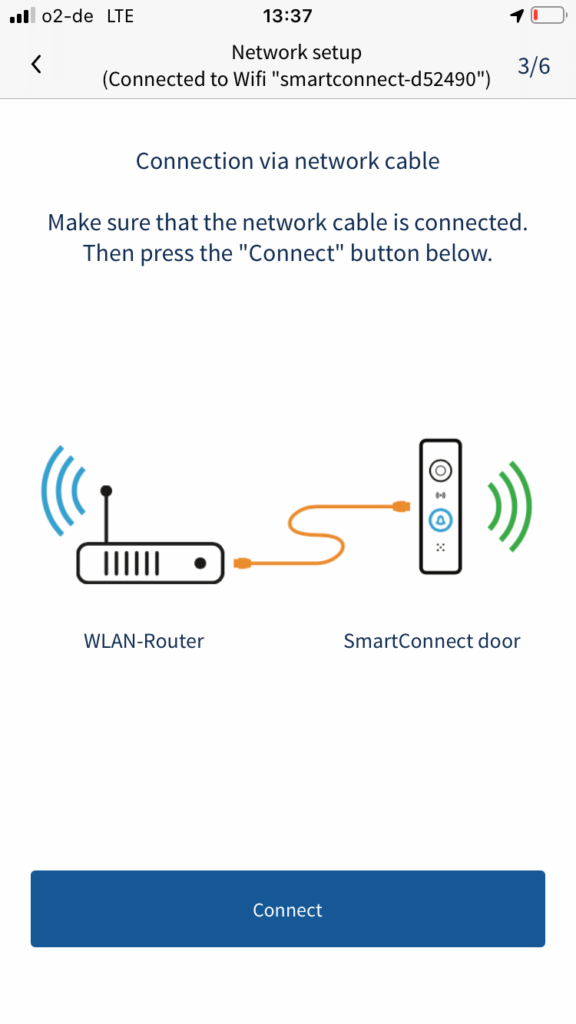
Connection via network cable: Direct connection to SmartConnect door via network cable (Only SmartConnect door). To do this, a network cable must be connected to the SmartConnect door and led out of the door. This network cable must then be connected to the router. (Recommended for SmartConnect door).
Access point mode: Direct connection to SmartConnect via Wi-Fi (factory default). This method should only be used if no home network is available, since to operate the SmartConnect you always have to switch to the Wi-Fi of the SmartConnect and therefore no Internet is available.
Make sure you have a very good WLAN connection to the SmartConnect door. The wireless access point (router/repeater) should not be more than 2 meters away from the SmartConnect to ensure reliable data transmission. To optimize the connection quality, you can also use the options described in chapter Connection Quality below.
Commissioning your SmartConnect
Connect to the SmartConnect
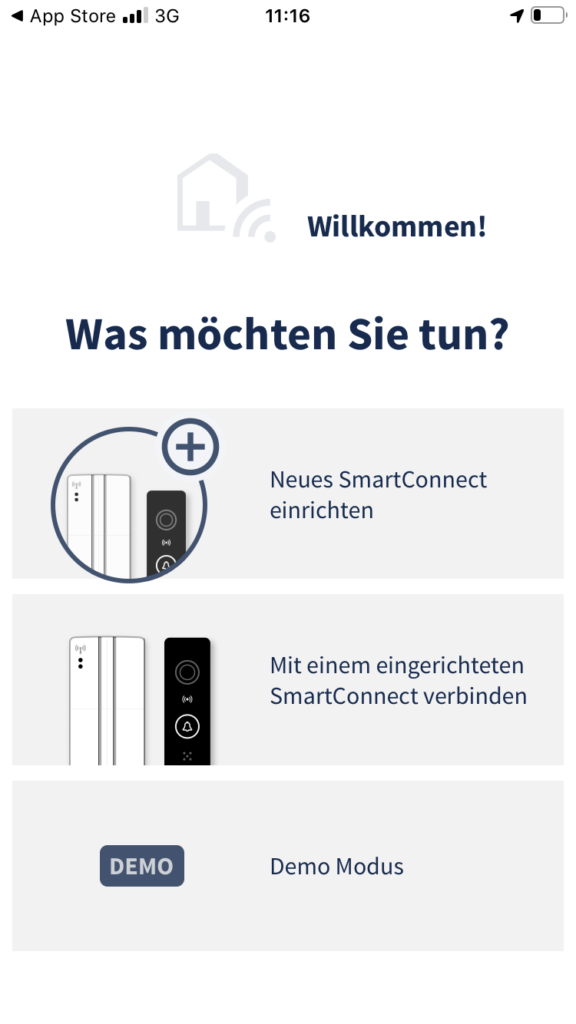
Open the SmartConnect app and select Set up new SmartConnect.
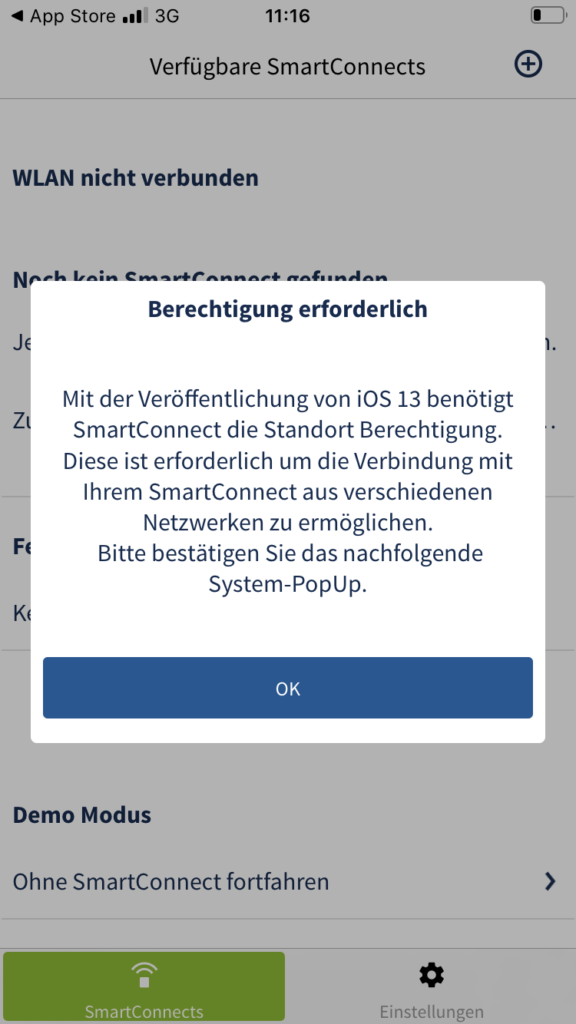
You are now informed that the SmartConnect requires location authorisation to enable connection from different networks. Confirm the message by tapping OK.
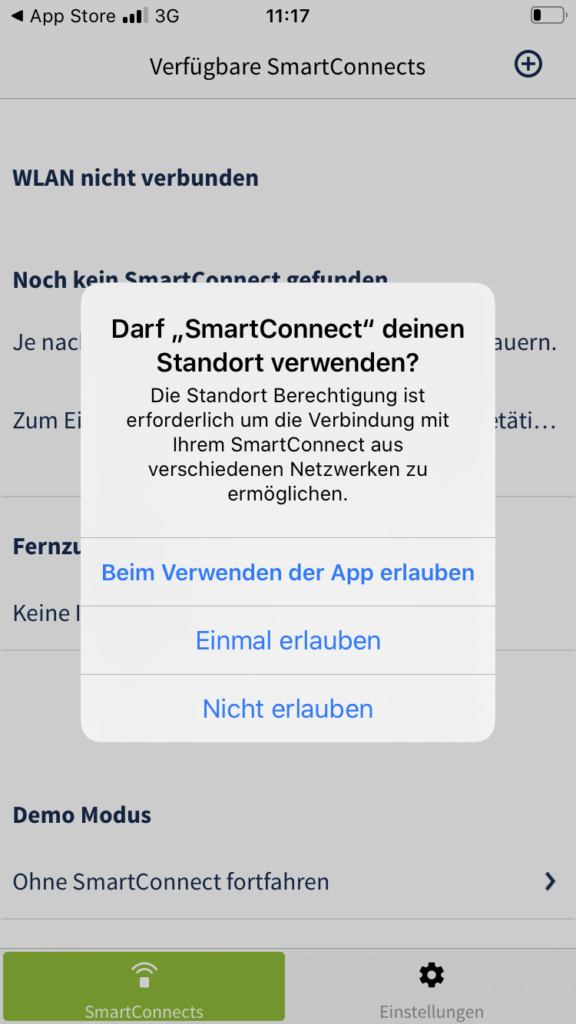
Confirm the system pop-up by tapping Allow while using the app.
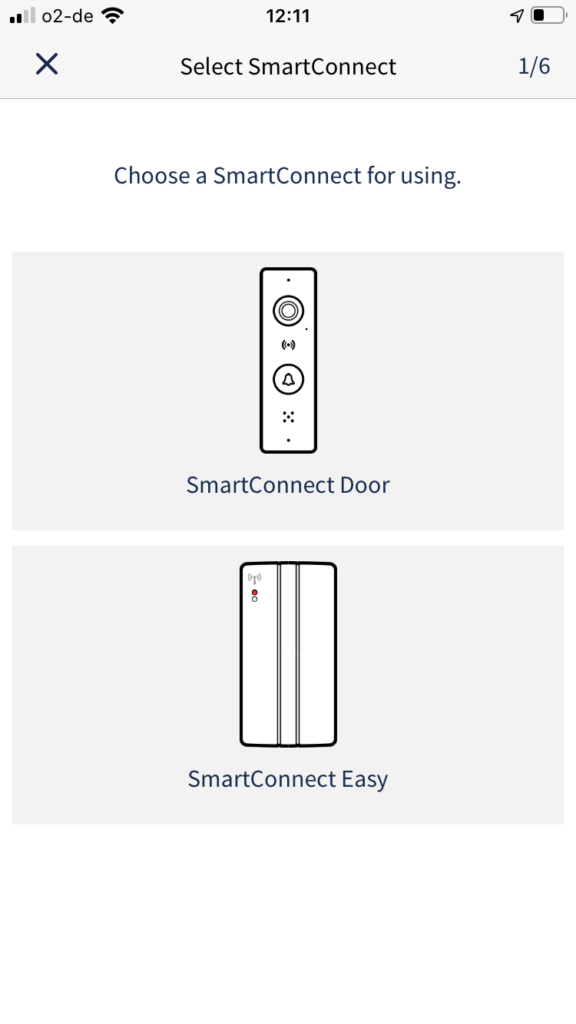
Choose whether you want to use a SmartConnect easy or a SmartConnect door.
If you have not yet connected your SmartConnect to a power supply, connect it to a suitable power source.
SmartConnect easy: Schuko socket SmartConnect door: 12 – 24V DC
After about a minute, the SmartConnect is up and running and you can continue by tapping continue.
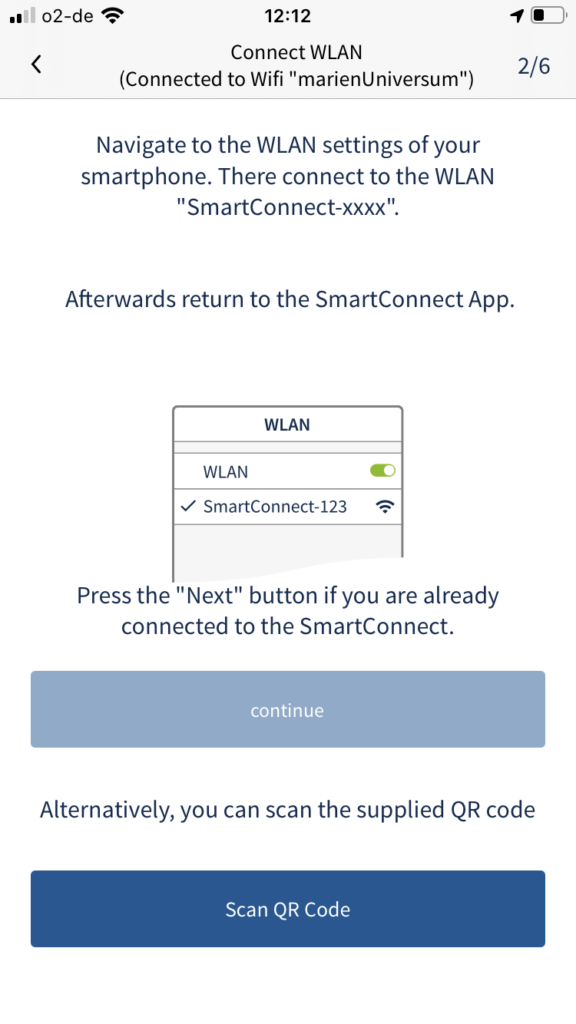
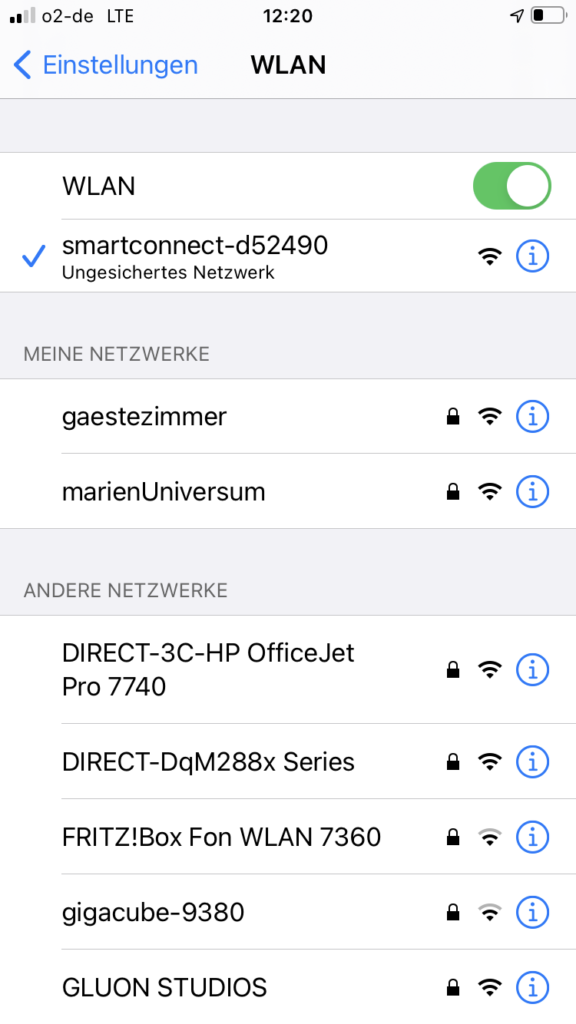
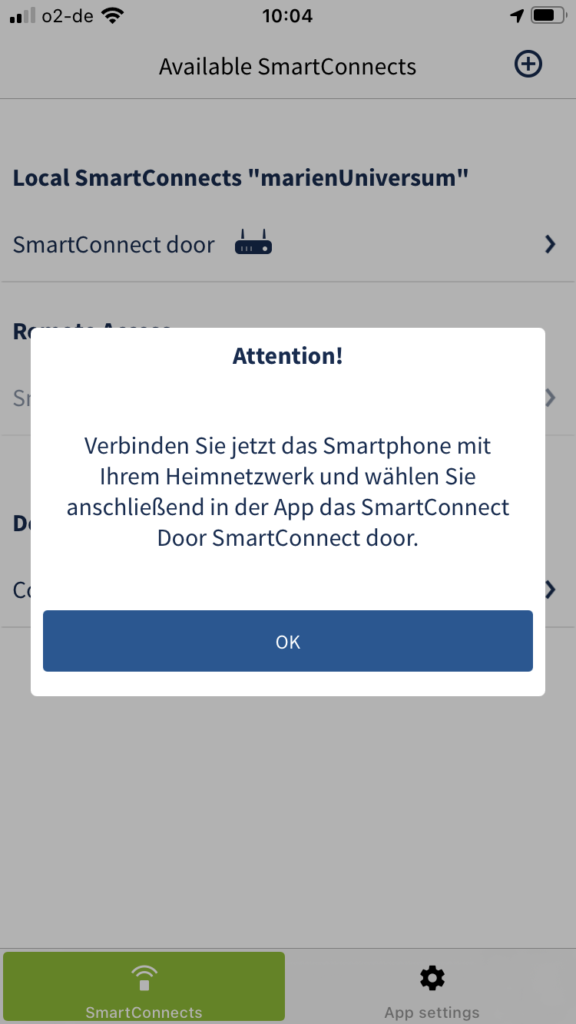
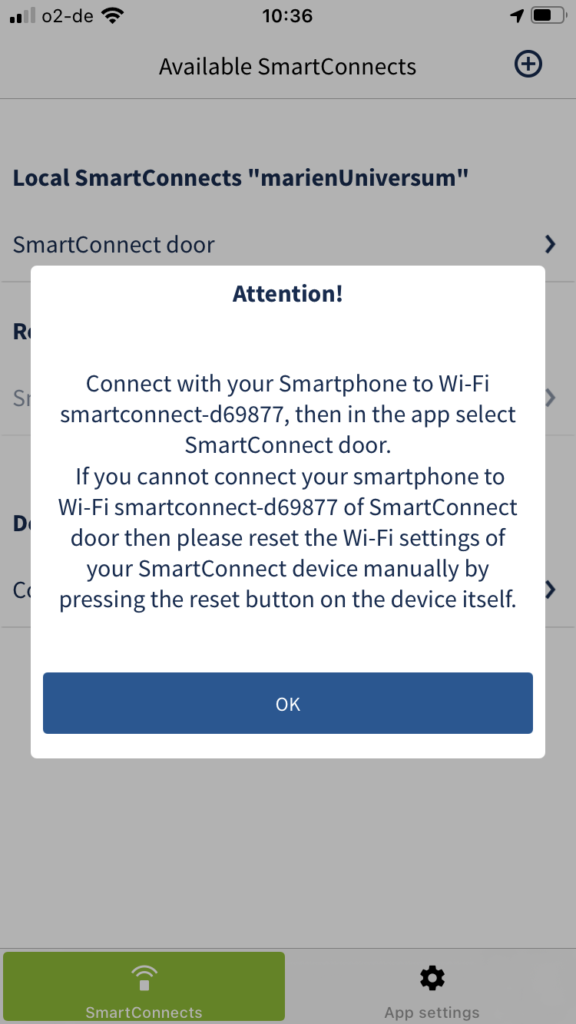
Your SmartConnect will now establish a free Wi-Fi signal (access point). Now switch to the Wi-Fi settings of your smartphone or tablet.
Connect your smartphone or tablet to the “SmartConnect-XXXX” Wi-Fi and then switch back to the SmartConnect app.
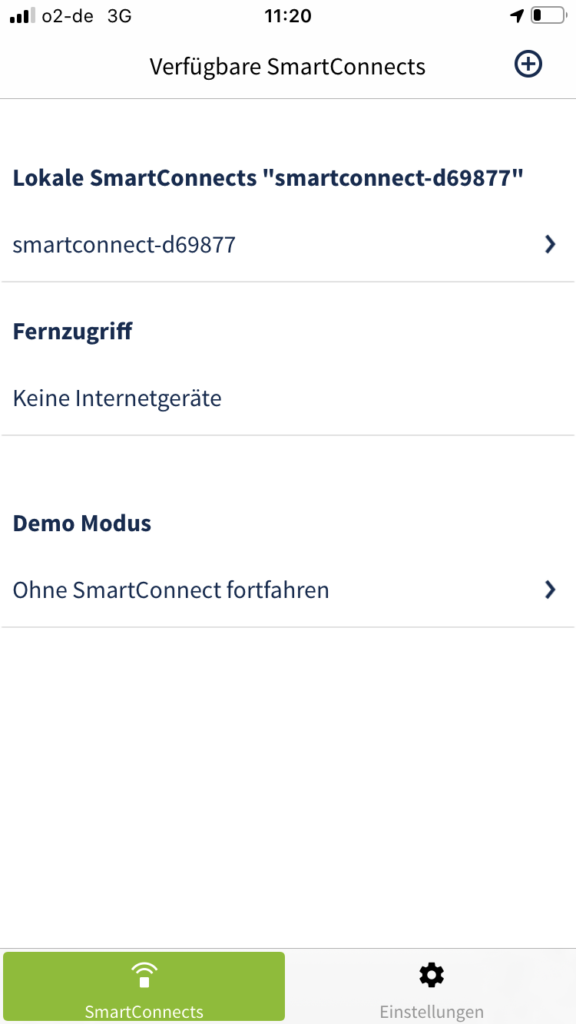
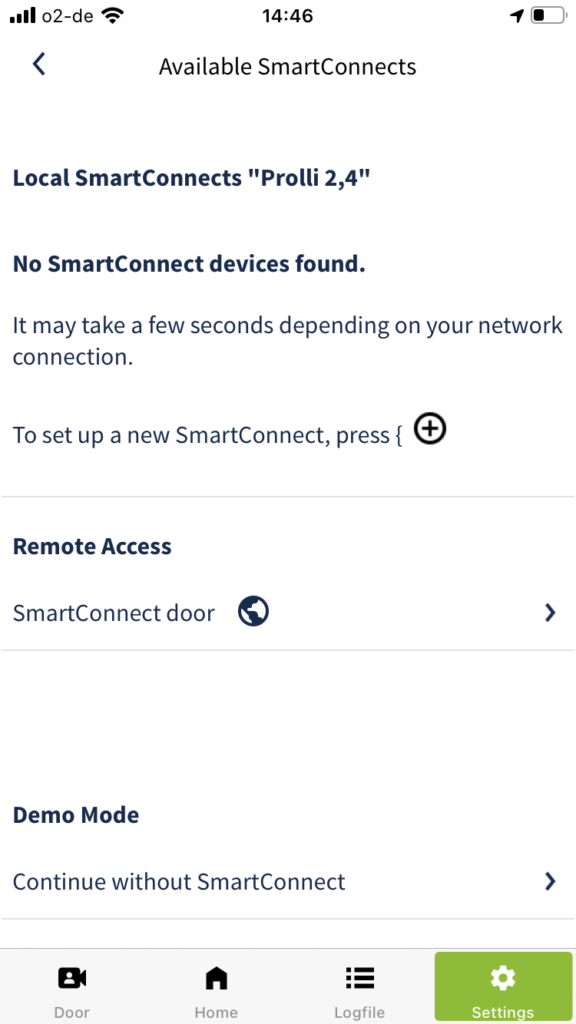
The SmartConnect is now displayed in the overview under Available SmartConnects.
Tap on your SmartConnect.
Please follow the steps described in the next section.
Network configuration
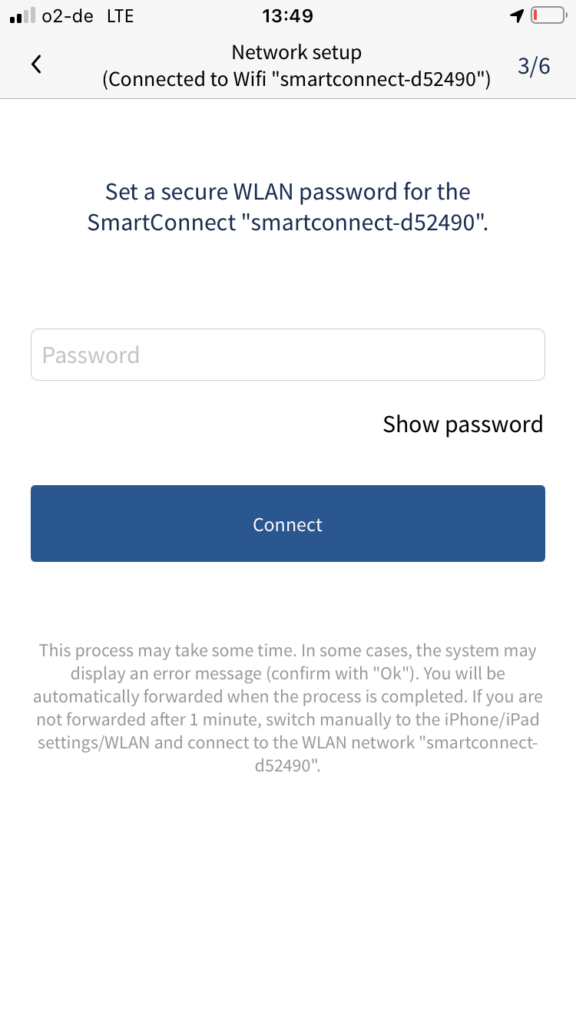
Option 1: Wi-Fi integration
Recommended for SmartConnect easy.
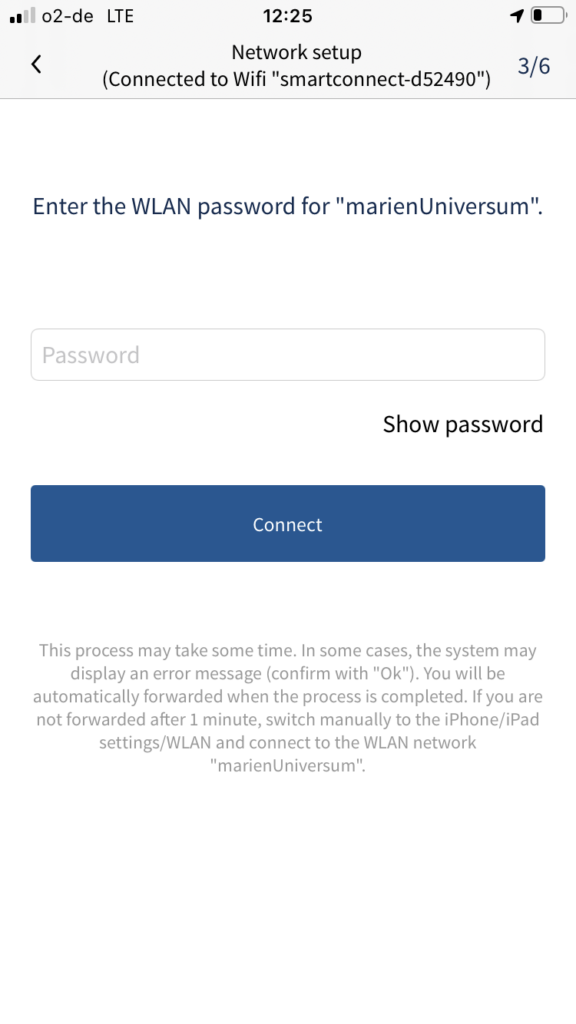
Tap on your desired Wi-Fi network.
Enter the password of your Wi-Fi network and tap Connect.
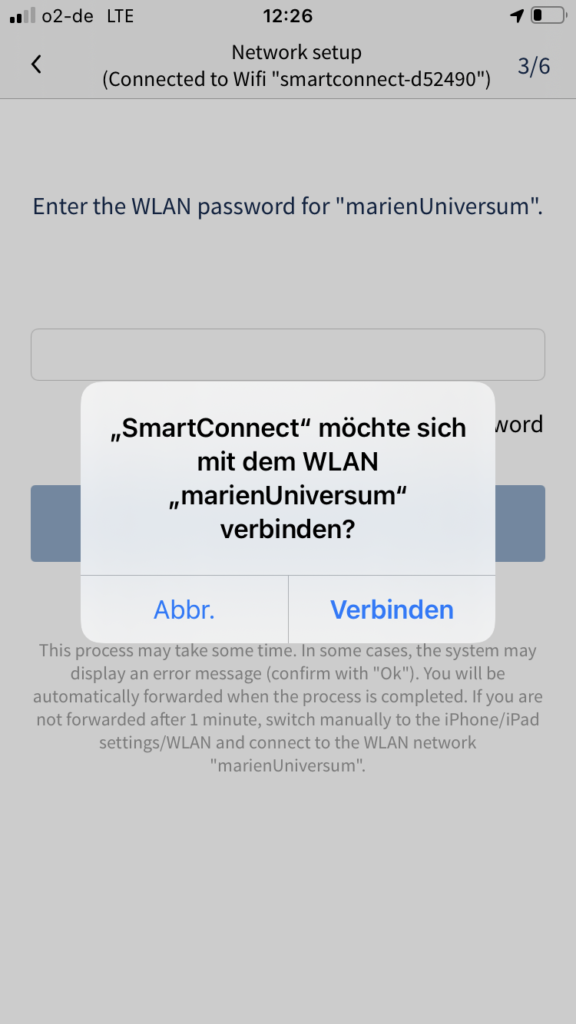
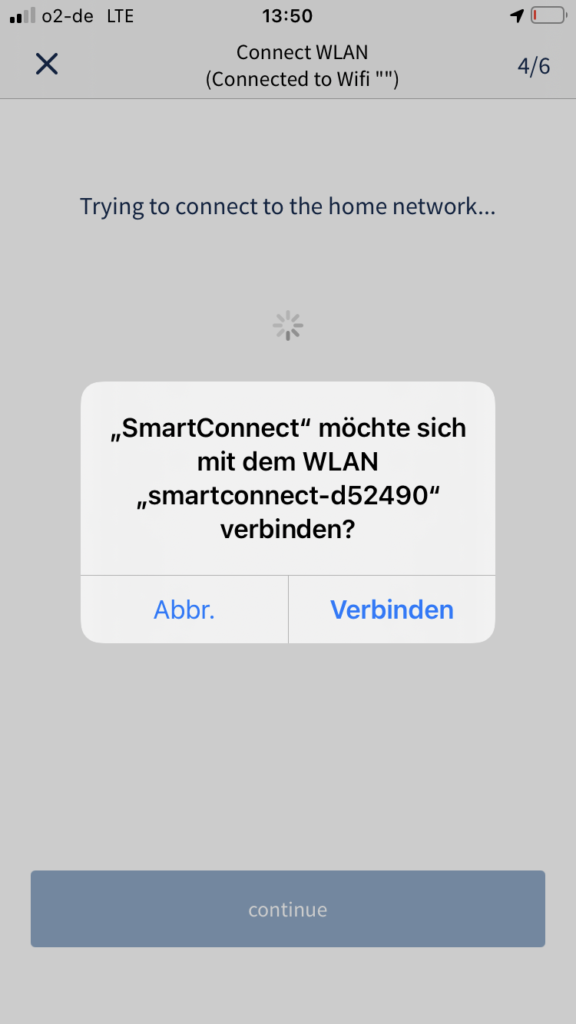
Confirm the system pop-up by tapping Connect.
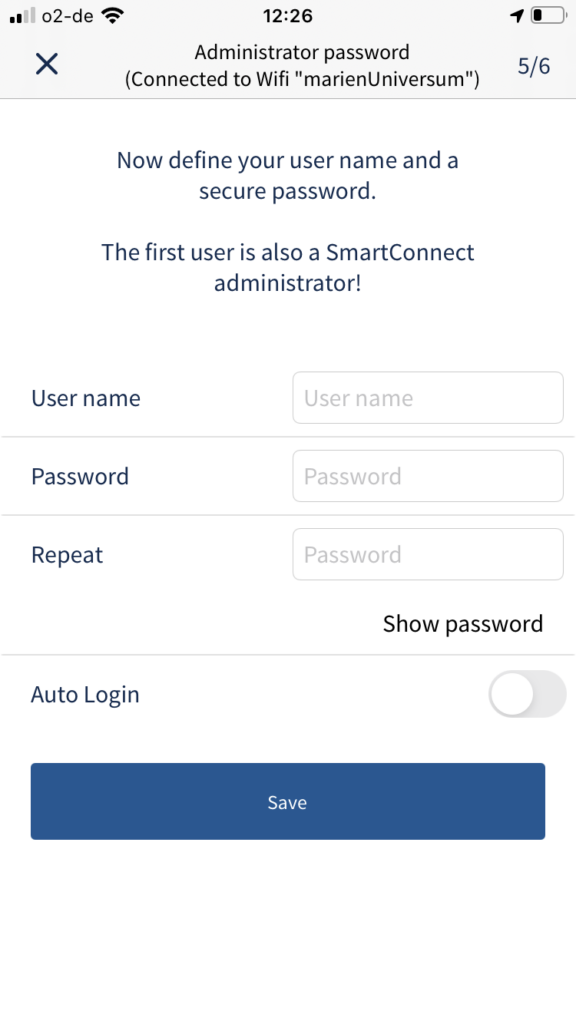
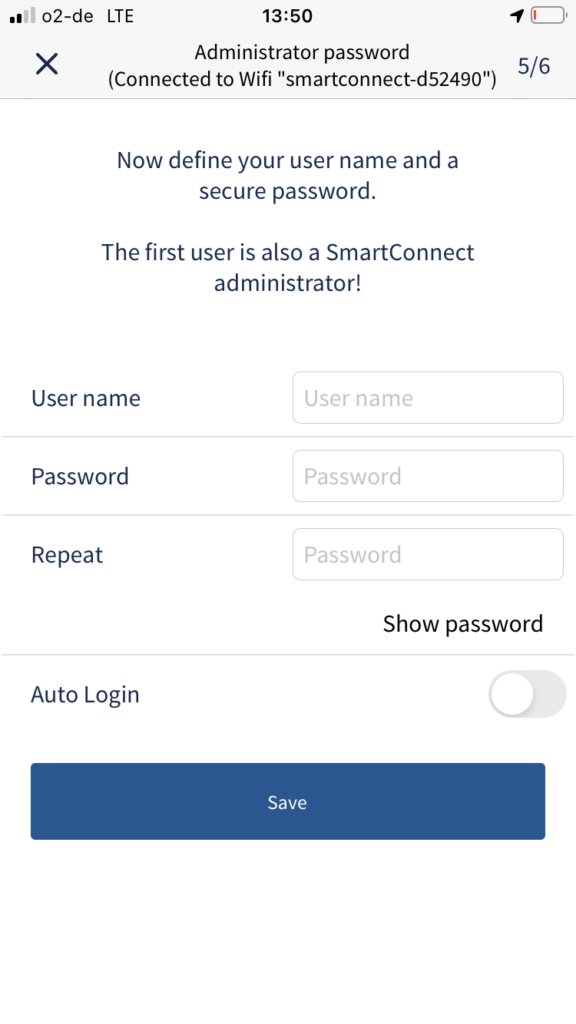
Define your username and a secure password. Each user password must meet the following requirements: Min. 6 characters – at least one upper case, one lower case and one number.
Write down your administrator password as a reminder, e.g. in the QuickStartGuide.
Note that the first user is also an administrator of the SmartConnect. Confirm your entry by tapping Save.
A system pop-up may appear asking if your password should be saved in the keychain. Make a choice.
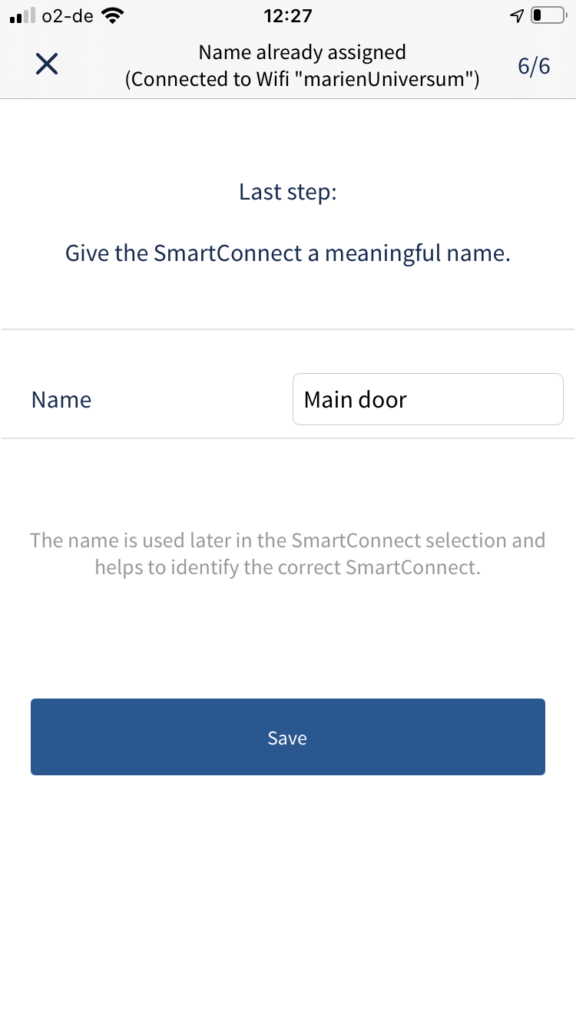
Enter a unique name for your SmartConnect. The name is used later in the SmartConnect selection and helps to identify the right SmartConnect. Confirm your entry by tapping Save.
Option 2: Connection via network cable (Only SmartConnect door)
Recommended for SmartConnect door.
Choose how to connect the SmartConnect to the network. In this case, select Connected by cable.
Make sure the SmartConnect door is connected to the router via cable. Tap Connect.
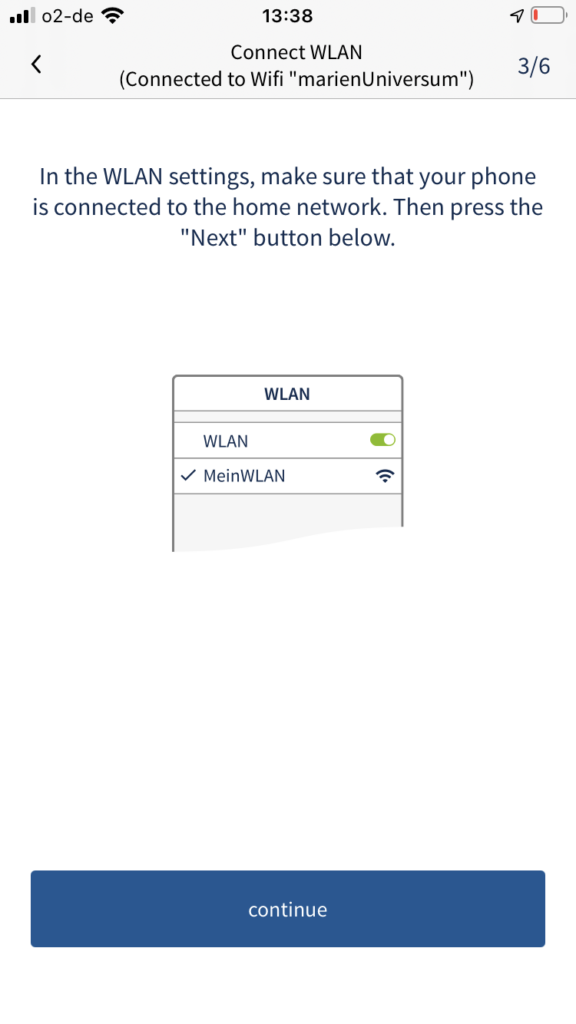
Make sure your smartphone is connected to your home network. You may need to change to the network settings of the system.
Option 3: Access point mode
If a home network is not available, a direct connection can be established between the smartphone and SmartConnect.
Choose how to connect the SmartConnect to the network. In this case, select Use as an access point.
Set a secure password for the WI-Fi of the SmartConnect and tap Connect.
Confirm the system pop-up by tapping Connect.
Define your username and a secure password. Each user password must meet the following requirements: Min. 6 characters – at least one upper case, one lower case and one number.
Write down your administrator password as a reminder, e.g. in the QuickStartGuide.
Note that the first user is also an administrator of the SmartConnect. Confirm your entry by tapping Save.
A system pop-up may appear asking if your password should be saved in the keychain. Make a choice.
Enter a unique name for your SmartConnect. The name is used later in the SmartConnect selection and helps to identify the right SmartConnect. Confirm your entry by tapping Save.
Connection quality
The SmartConnect app provides information about the connection quality between SmartConnect and router as well as the video quality during active video transmission.
Connection quality between Smart Connect and router
If the connection between SmartConnect and router is not very good, a colored connection warning (yellow / red) appears at the top of the SmartConnect app. The connection warning is displayed in the Video, Home and Journal areas. The connection warning is not displayed in the settings area.
The SmartConnect app displays a connection warning (red information bar) in the upper area. Tapping on the connection warning will bring up a pop-up.
Within the pop-up, various options for optimizing the connection quality are shown and the option is given to hide the connection warning in the future.
By activating the switch Do Not Show again within the pop-up, the connection warning can be permanently hidden.
Options to optimize the connection between SmartConnect and router:
Reduce the distance between SmartConnect and router
Switch WLAN channel in the router
Connect SmartConnect and router via network cable
As a logged-in administrator, the connection warning is displayed permanently. In case of poor connection quality, the effects of optimizations can be checked.
Connection quality video transmission
When video transmission is active, the SmartConnect app provides information about poor quality of video transmission.
The SmartConnect app displays a connection warning (yellow information bar) at the bottom of the video screen. By tapping on the connection warning, details of the connection can be displayed on the one hand and options for optimization can be shown on the other.
By tapping on the triangle icon (left half of the information bar), further details on the connection quality can be displayed.
By tapping on the info icon (right half of the information bar) a pop-up can be displayed that informs about the causes that may influence the connection quality.
Possible causes of poor connection quality of video transmission:
Poor connection between SmartConnect and router; reduce distance between devices
Poor connection between router and smartphone / tablet, or poor internet connection
Log in to the SmartConnect
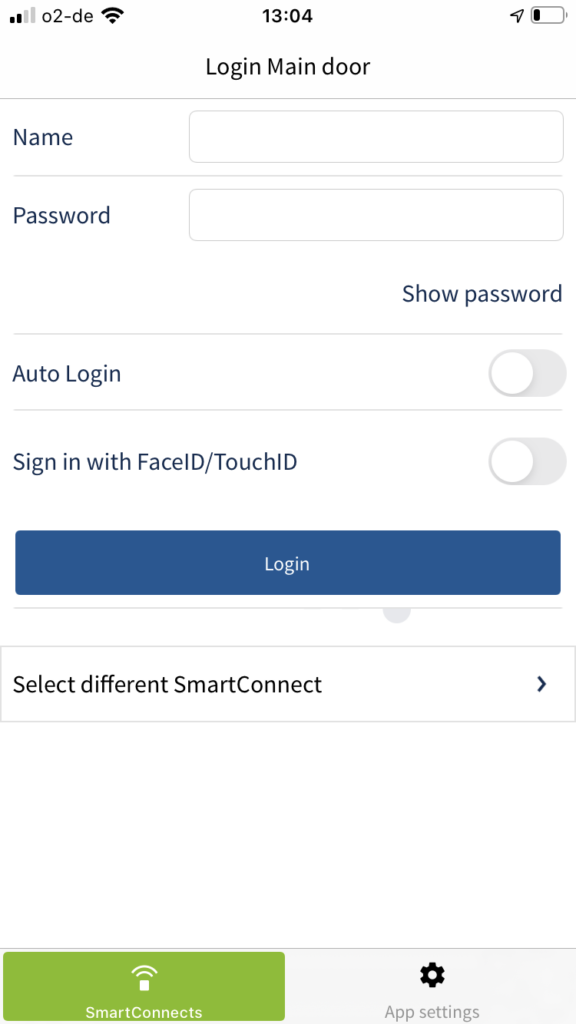
The SmartConnect is now displayed in the overview under Available SmartConnects. Tap on the SmartConnect.
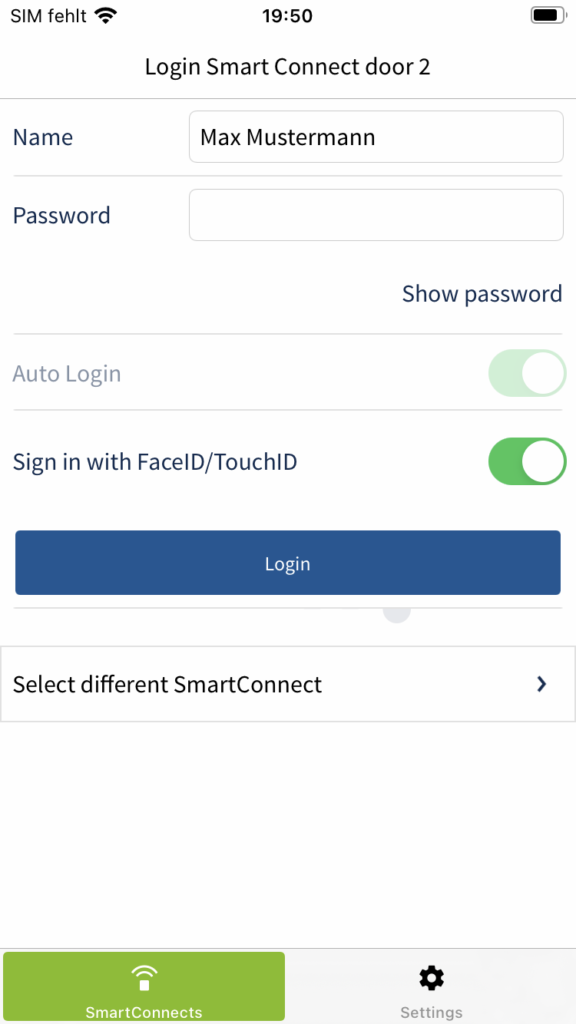
Log in with your previously defined access data and tap Login.
Activate the option Auto Login or Sign in with FaceID/TouchID to log in automatically and conveniently the next time you log in without entering your access data.
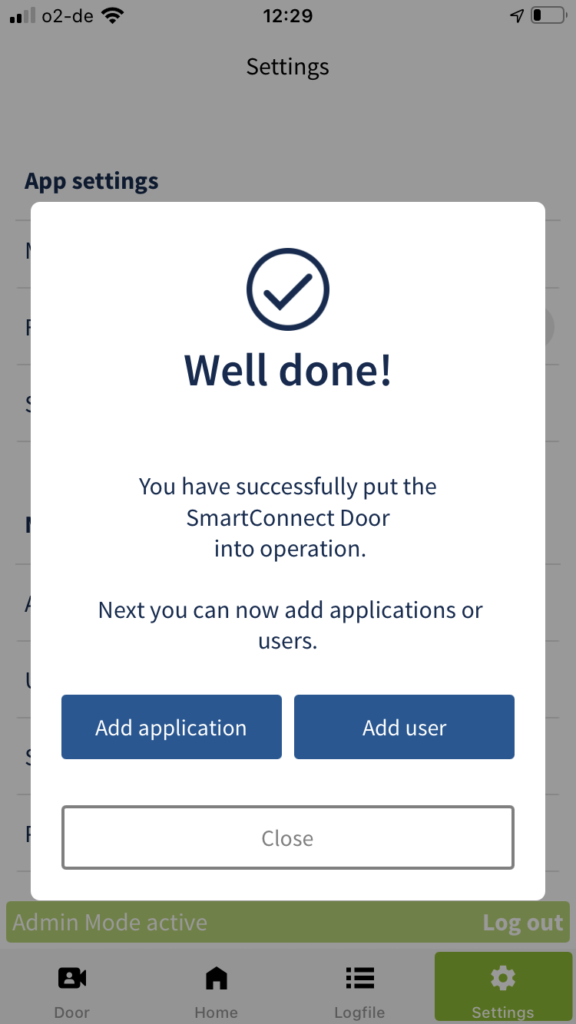
Well done! You have successfully put the SmartConnect into operation. Next you can add applications or users.
As soon as the smartphone is connected to the Wi-Fi of the SmartConnect, LED 2 (SmartConnect easy) or LED 1 (SmartConnect door) lights up blue.
SmartConnect easy
SmartConnect door
Structure of the App
Door area (only SmartConnect door)
Home area with all existing applications
The app is divided into two areas: the content area and the menu bar.
The menu contains the following menu items:
Door: Shows the video image and enables its operation (only SmartConnect door). Go to chapter
Home: The home area is the start page of the SmartConnect app. All configured applications are displayed and operated here. The displayed applications vary depending on the rights of each user. Go to chapter
Logfile: The logfile shows the progress of the executed applications, with user, date and time. Their visibility can be set for each user. Go to chapter
Settings: The settings allow you to configure the app and the SmartConnect, as well as manage users and rights. Go to chapter
Schedules (Android only, if logged in as administrator): Schedules, e.g. automatic switching on of the lights at 8 a.m., can be created and managed here. On iOS, the schedules are in the settings area. Go to chapter
Administrators and Users
Administrators
Administrators are users who have the full functionality of the SmartConnect app and can fully operate all applications.
There must be at least one administrator to manage the SmartConnect app. This is specified by default during the initial setup of the SmartConnect App and cannot be deleted. Additional users with administrator rights can be created. All administrators have equal rights. Ideally, only one user with full rights should exist to avoid abuse. Therefore, when creating users, be sure to know what rights you assign (see chapter Add user. For the daily operation of the applications, it is recommended to log in only as a user without administrator rights.
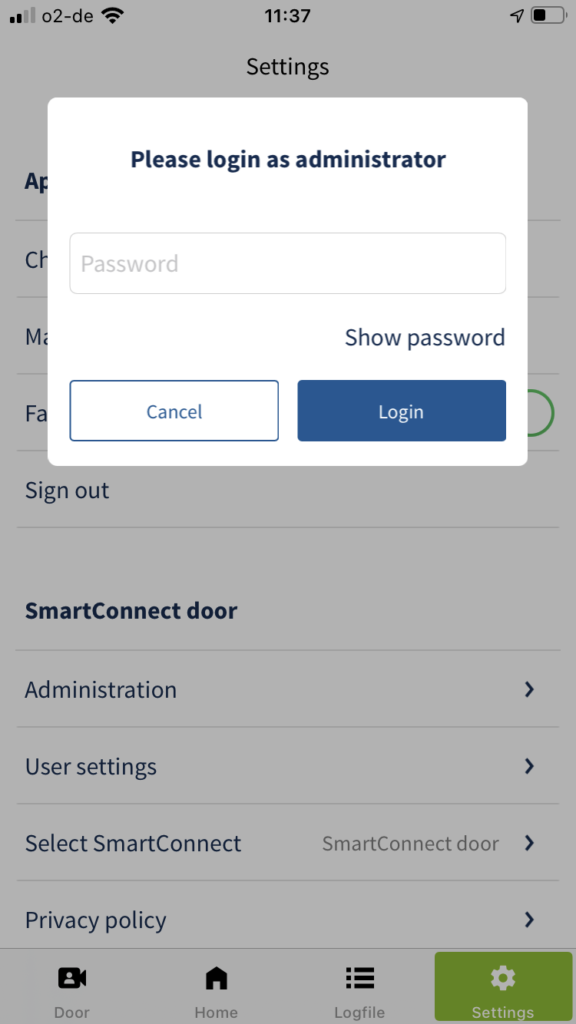
Log in as administrator
In order to make certain settings on the SmartConnect or to be able to use the entire range of functions of the device without restriction, it is necessary to log in as an administrator. To log in as an administrator, please follow the steps below.
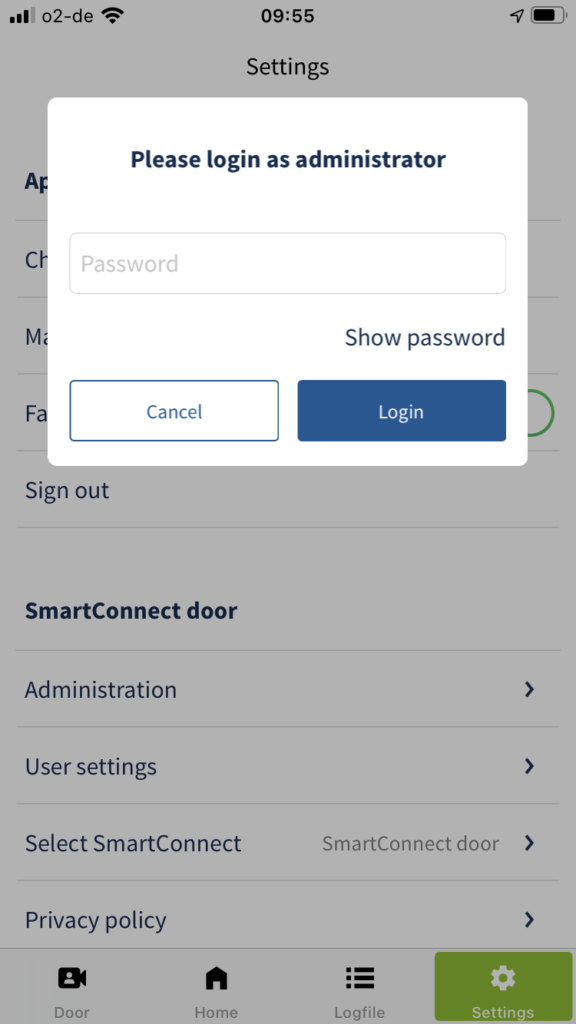
Tap Settings in the main menu and then tap Administration.
Enter your administrator password and tap Login.
You are now logged in as an administrator. At the bottom of the content area of the app, you will now see a green bar indicating that you are currently in admin mode.
Users (without administrator rights)
Users without administrator rights are all regular users, e.g. family members. Each of these users has the right to set and change the own password. Assign unique names and secure passwords to protect your system adequately.
The administrator can lock a user and grant him further rights, for example the right to activate applications. If a user has been locked, he cannot access any SmartConnect applications.
Individual users are authorised with name and password, and no devices (smartphone, tablet). You can access the SmartConnect from various devices via your login data.
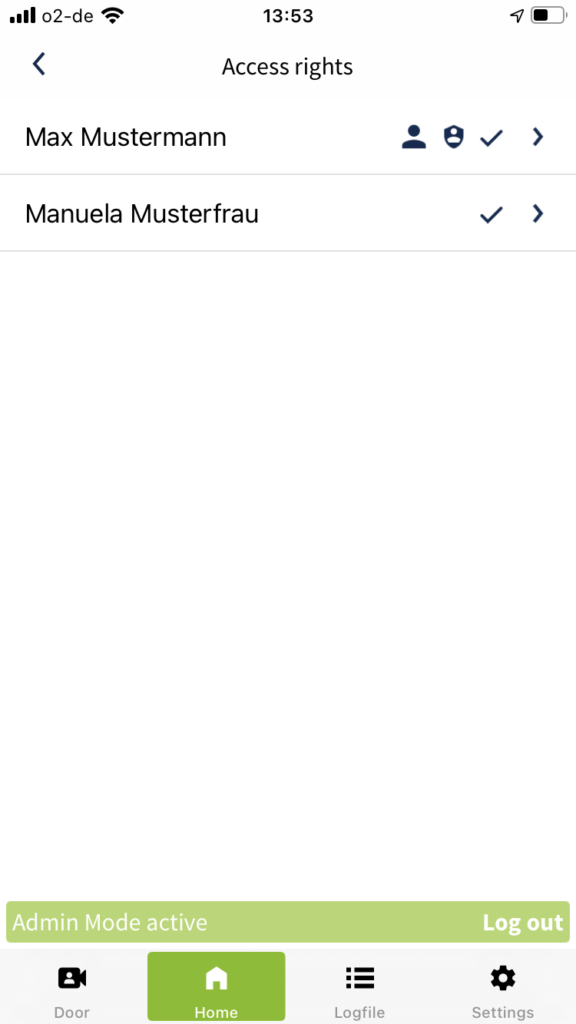
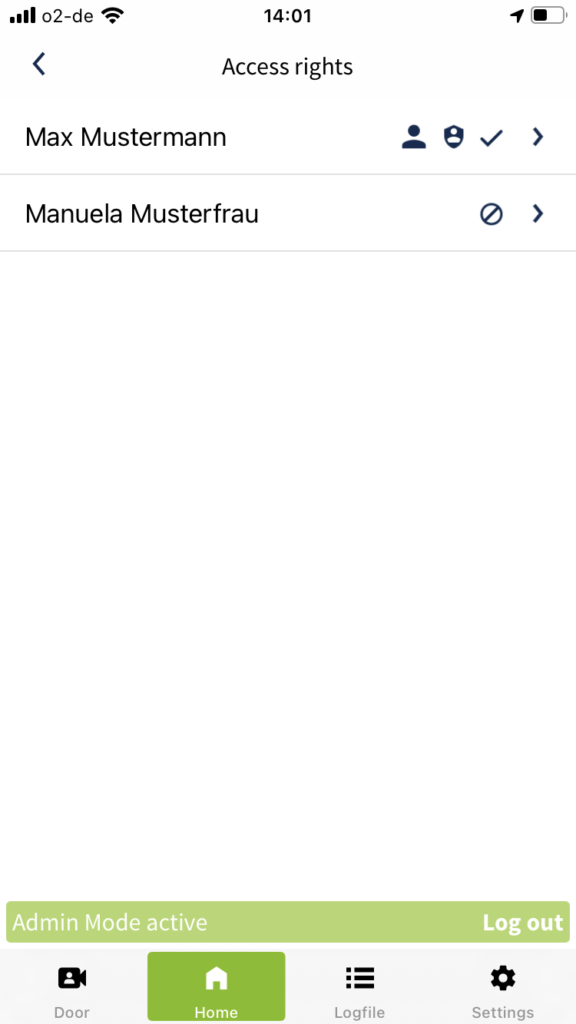
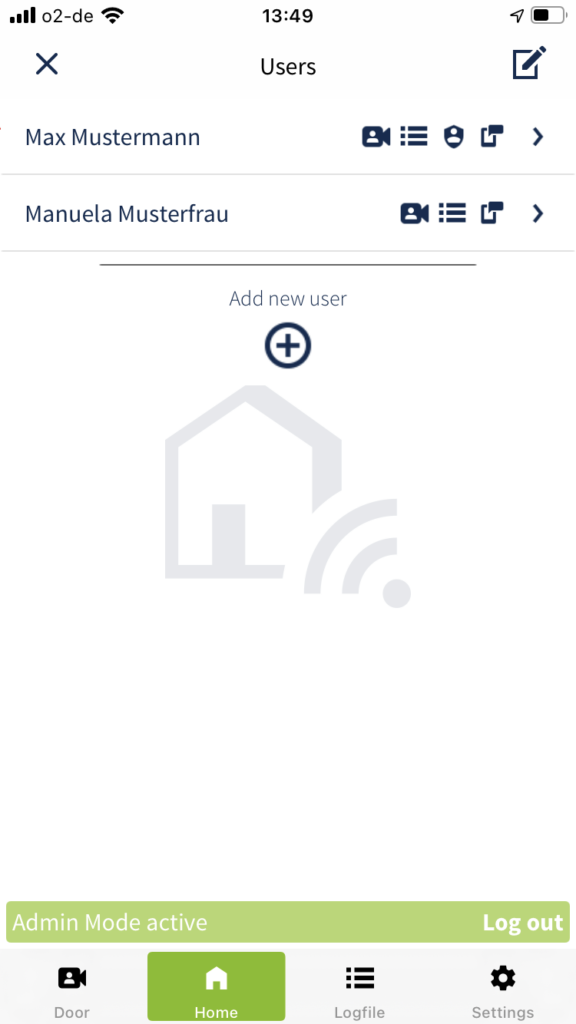
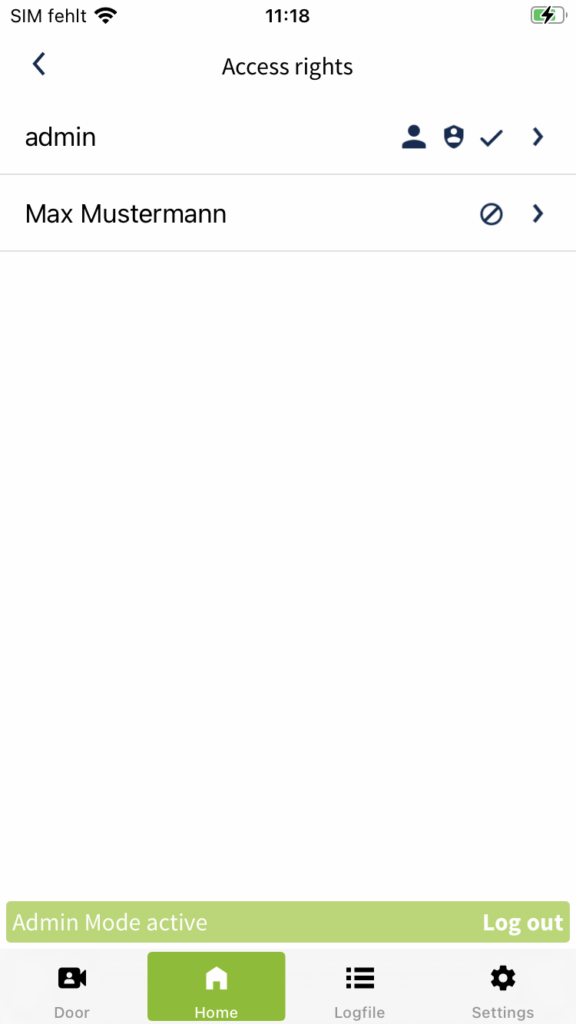
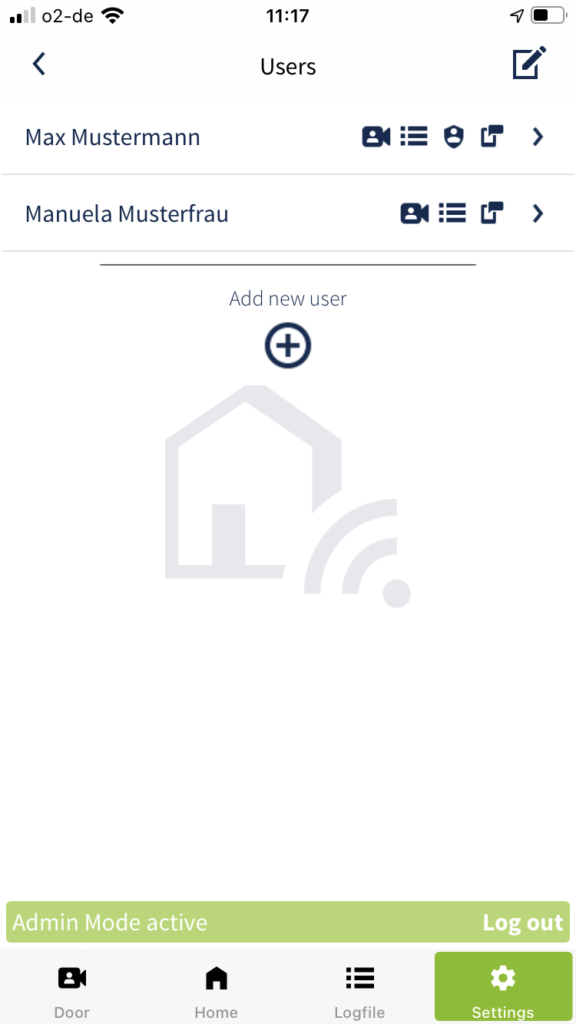
The following icons can be displayed to users:
The user is an administrator
Logged in user
The user is authorised for the application for a set time
The user is locked for the application
The user is authorised to access the logfile
The user receives push notifications
The user has access to the camera
The user is allowed to use Alexa to control doors
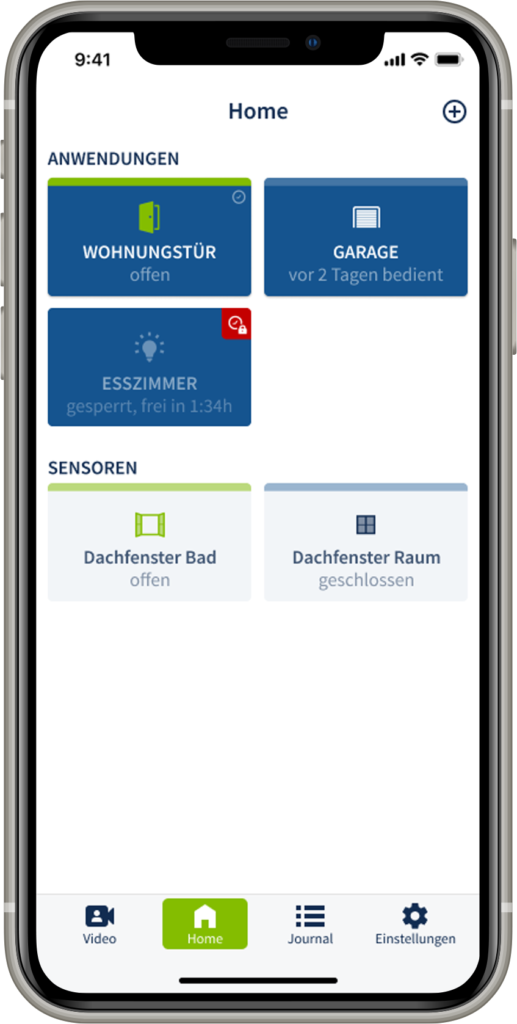
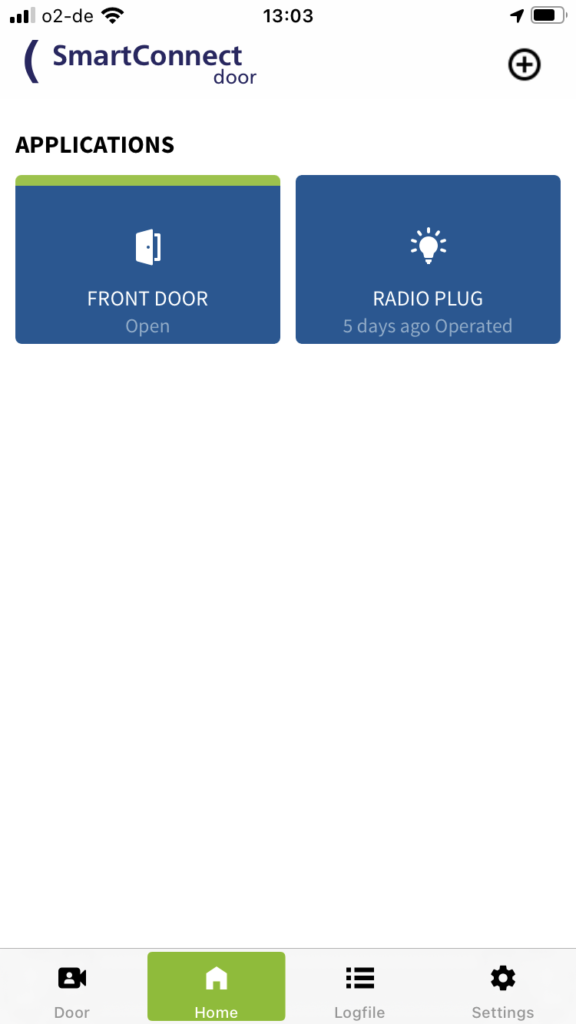
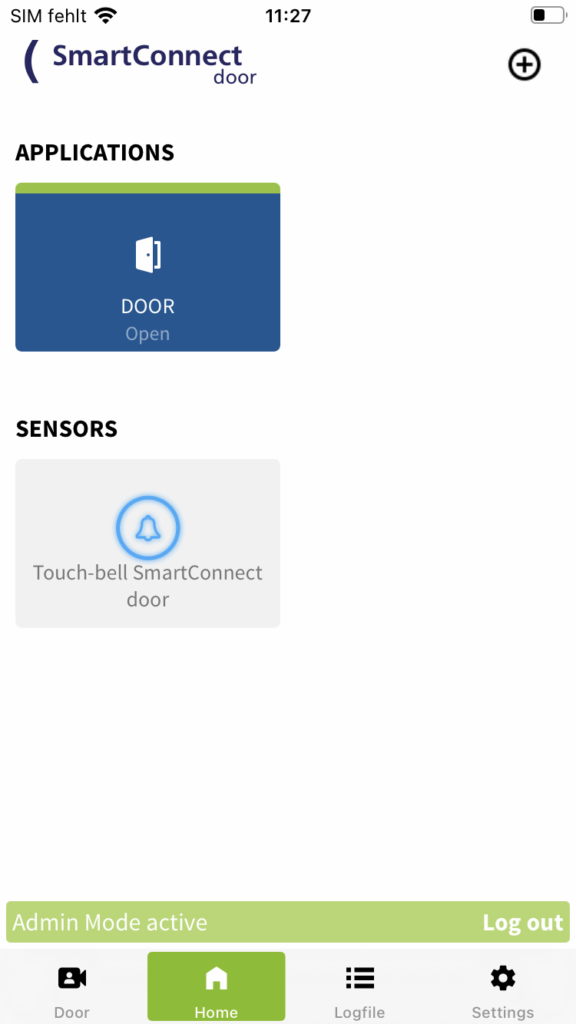
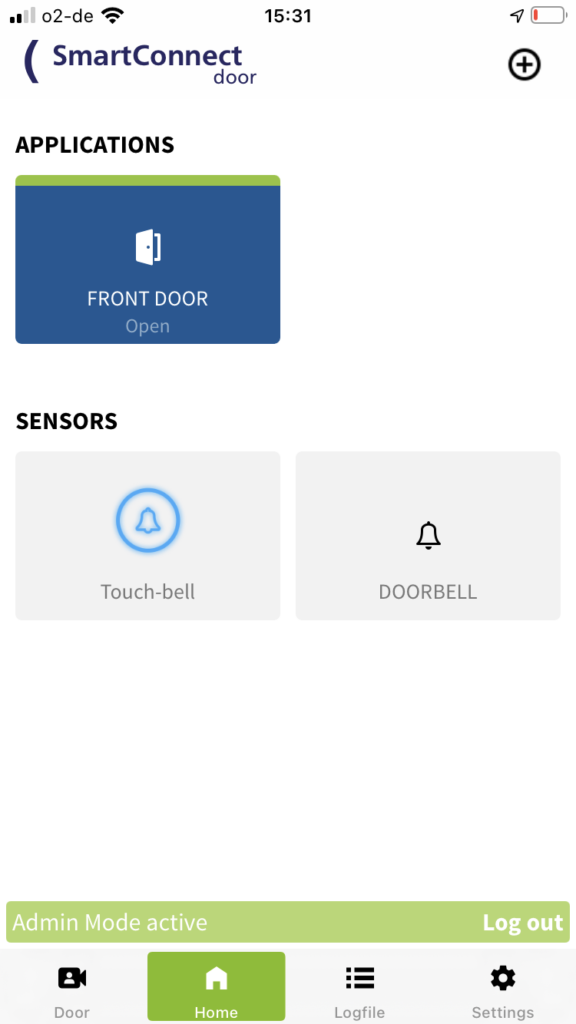
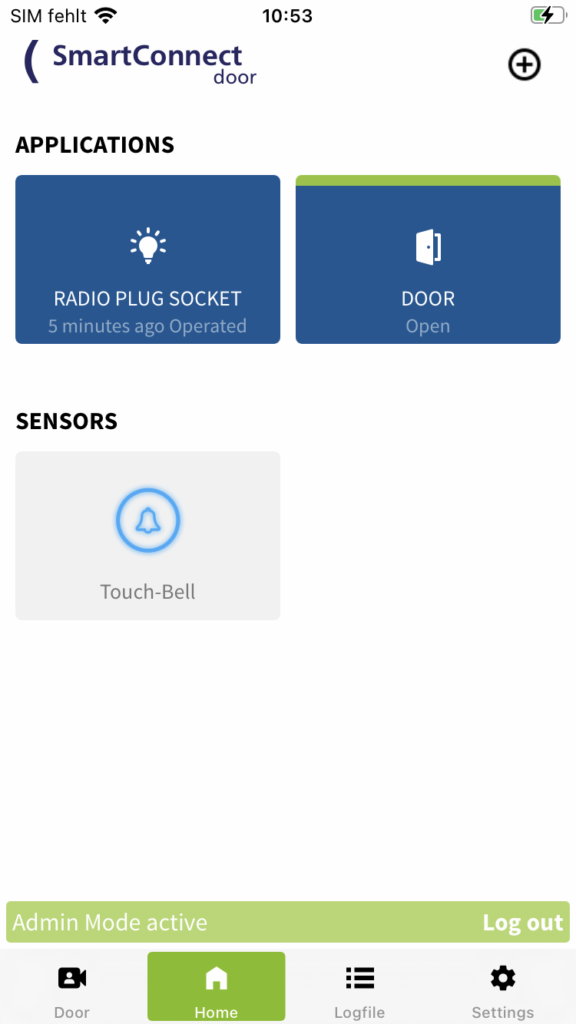
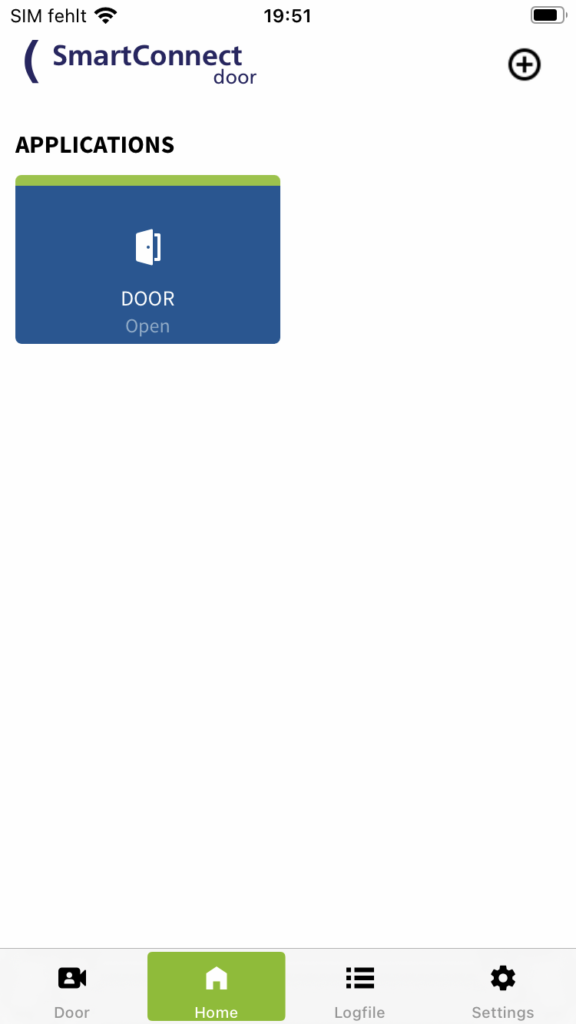
Home
The home area is the start page of the SmartConnect app. All configured applications are displayed and operated here. The displayed applications vary depending on the rights of each user. All devices connected to the SmartConnect are called applications. These can be, for example, the door with a FUHR multi-point lock multitronic 881 or autotronic 834, a radio-controlled socket or a radio gong.
Applications can be operated via the SmartConnect app and – depending on the product – their status can be queried. Depending on the logged in user, different applications will be displayed in the app and permissions will be released.
Home-Screen
Set up and pair an application
Only an administrator is authorised to set up an application. Log in with your administrator access data (see chapter Administrators and Users) and follow the steps below.
Not every product is able to send feedback. The choice of the product decides whether it can be displayed, for example, whether the door lock is locked or not. If, for example, the FUHR radio receiver NB506NR is installed in the door, the status of the lock can be queried in the app. Your dealer will be happy to help you choose the right product.
Creating an new Application
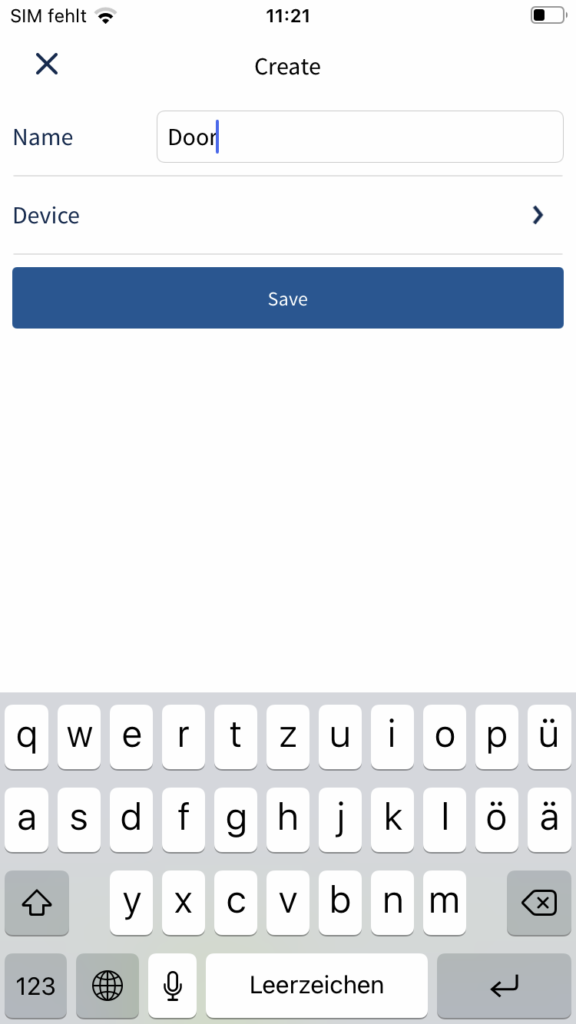
Tap the Plus icon in the top right of the header and selectAdd application.
Name your new application. The name can be up to 20 characters long and should be chosen to avoid confusion with other applications, e.g. door or radio socket.
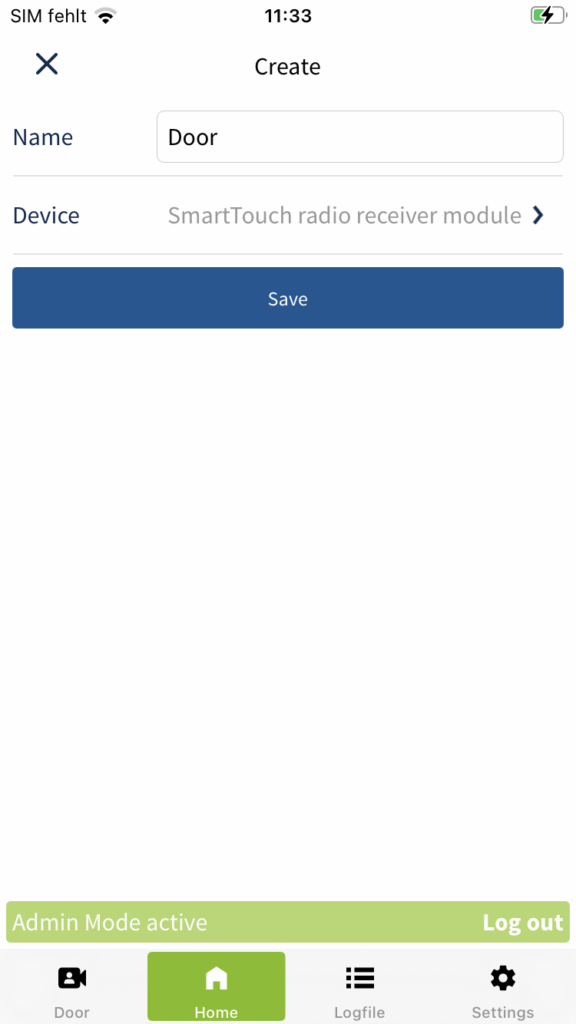
Then determine the product which you want to use for the application. Tap Device.
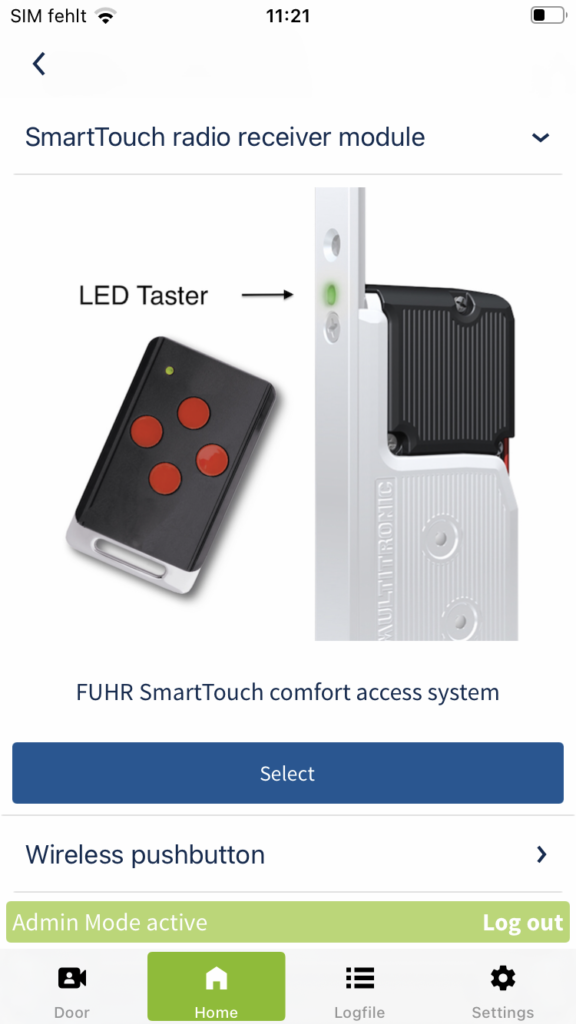
Select the appropriate product from the list and tap Select.
Depending on the product, you can define an icon that is displayed on the home screen for the application and choose between different functions. Now save the application.
Pair an application
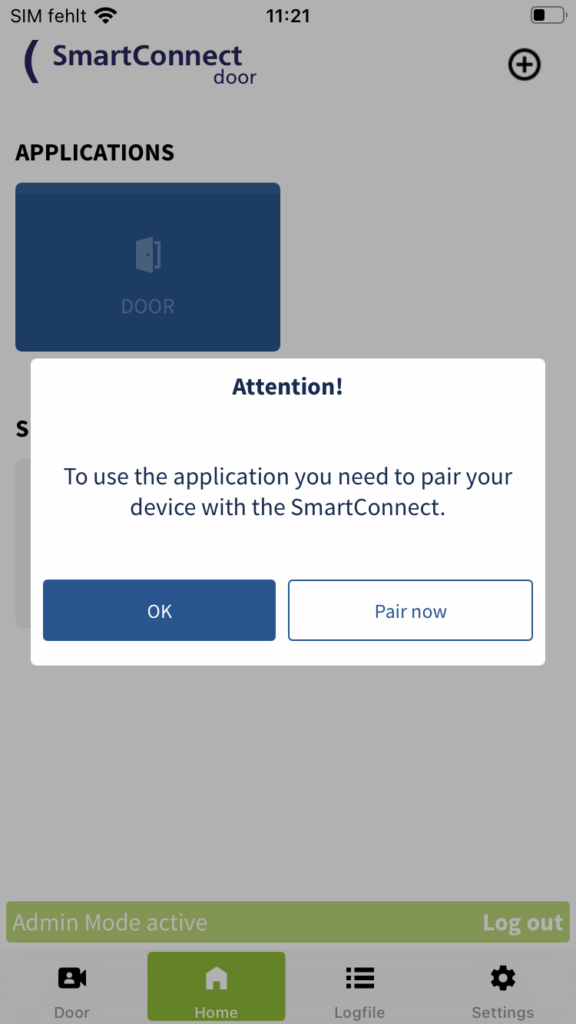
To operate an application with the app, it must be paired with the SmartConnect.
The master key is required to pair some applications or products (e.g. SmartTouch radio receiver module). Further information on the key assignment of the master key / SmartTouch radio key can be found in the chapter Key assignment of the SmartTouch radio key below.
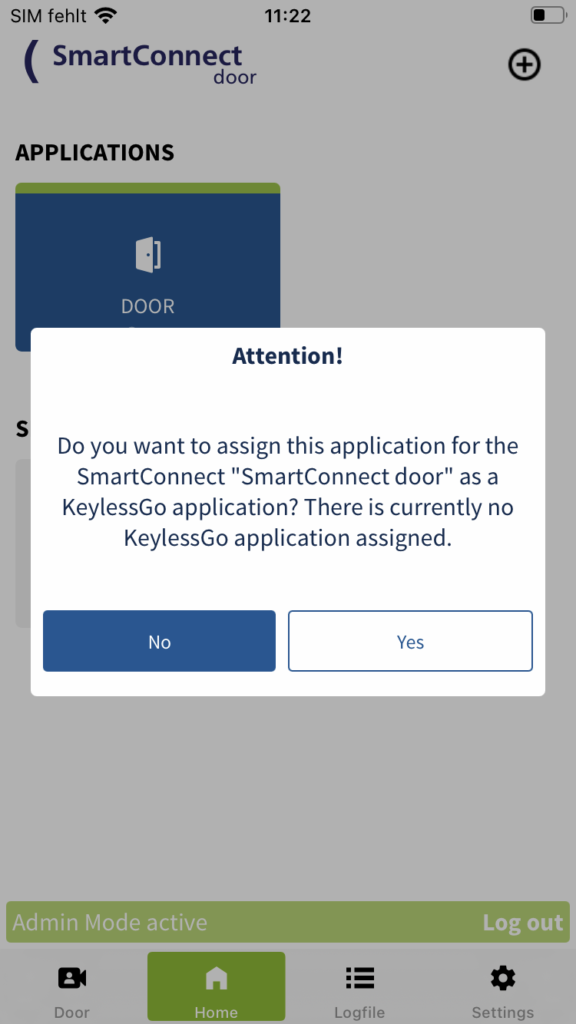
Option 1: Pair immediately after creating
After the successful creation of the application in the step before, a dialogue window appears. You now have the option to pair the application immediately.
Tap Pair now.
Now please follow the instructions described in the SmartConnect app exactly and complete the process by tapping Application paired.
The application has now been successfully paired and can be used.
After creating applications, only administrators are authorised to use them. See chapter Authorisations for Applications or User administration for instructions on how to activate users for operations.
Key assignment of the SmartTouch radio key
Restart
Network Reset
Factory settings
Confirm / Send
Operation (Reset): Shortly press button 1, 2 or 3 and then confirm with button 4.
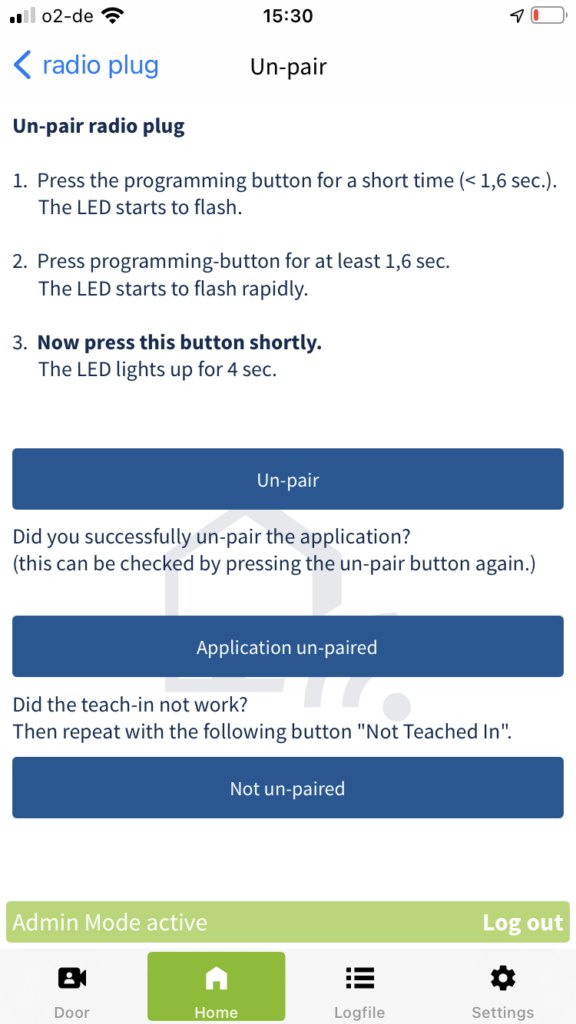
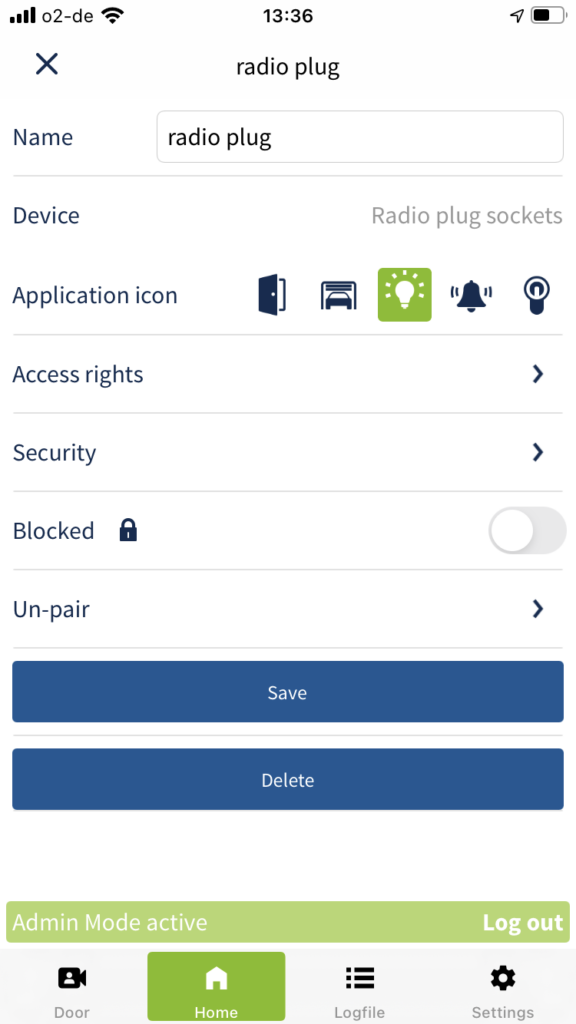
Un-pair and delete an application
To successfully delete an application, the application must first be un-paired. Only an administrator is entitled to un-pair and delete an application. Therefore, log in with your administrator access data (see chapter Administrators and Users) and follow the steps below.
Press and hold the button of the application you want to un-pair and then release it. A dialog window will now open. Tap Edit.
Tap Un-pair.
Now please follow the instructions described in the SmartConnect app exactly and complete the process by tapping Application un-paired.
Tap Delete.
Confirm the pop-up by tapping Delete.
The application has now been successfully un-paired and deleted.
You can also tap Delete directly on the first step. This will open a pop-up indicating that the application has to be un-paired before deleting it. Tap Un-pair now and then follow the steps described above.
Application settings
Only an administrator is authorised to edit the settings of an application. Therefore, log in with your administrator access data (see chapter Administrators and Users) and follow the steps below.
Tap Home in the main menu to display your applications.
Press and hold the button of the application you want to edit and then release it. A dialog window opens with the menu items Edit, Delete, Push Settings and iOS Widgets.
Detailed information on the different settings can be found in the explanations below.
To change the arrangement of the applications, press and hold the button of an application until it enlarges. Now move the button to the desired position and release it again.
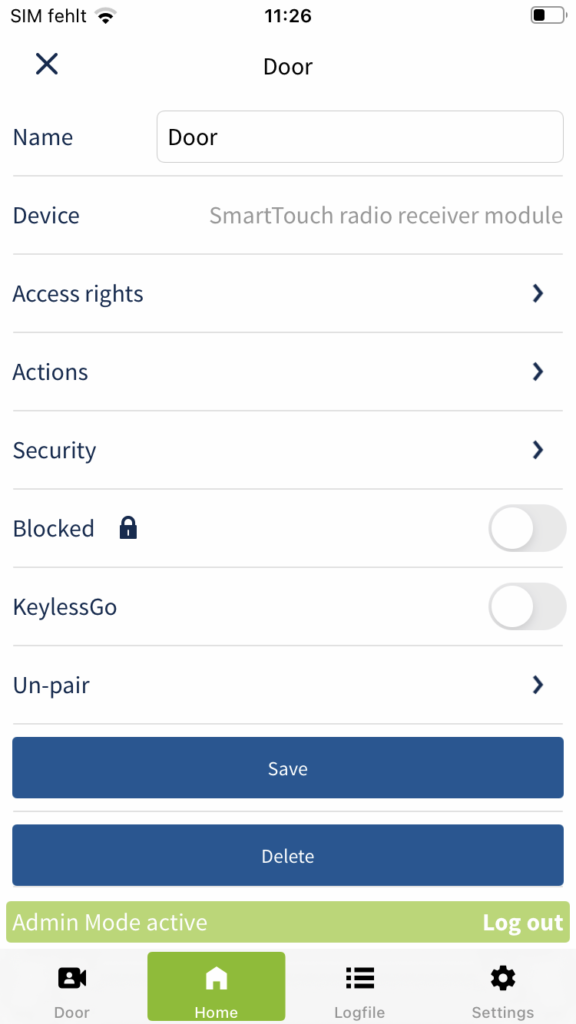
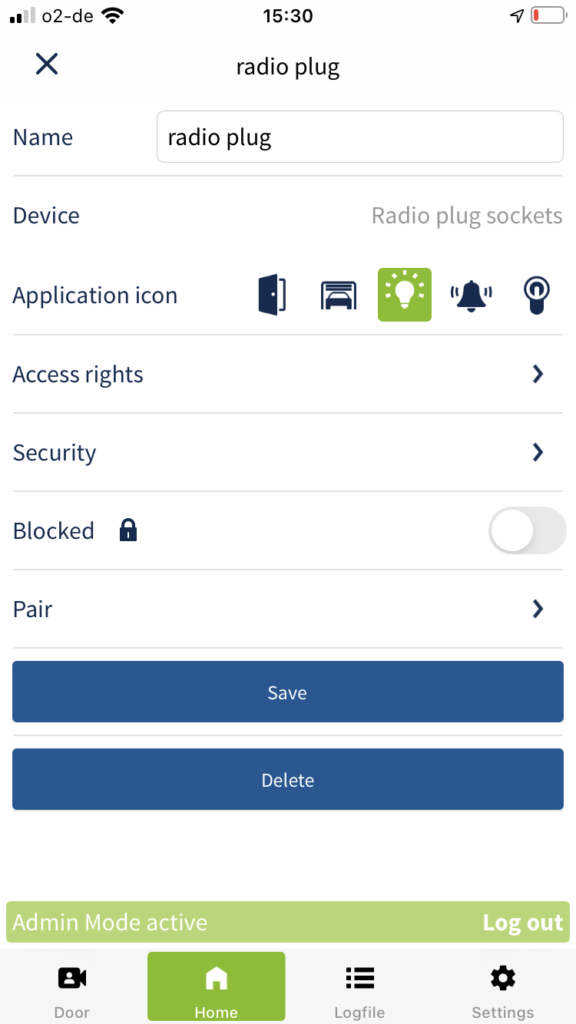
Edit
In the editing area of an application, you have the option to make various settings for the application.
Change name You can change the name of the application.
Set Icon Depending on the application or device, you can specify an icon that will be displayed on the home screen for the application.
Authorisations For detailed information on granting and managing authorisations, see chapter Authorisations for Applications.
Security Here you have the option to set up an additional confirmation in the app for remote access to the app (two-level opening). This prevents accidental operation of the application.
Blocked By activating the Blocked switch, the application can no longer be operated. In the home screen, blocked applications are displayed grayed out.
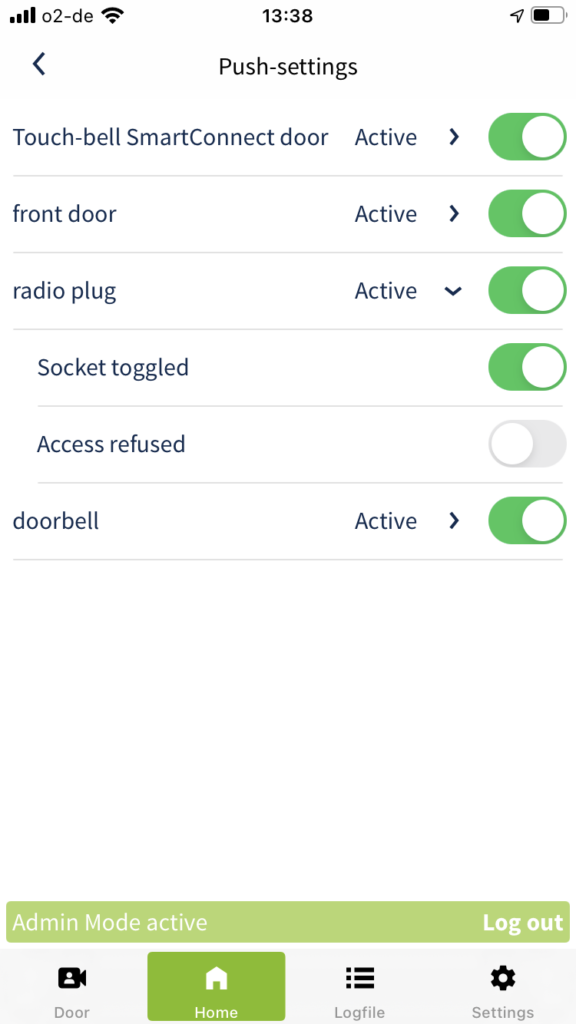
Here you have the option to manage push-settings for all applications. Depending on the application, you can specify exactly which application events you want to receive push notifications for. Tap on the name of the application and activate the corresponding buttons.
The push-settings can also be edited by users without administrator rights.
iOS Widgets
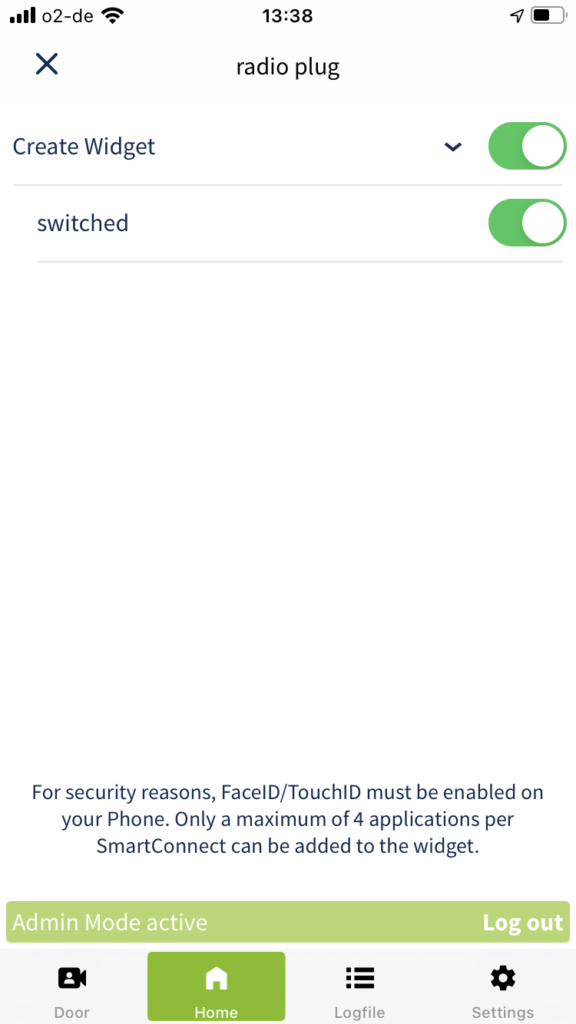
In the iOS Widgets area, you have the option to create widgets for the applications you have created. These are then available for quick access in the widget area or in the home screen of your smartphone. Depending on the application, you can precisely define for which events you want to create a widget. Tap the application to define the exact definition and activate the corresponding switches in the list.
To use the widgets created in the SmartConnect app on your smartphone, you need to add them to the widget or home area via your smartphone (see Use widgets on your iPhone and iPod touch).
The editing of iOS widgets can also be done by users without administrator rights.
Authorisations for applications
Administrators are always authorised to operate applications. In the following steps you will learn how users without administrator rights are also authorised to use applications. Each user can be assigned a permanent or temporary authorisation for an application.
Only an administrator is entitled to assign and edit authorisations for an application. Therefore, log in with your administrator access data (see chapter Administrators and Users) and follow the steps below.
Grant permanent authorisation for an application
Tap Home in the main menu to display your applications.
Press and hold the button of the application for which you want to assign or edit authorisations and then release it. A dialog window will now open. Tap Edit.
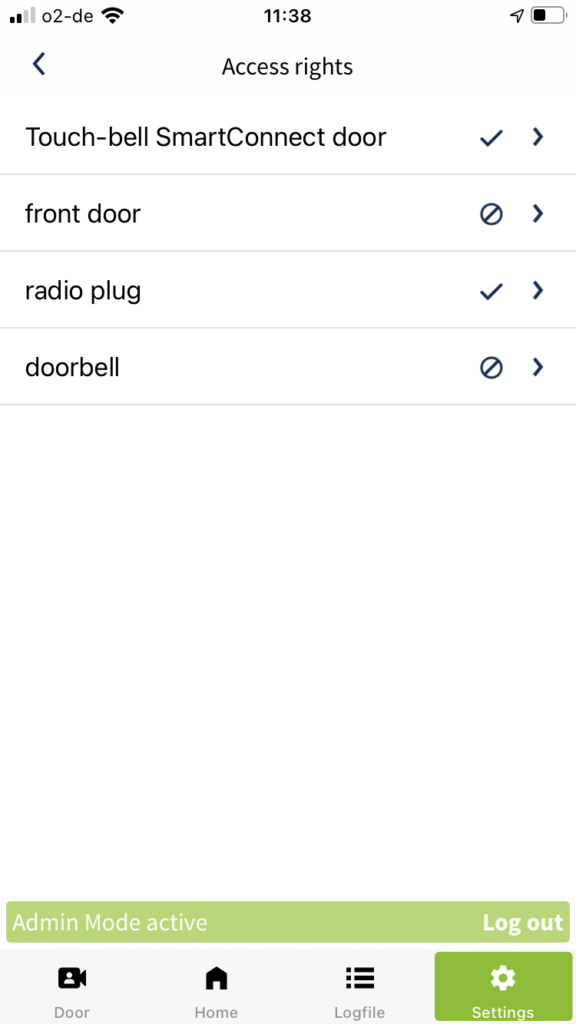
Tap Access rights.
An overview of the existing users and their authorisations appears. Now select the user for whom you want to manage the authorisations.
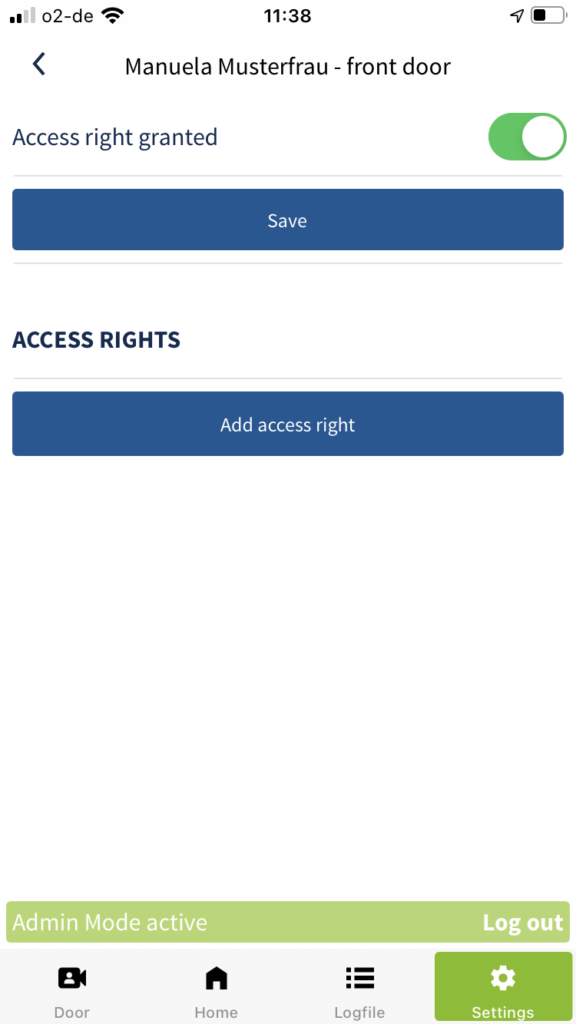
To grant the user permanent access to an application, activate the switch Access right granted and confirm your selection by tapping Save.
You will now see the overview of the users again. A check mark icon indicates that the user now has permanent authorisation to use the application.
Grant time-restricted authorisation for an application
Tap Home in the main menu to display your applications.
Press and hold the button of the application for which you want to assign or edit a time-restricted authorisation and then release it. A dialog window will now open. Tap Edit.
Tap Access rights.
An overview of the existing users and their authorisations appears. Now select the user for whom you want to assign or edit the time-restricted authorisation.
Tap Add access right.
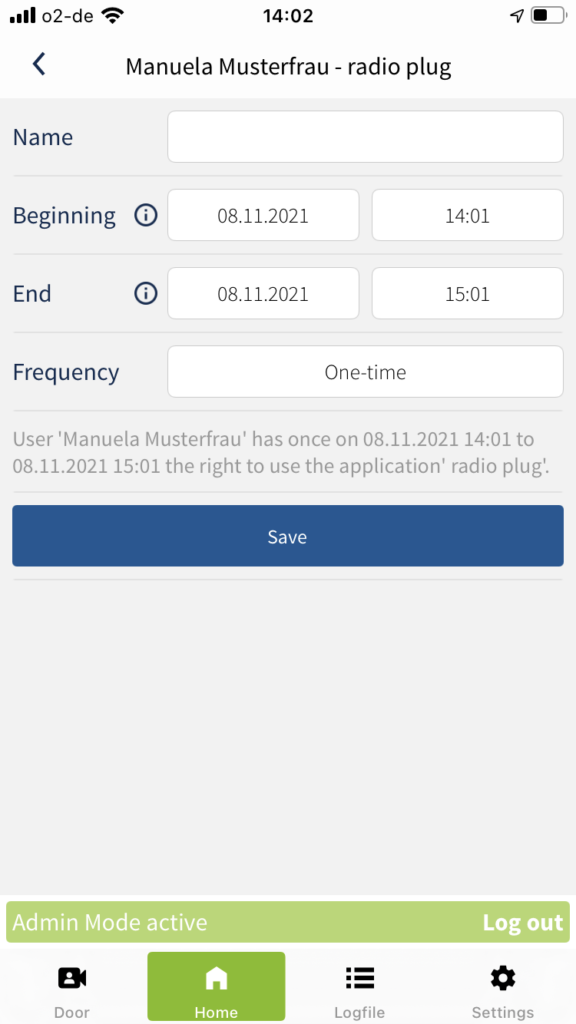
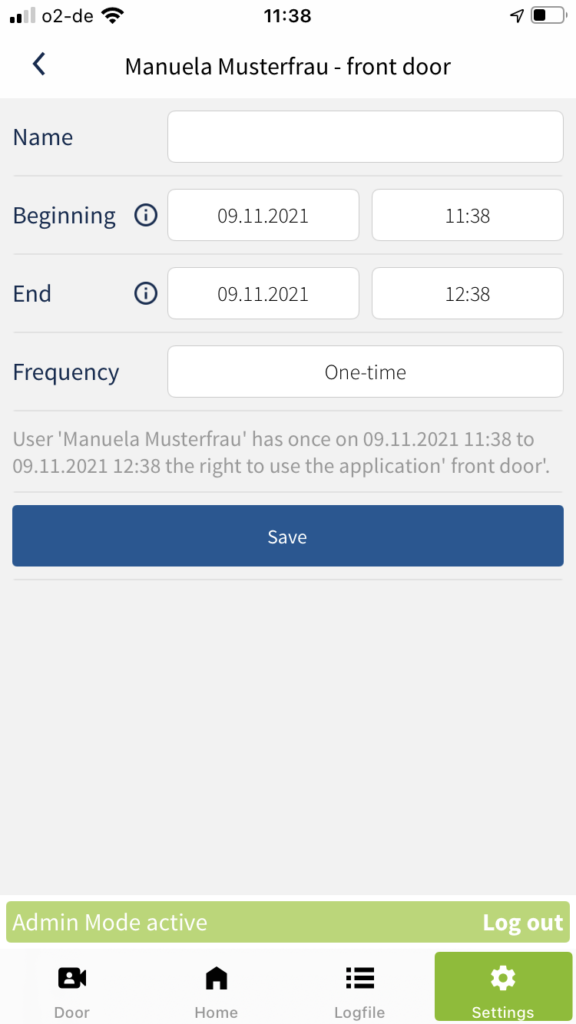
Enter the conditions Name, Beginning, End and Frequency in the window and confirm your entries by clicking Save. Further information on the different terms and conditions is provided below.
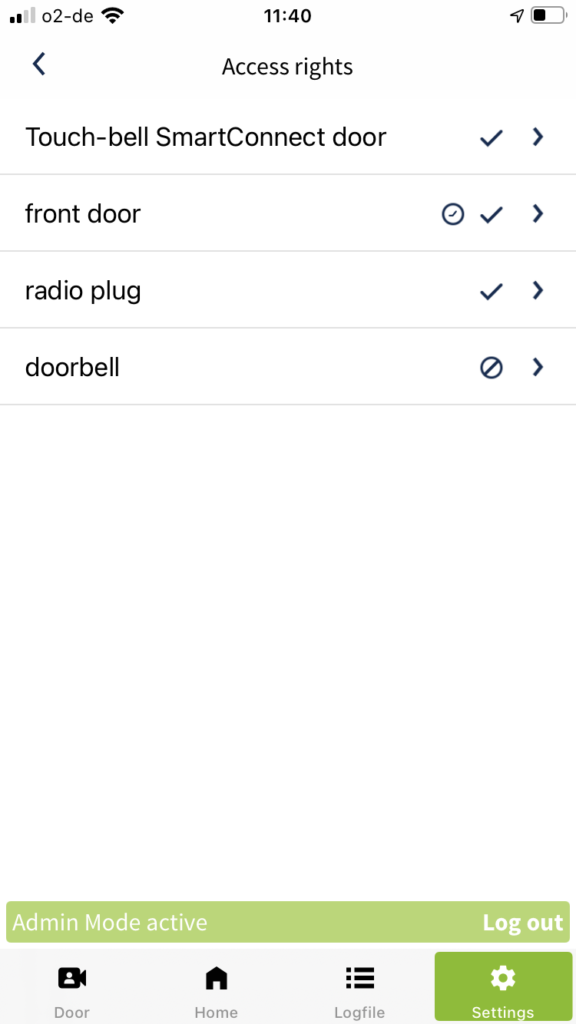
Check whether the switch Access right granted is activated and complete the process by tapping Save.
You will now see the overview of the users again. A tick and clock icon indicates that the user now has time-restricted authorisation to use the application.
Make sure that the Authorised button at the top is always active. If this switch is disabled, the time-restricted rights are also inactive and the user cannot switch applications.
Terms and conditions of time-restricted authorisations:
Name: Unique name of the separate authorisation, e.g. “Cleaning lady”.
Start: Time from which the user is authorised to use this application.
End: Time when the user no longer has rights to use the application.
Frequency: Interval of how often the user is authorised to use this application: once in the set time window, repeated weekly, monthly or annually.
To give a user access to multiple applications, you can also manage authorisations via Settings. To do this, follow the instructions described in the chapter User administration.
Add users
We recommend that you add users in a secure environment (the home network), as this requires the extended rights of an administrator. For everyday use, a user without administrator rights is recommended. This way, abuse can be avoided as best as possible.
Only an administrator is authorised to create users. Therefore, log in with your administrator access data (see chapter Administrators and Users) and follow the steps below.
You have two options to add users:
On the one hand, you can create users. Set the username and password for the new user. Afterwards, you inform the new user of the access data and of which SmartConnect he or she has access to.
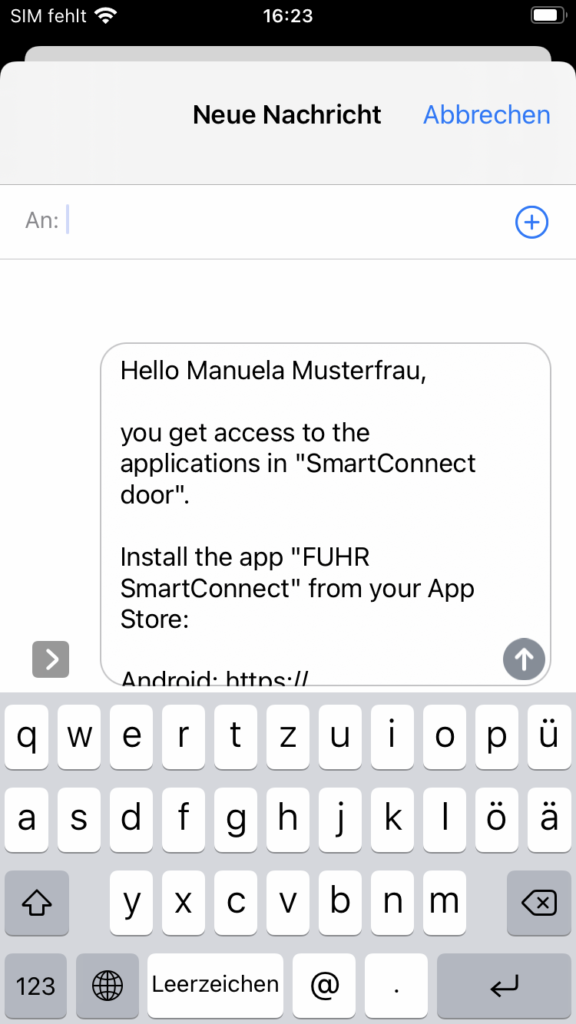
On the other hand, you can also invite users via a link. The invitation provides the new user with information on how to install the SmartConnect app and the corresponding link allows the user to set his or her personal password.
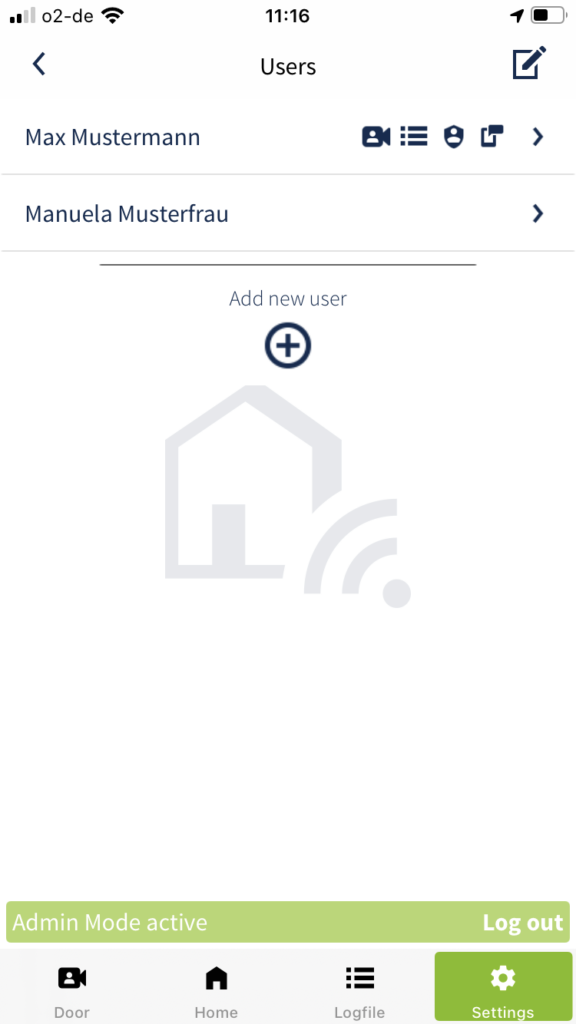
Create users
Tap the Plus icon in the top right of the header.
TapAdd user.
Tap the plus icon below the user list.
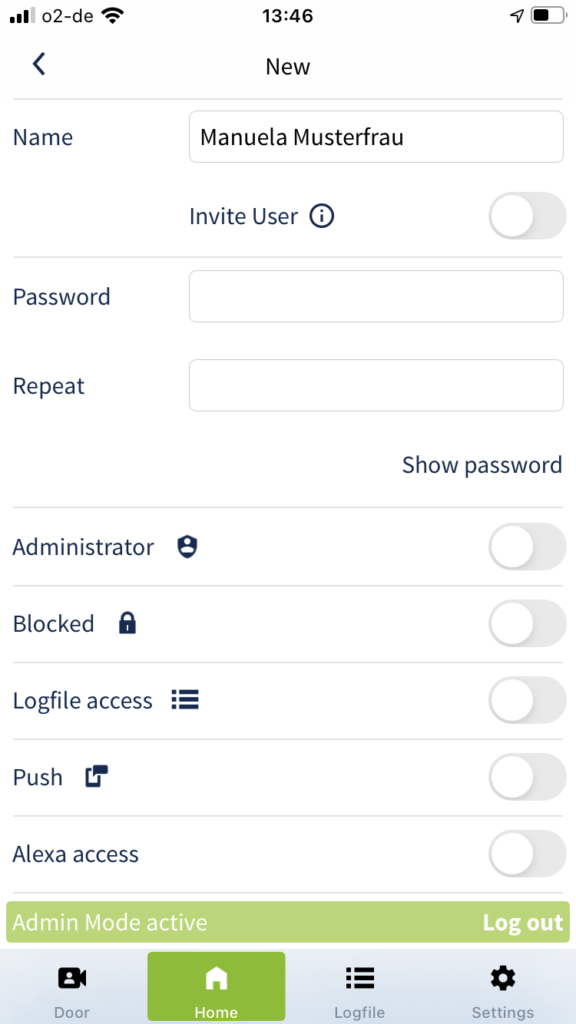
Enter the name of the user and define a secure password (see chapter General information). Only assign unique names in order to be able to assign the user precisely later.
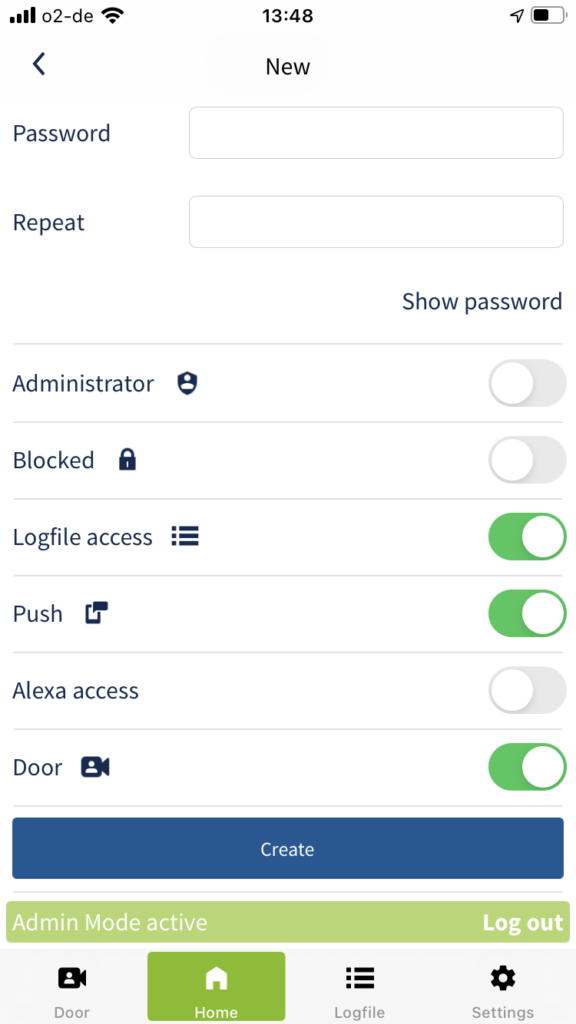
Define the rights of the user by activating the respective switch. A list with explanations of the respective rights can be found below.
As an administrator, you can edit the rights of users at any time. To do this, follow the instructions described in the chapter User administration.
Save the new user by tapping Create or Send Invitation.
You will now see the overview of the users again. The icons next to the username indicates what rights the user has.
Invite users
Tap the Plus icon in the top right of the header.
TapAdd user.
Tap the plus icon below the user list.
Enter the name of the user and activate the switch Invite User.
Define the rights of the user by activating the respective switch. A list with explanations of the respective rights can be found below.
As an administrator, you can edit the rights of users at any time. To do this, follow the instructions described in the chapter User administration.
Save the new user by tapping Send Invite.
The “Share menu” of your smartphone will now open. Choose which service (messages, mail, messenger, etc.) you want to use to send the invitation or link.
The previously selected service will open. Enter the user’s contact details and then send the invitation or link.
The user can use the link to assign a personal password. For security reasons, this link is no longer valid after 24 hours.
You will now see the overview of the users again. The icons next to the username indicates what rights the user has.
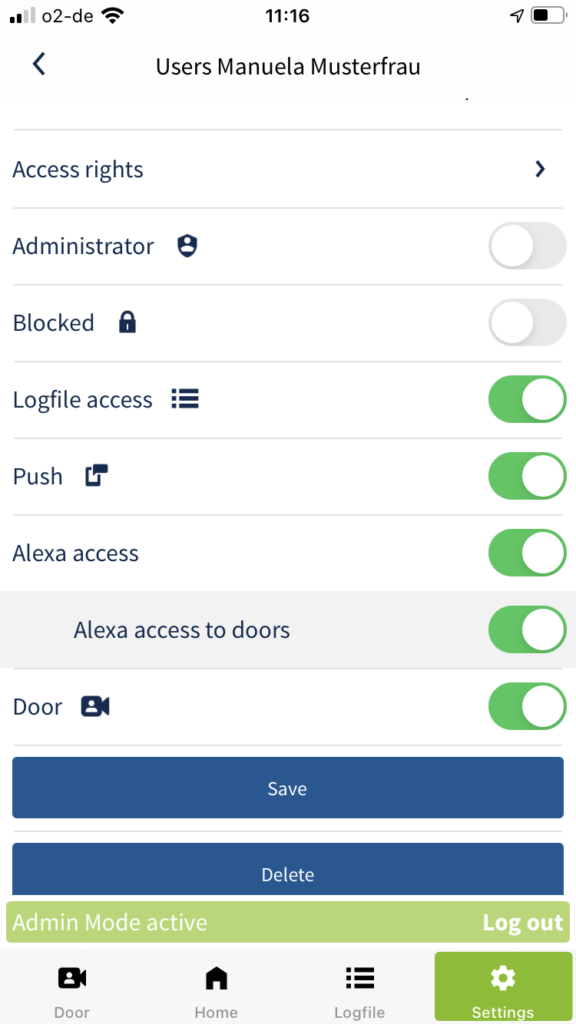
Administrators can set the following rights for each user:
Administrator: Activate this switch if the user is to be granted administrator rights. These rights may be granted or withdrawn at any time.
Blocked: Activate this switch if you want to temporarily lock the user. He can then neither log on nor operate applications.
Logfile access: Activate this switch if the user is allowed to read the logfile entries.
Push: Activate this switch if the user is allowed to receive push notifications.
Alexa access: Activate this switch if the user is allowed to use Alexa.
Door: Activate this switch if the user is allowed to access the camera.
Day-latch & permanently-open
In combination with the FUHR multi-functional control, the SmartConnect door provides the use of a day-latch function and a permanently-open function.
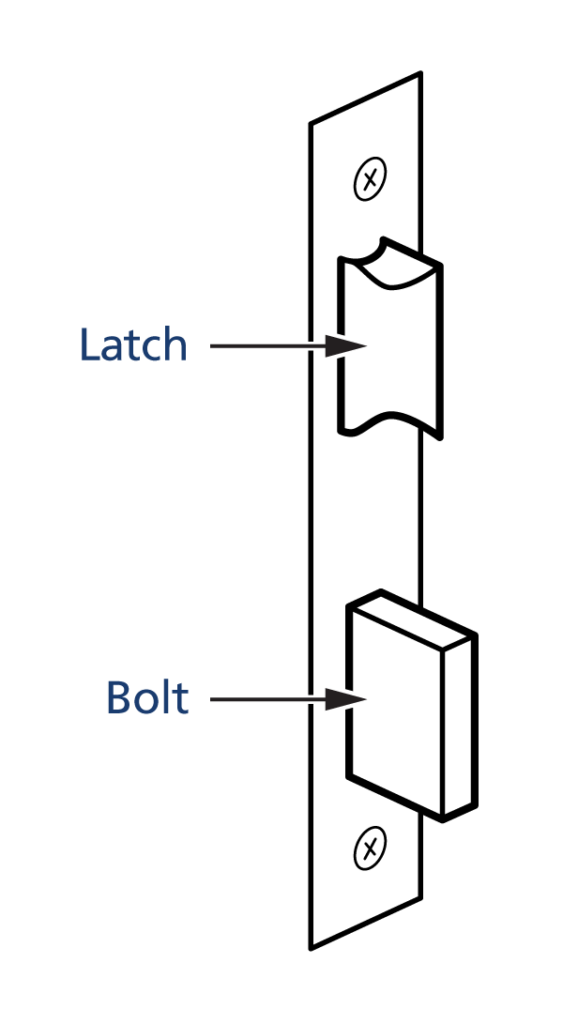
With the day-latch function, during the day the door is secured only by the latch. Ideal for heavily frequented doors where controlled access is required.
With the permanently-open function, the latch and all bolts are permanently retracted. This allows unhindered opening of the door from both sides – without access control.
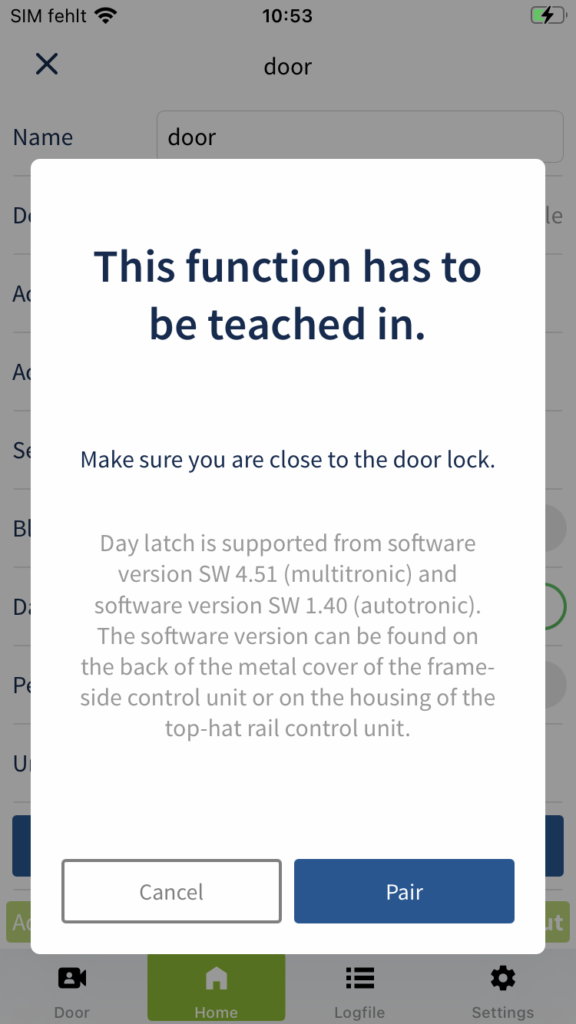
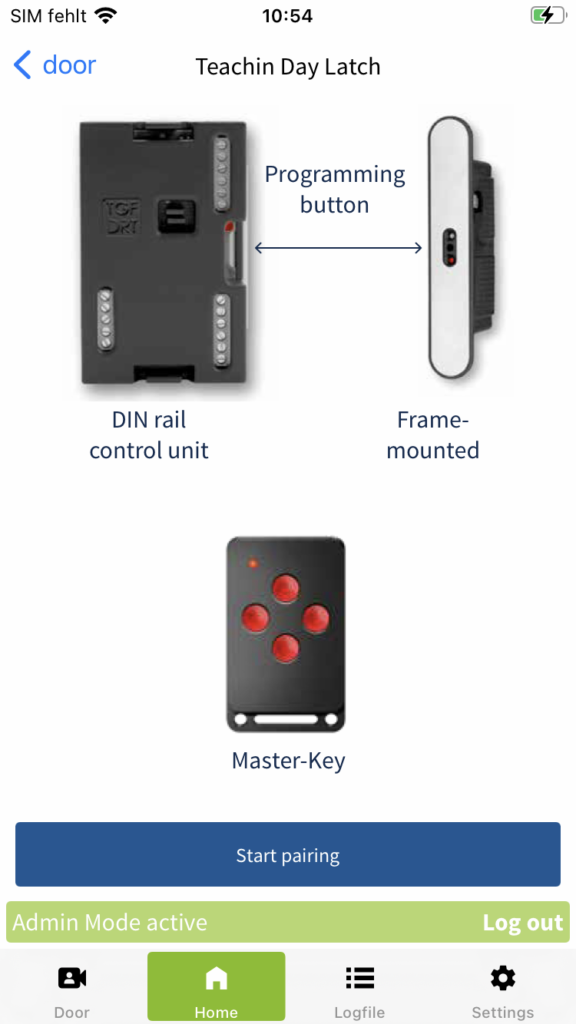
The day-latch function is supported by FUHR multitronic from software version SW 4.51. The permanently-open function is supported by FUHR multitronic from software version SW 4.51 and by FUHR autotronic from software version SW 1.40. The software version can be found on the back of the metal panel of the frame controller or on the housing of the DIN rail control unit.
SmartConnect only supports day-latch and permanently-open in combination with a SmartTouch radio receiver module with the latest firmware (V 2.22 and higher).
In order to be able to use the day-latch function and the permanently-open function a two stage creation and pairing process is required. The first step is to create an application (e. g. door or main entrance) and pair the SmartTouch radio module. Afterwards, you have the opportunity to pair the day-latch function and/or the permanently-open function. The FUHR multipoint locking system is used for this purpose. How to set up the application and the corresponding functions is explained below.
Only an administrator is authorised to set up an application. Log in with your administrator access data (see chapter Administrators and Users) and follow the steps below.
Set up and pair the application (door / main entrance)
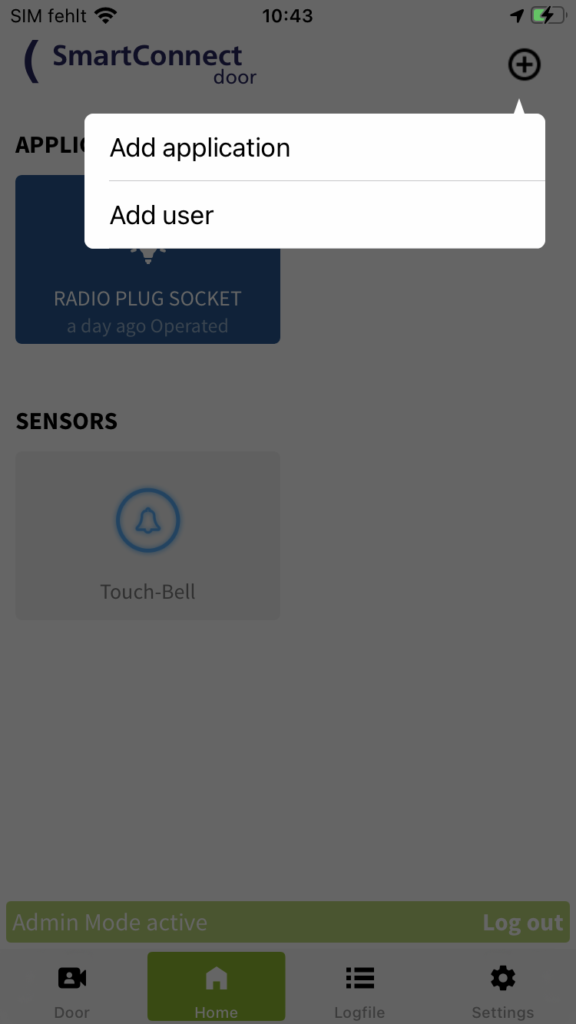
Tap the Plus icon in the top right of the header and selectAdd application.
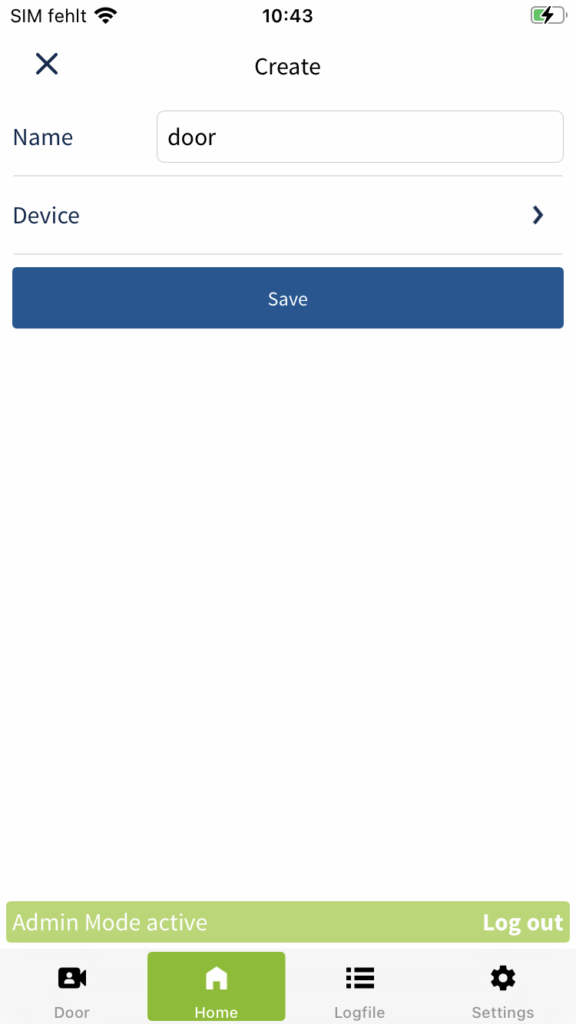
Name your new application. The name can be up to 20 characters long and should be chosen to avoid confusion with other applications, e.g. door or main entrance.
Then determine the SmartTouch radio receiver module as the product, which must be connected to the motorized lock. Tap Device.
Select the appropriate product (SmartTouch radio receiver module) from the list and tap Select.
Now save the application.
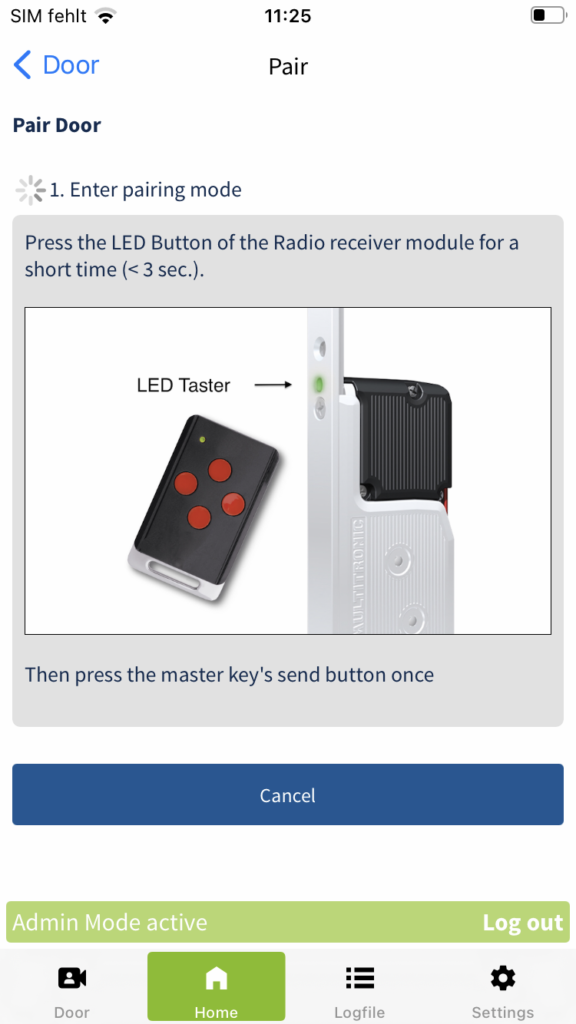
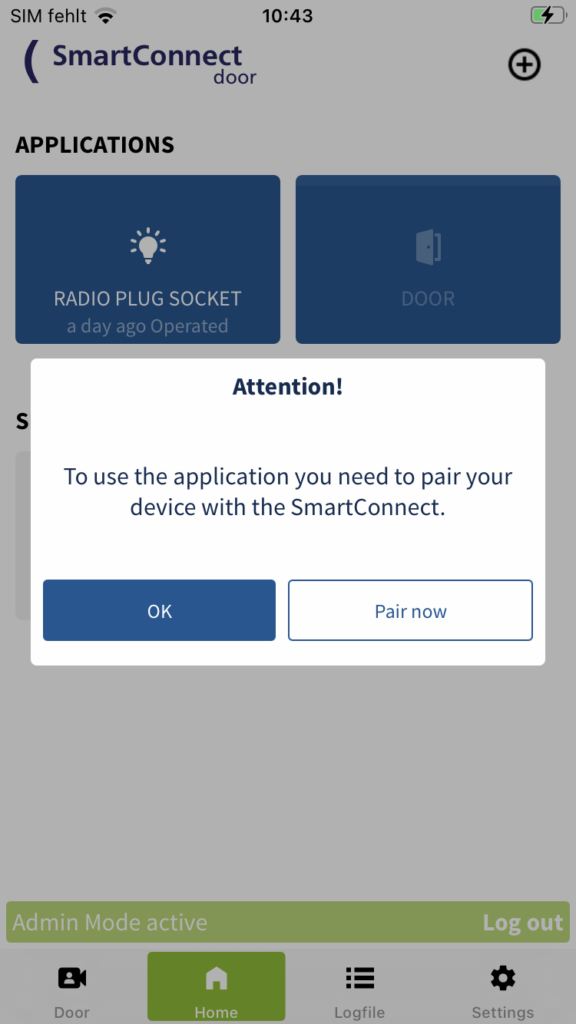
To use the application you need to pair your device with the SmartConnect. To do this, tap Pair now in the pop-up.
Now please follow the instructions described in the SmartConnect app exactly and complete the process by tapping Application paired.
The application has now been successfully paired and can be used.
In order to be able to use the functions day-latch or permanently-open, you need to pair these two functions in a further step. To do this, follow the steps described below.
Pairing the functions day-latch or permanently-open
In order to be able to use the functions day-latch or permanently-open, both functions must be paired separately. In the following, the pairing process is illustrated using the example of the day-latch function.
Tap Home in the main menu to view your applications.
Press and hold the button of the previously created application and then release it. A dialog window will now open. Tap Edit.
Activate the switch Day Latch or Permanent Open to pair the function.
Confirm the pop-up by tapping Pair.
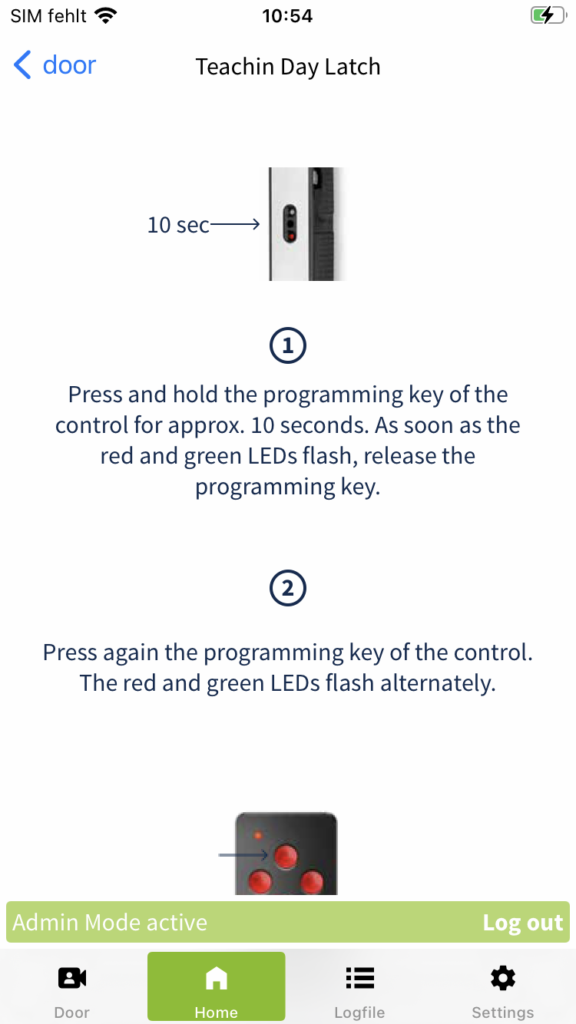
Make sure you have access to the motor lock and the associated master key. Tap Start pairing.
Now please follow the instructions described in the SmartConnect app exactly and complete the process by tapping Application paired.
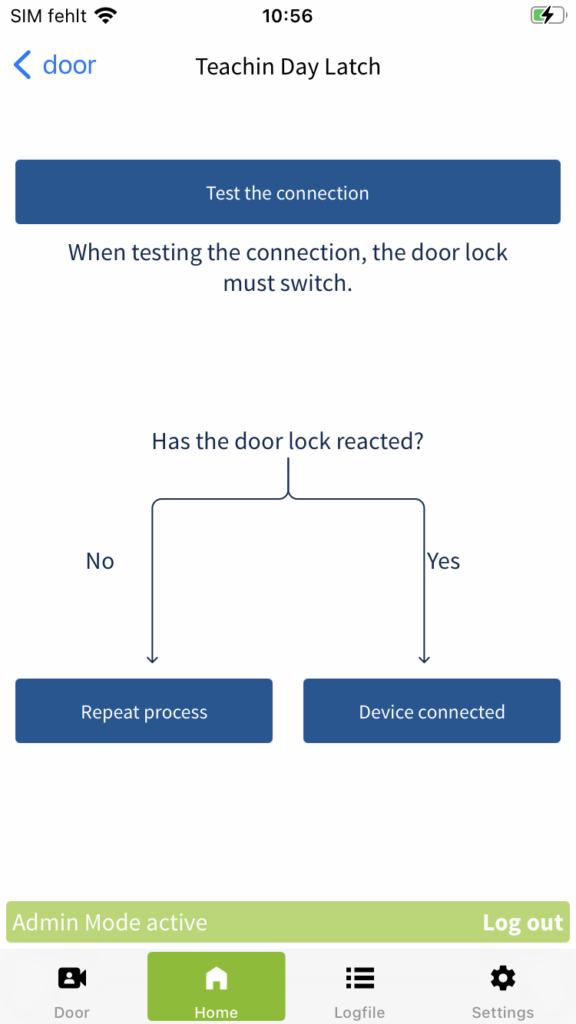
Tap Test the connection to check if the device has been successfully connected. If the lock has responded, complete the pairing process by tapping Device connected.
If the lock has not responded, tap Repeat process and run the pairing process again.
The Day Latch switch is now activated. Tap Save to save the function.
If you also want to use the permanently-openfunction, activate the corresponding switch and repeat steps 4-7 again. Then tap Save to save the functions.
The function day-latch and/or permanently-open has now been successfully paired and can be used.
The last paired function is activated by default after the pairing process.
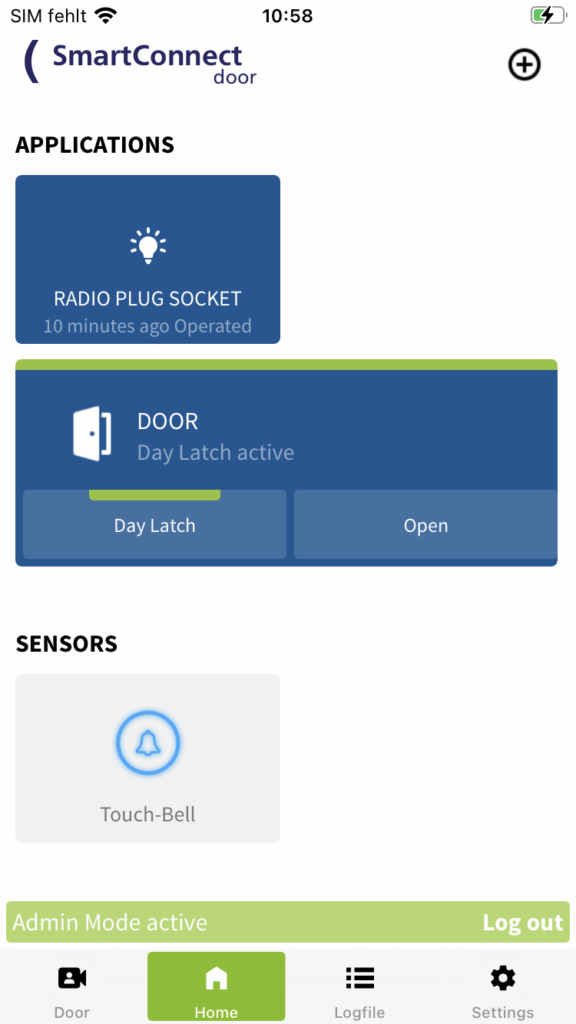
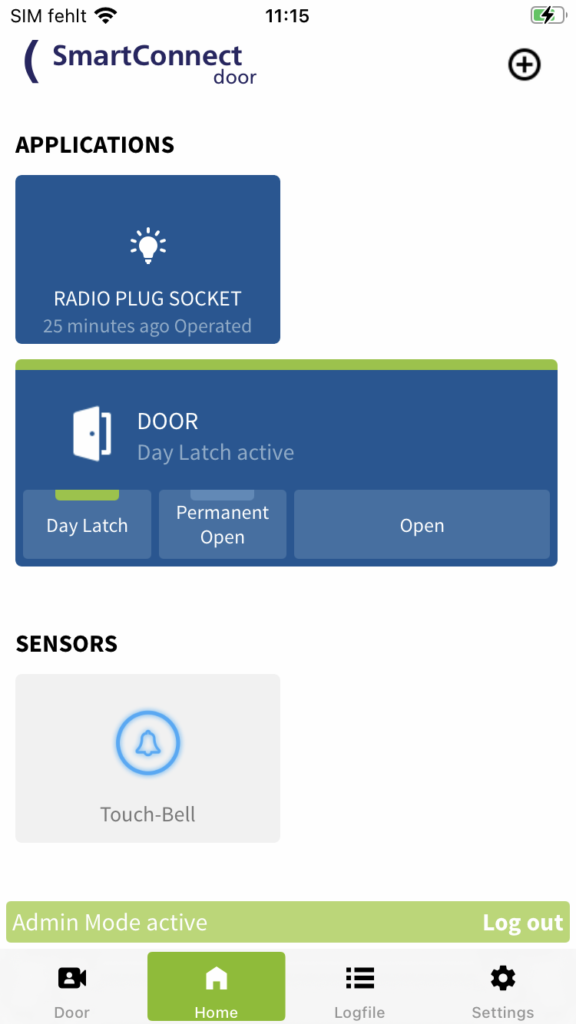
By activating the day-latch or permanently-openfunction in the settings of the application, the button of the application (door / main entrance) is expanded by the corresponding functions. It is now possible to “open” the door as usual and additionally to operate the functions day-latch or permanently-open. If the switches day-latch or permanently-open are deactivated in the application settings, the functions are no longer displayed on the home screen. It is then only possible to “open” the door via the button of the application. Deactivating the function in the application settingsalsodeactivates the time schedules of the corresponding function.
Use of the functions day-latch or permanently-open
There are two different ways to use the day-latch and permanently-open functions. On the one hand, the functions can be switched directly via the SmartConnect app or via a SmartKey that has been paired to the SmartConnect. On the other hand, the functions can be time-controlled by creating time schedules. The two different ways are described in more detail below.
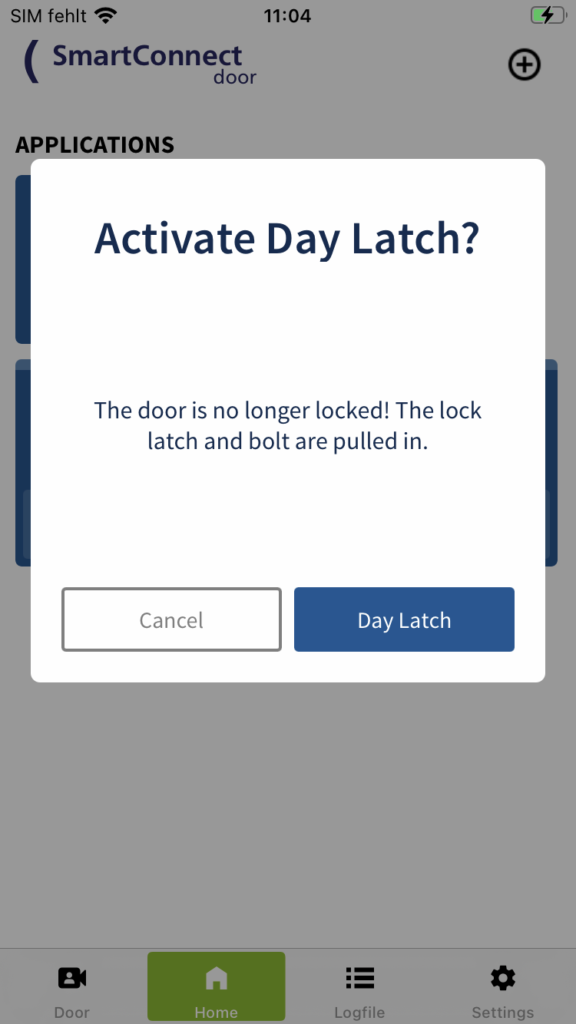
Direct switching via the SmartConnect app
Tap Home in the main menu to view your applications. Then tap the button Day Latch or Permanent Open.
Confirm the pop-up by tapping day-latch or permanently-open.
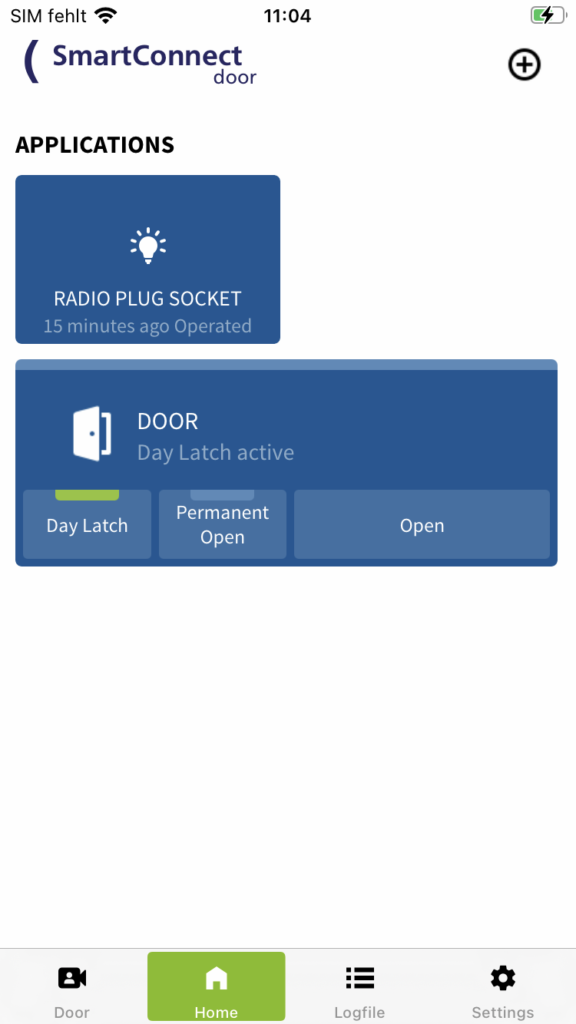
The Day Latch or Permanent Open function has been successfully activated.
The green bar at the top of the application or at the top of the button Day Latch or Permanent Open indicates that the function is active.
To deactivate the function, tap the button of the corresponding function again.
Time-controlled switching using time schedules
Tap Settings in the main menu and then tap Administration.
Enter your administrator password and tap Login.
Tap Schedules.
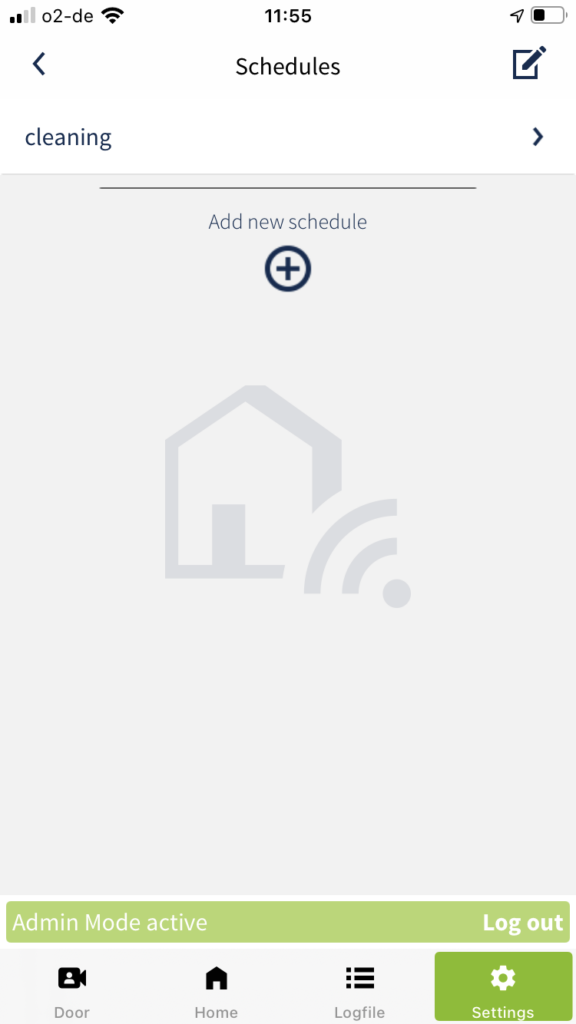
Tap the plus icon below the schedule list.
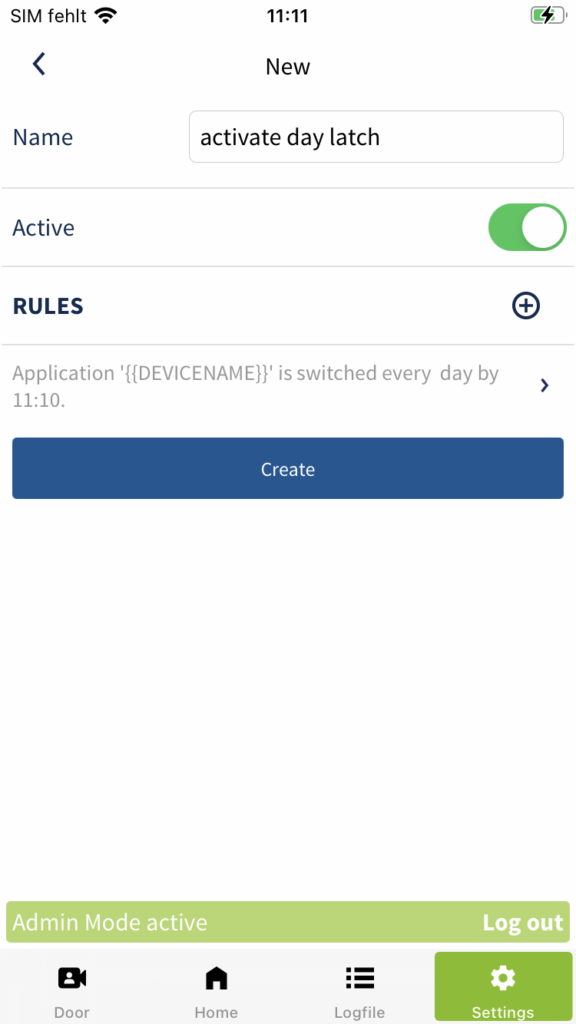
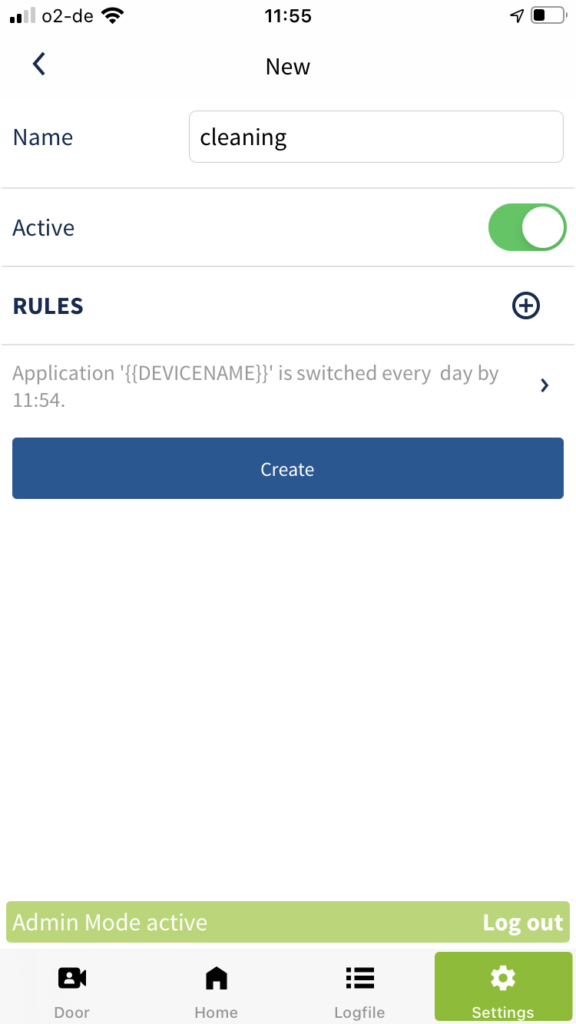
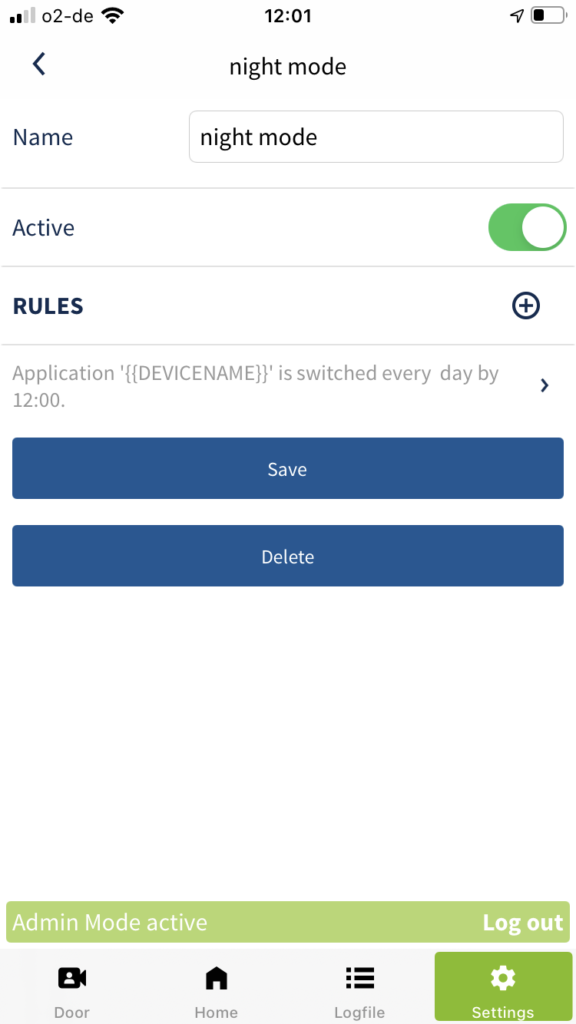
Enter a name for the schedule and then tap the plus icon to set the rules.
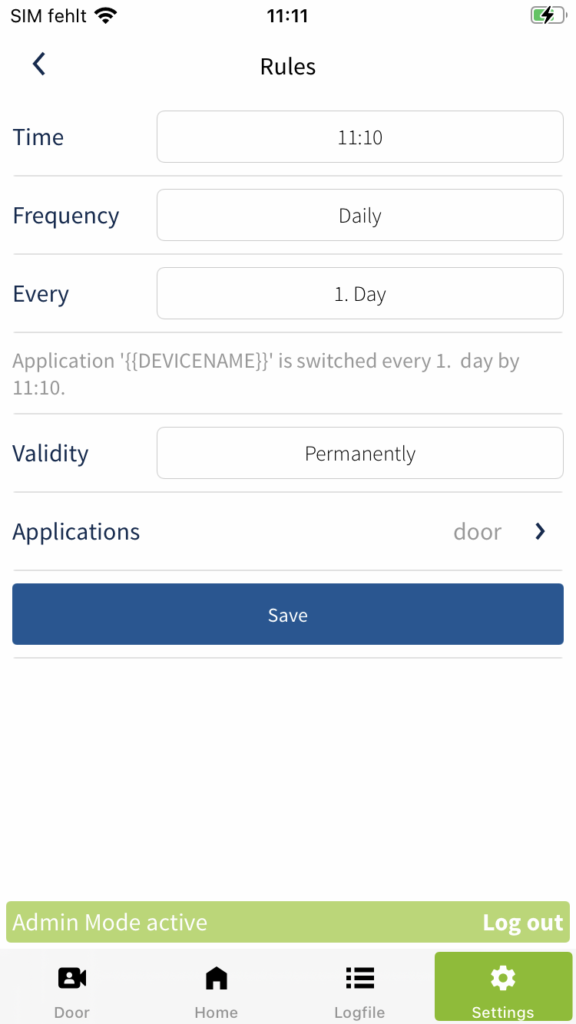
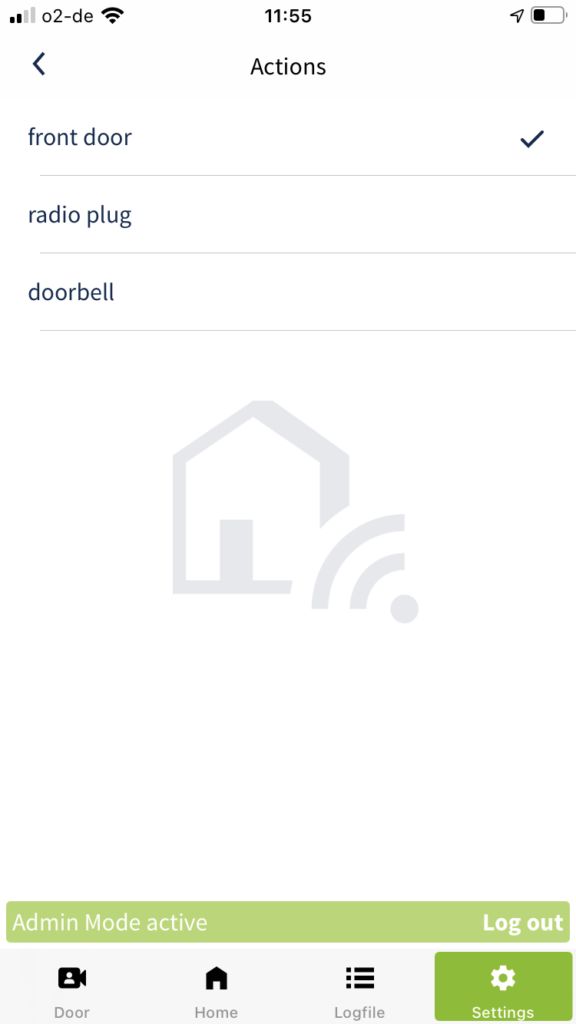
Set the rules Time, Frequency, Every and Validity. A table with explanations of the individual rules can be found in chapter Schedules. Then tap Applications to specify which application should be switched.
Select the appropriate application (door / main entrance) from the list.
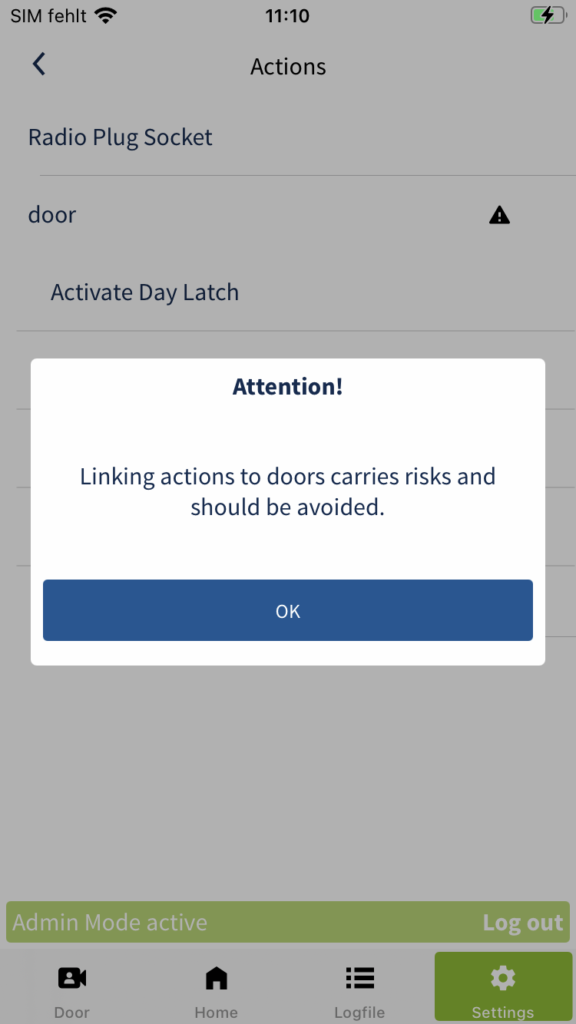
Confirm the pop-up by tapping OK.
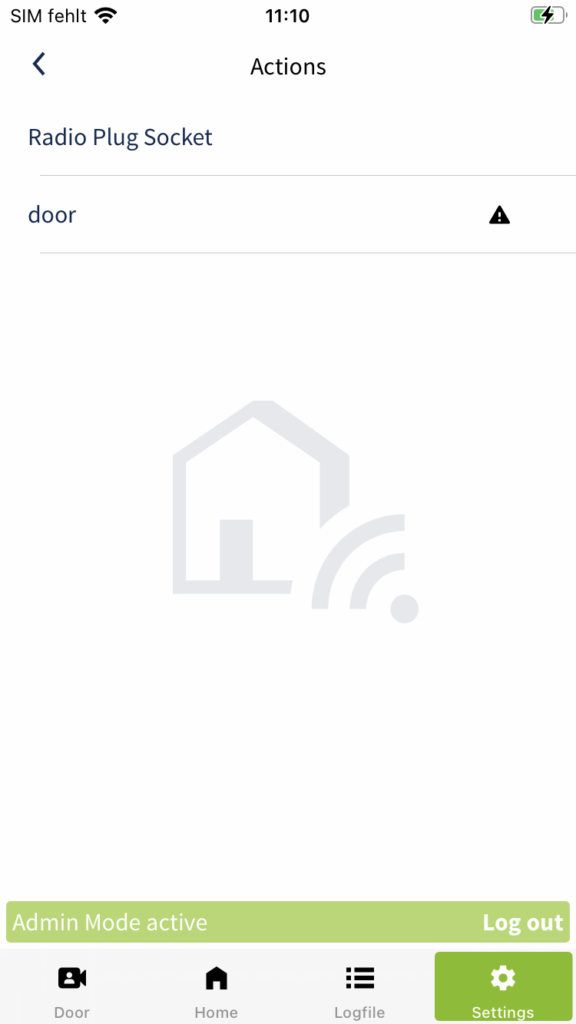
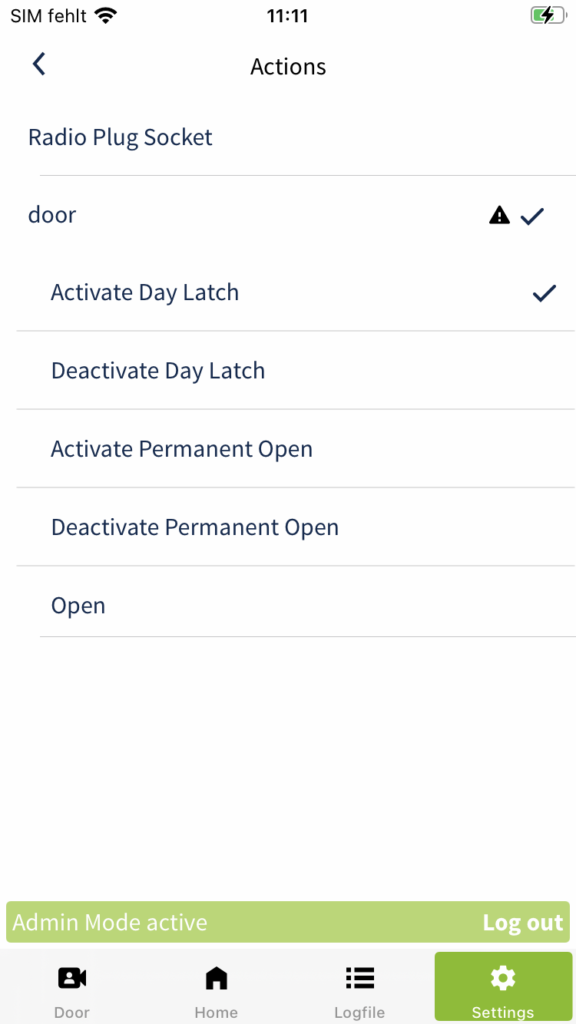
Select the function that should be executed (e.g. Activate Day Latch). Return to the overview of the rules by tapping the arrow in the top left corner.
Check your rules again and confirm your selection by tapping Save.
Make sure that the Active switch is activated and create the new schedule by tapping Create.
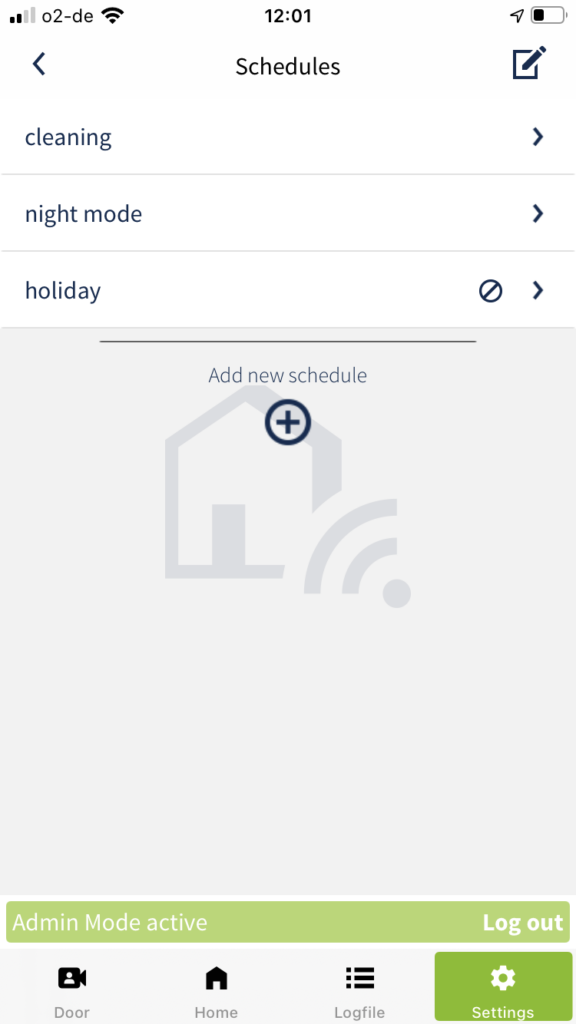
Your previously created schedule is now displayed in the list. The small arrow next to the name indicates that the schedule is active. A crossed circle indicates that the schedule is currently deactivated.
Make sure that the day-latch or permanently-openfunction is deactivated again at the desired time. You can, for example, create an additional schedule for this (Deactivate Day Latch) or deactivate the day-latch function by switching directly via the SmartConnect app or a correspondingly paired SmartKey.
Assign authorisations for day-latch and permanently-open function
After the day-latch or permanently-open function has been set up successfully, only administrators are initially authorised to operate the functions. In the following steps you will learn how users without administrator rights are also authorised to operate the functions. Each user can be assigned a permanent or temporary authorisation for an application.
Only an administrator is entitled to assign and edit authorisations for an application. Therefore, log in with your administrator access data (see chapter Administrators and Users) and follow the steps below.
Tap Home in the main menu to display your applications.
Press and hold the button of the application for which you want to assign or edit authorisations and then release it. A dialog window will now open. Tap Edit.
Tap Access rights.
An overview of the existing users and their authorisations appears. Now select the user for whom you want to manage the authorisations.
To grant the user permanent access to an application, activate the switch Access right granted and the switch of the corresponding Day Latch or Permanent Open function. Confirm your selection by tapping Save.
If you only activate the Authorised switch, the user is only allowed to open the door.
You will now see the overview of the users again. A check mark icon indicates that the user now has permanent authorisation to use the application.
Depending on the authorisations assigned to the user, the button of the application (door / main entrance) is expanded to include the day-latch or permanently-open functions.
To learn how to grant a user a time-restricted authorisation to an application, see chapter Authorisations for applications.
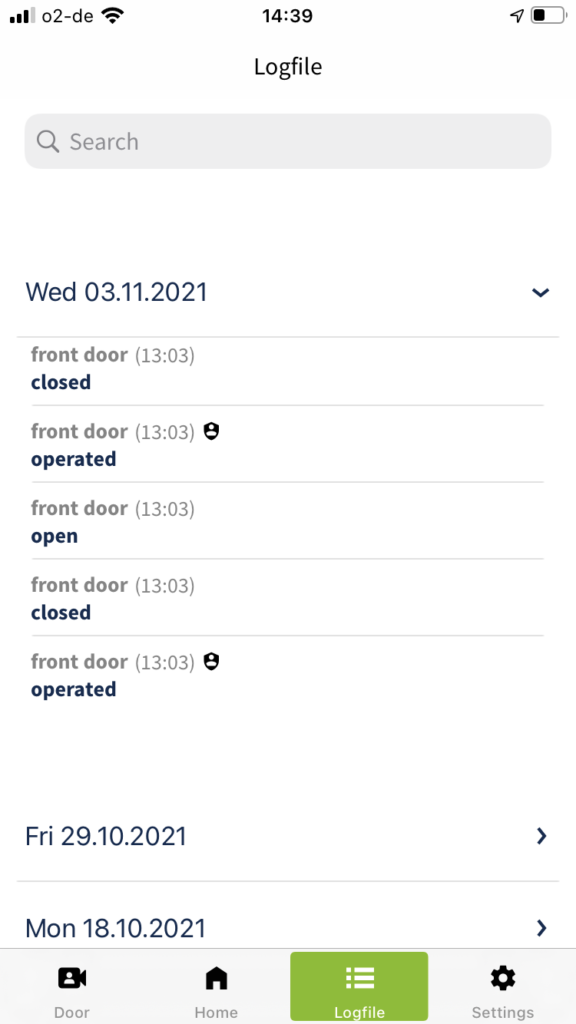
Logfile
Using the logfile, you can see all the applications that have been made with the SmartConnect using the date and time.
You can search the logfile for specific entries. Tap in the Search field and enter the desired search term. For example, if you enter a username, all operations that originated from that user will appear. You can also search for a specific date, e.g. 29.06.2021, or a month, e.g. 02.2021. After entering the search term, tap Done. All results found for this search term appear.
If you have installed a SmartConnect door, you can also view the events of the applications assigned in door mode directly in the door area (see chapter Door (Video).
By default, logfile entries are only visible to administrators, but can be released for users without administrator rights(see chapter user administration).
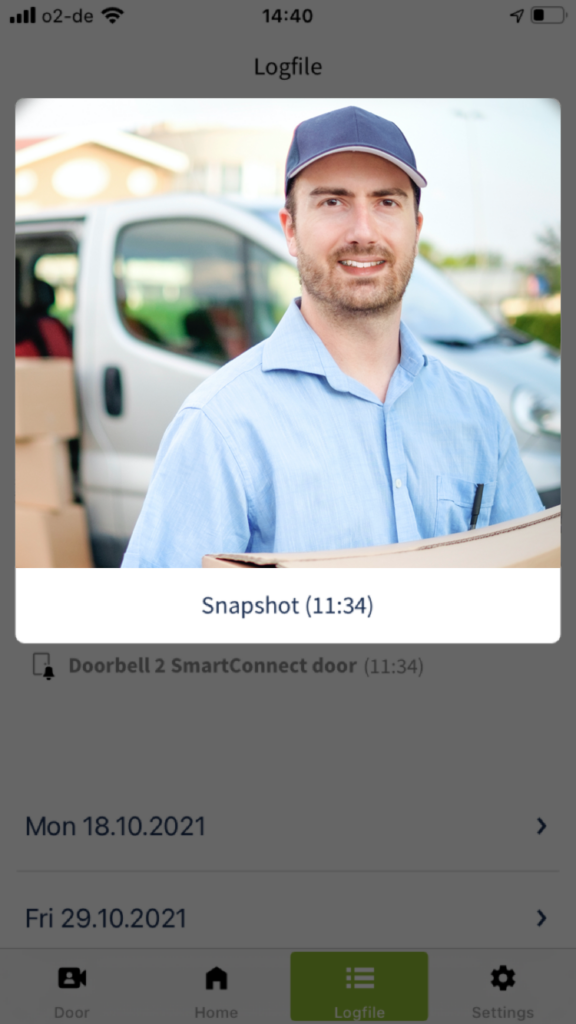
Events to which a photo has been assigned (SmartConnect door only) are marked with a small camera icon. By tapping the event, you can view details or the associated images.
Settings
This menu contains all settings for the SmartConnect app and the SmartConnect. Both users and administrators are authorised to edit the general settings. Only administrators are allowed to administer user lists and schedules and edit advanced settings (e.g. network configuration or reset to factory settings).
User settings
For more information about the general settings, please refer to the chapter User settings.
Administrator settings
For more information about the advanced settings, refer to the chapter Administrator settings.
This chapter summarizes the general settings for the SmartConnect app and the SmartConnect. Both users and administrators are authorised to edit the general settings.
The general settings are explained in more detail below.
Only administrators are authorised to administer user administration and schedules as well as to edit advanced settings such as network configuration or resetting to factory settings. For more information about the advanced settings, refer to the chapter Administrator settings.
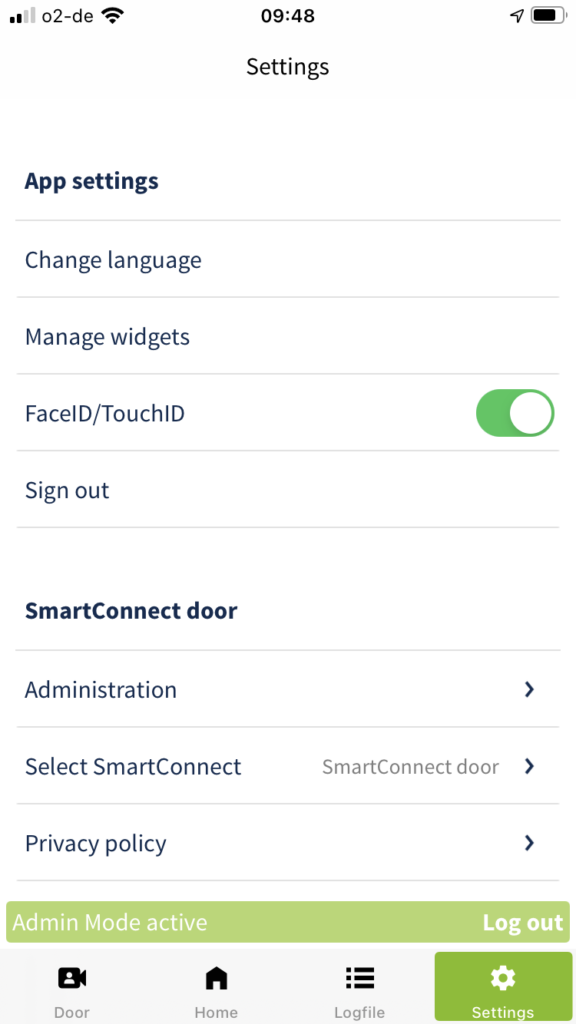
App settings
Change language
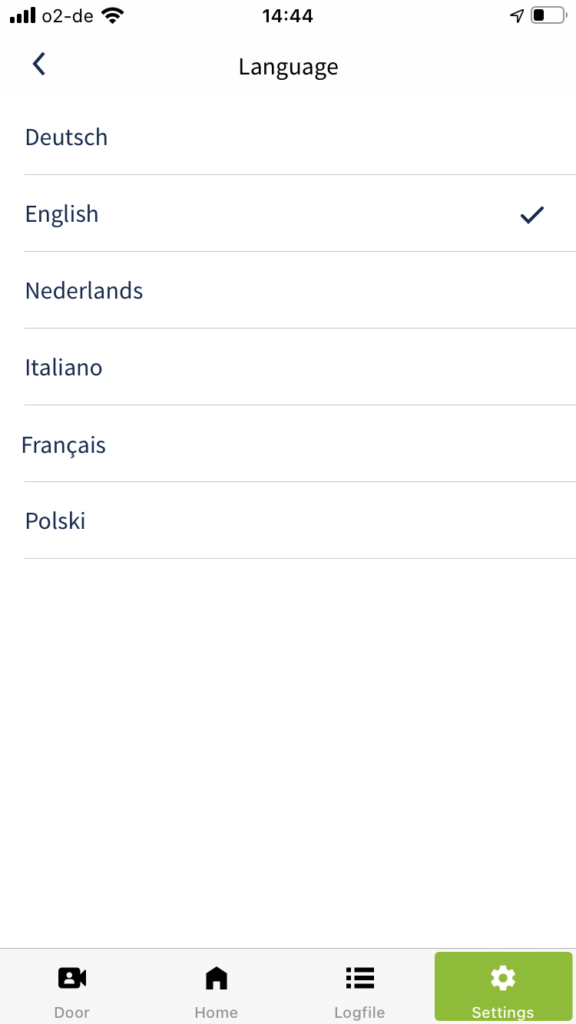
To change the language, tap Settings in the main menu.
Now tap Change language.
All languages that are available for the app are listed. Select your preferred language. The check mark indicates which language is currently selected. After changing the language, the SmartConnect app switches back to the settings overview. The language was changed successfully.
Manage Widgets
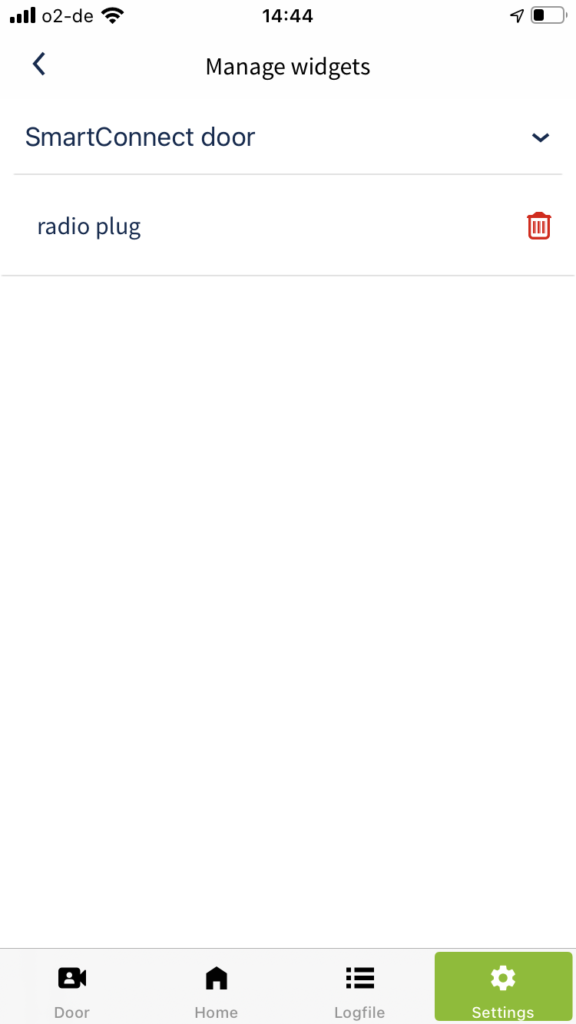
To manage the widgets of the SmartConnect app, tap Settings in the main menu.
Now tap Manage widgets.
A list of the available SmartConnects is displayed. By tapping on the desired SmartConnect, you will be shown the applications for which a widget has been set up. You now have the option to delete the corresponding widget by tapping the trash can icon.
To learn how to create widgets for applications, see chapter Application settings.
FaceID/TouchID login
To conveniently log in to your SmartConnect via FaceID/TouchID, tap Settings in the main menu.
Activate the FaceID/TouchID switch. The next time you open the SmartConnectapp, you can now log in easily using FaceID/TouchID.
Sign out
If you change a user or want to log in to another SmartConnect, you must log out first. With the log out step, you will also deactivate the Auto Login switch for this SmartConnect. You must therefore log in manually when you reconnect to the SmartConnect and you can activate the Auto Login switch again.
Tap Settings in the main menu.
Tap Sign out.
SmartConnect settings
Administration (Administrator rights required)
The Administration area is reserved for administrators only. Once you log in as an administrator (see chapter Administrators and users), you can configure advanced settings in this area, such as the SmartConnect network configuration (see chapter Administrator settings), manage user settings (see chapter User administration) or set up schedules (see chapter Schedules).
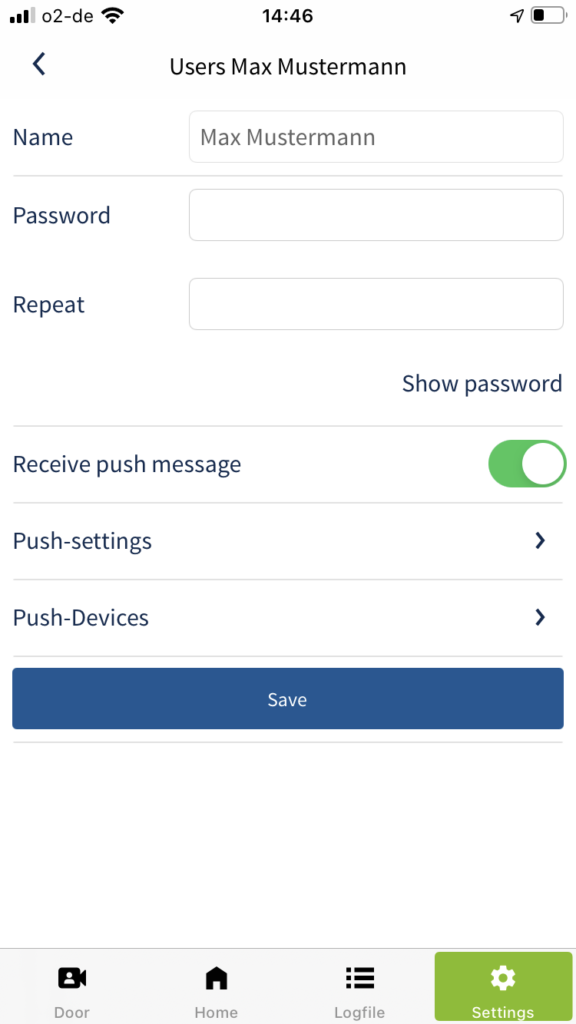
User settings
In the User Settings you have the option to change your username and password. You can also edit the settings for push notifications. You can specify whether you want to receive push notifications in general, which applications you want to receive push notifications for, and on which devices you want to receive them.
Tap Settings in the main menu.
Tap User settings.
Make the desired changes and confirm your settings by tapping Save.
If you are logged in as an administrator, this menu item does not exist. You can find out how to make the appropriate settings as an administrator in the chapter User administration.
Select SmartConnect
To connect to another SmartConnect, tap Settings in the main menu.
Tap Select SmartConnect.
All available SmartConnects are now displayed. Tap on the SmartConnect you want to connect to and log in with your access data.
As a user without administrator rights, you can also log in automatically – the login data will then be stored on your smartphone.
The demo mode shows the basic functions of the SmartConnect app even without accessing a SmartConnect.
Privacy Policy
Here you can find the privacy policy of the SmartConnect app.
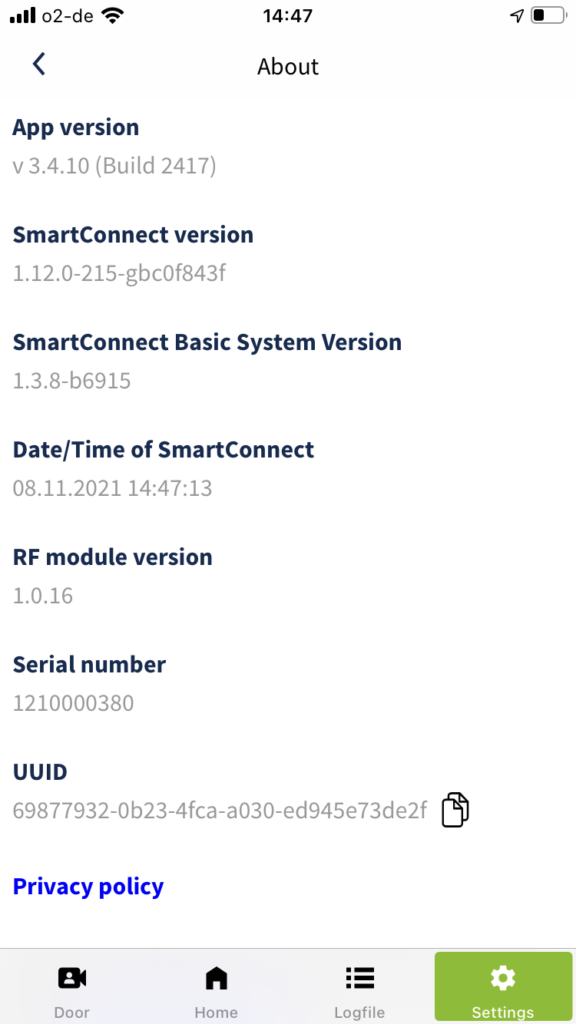
About
Here you will find basic information about the SmartConnect app and the SmartConnect.
The following information will be displayed:
SmartConnect app Version
SmartConnect software version
SmartConnect basis system version
Date/Time of the SmartConnect
RF modul software version
Serial number
UUID
Administrator settings
This chapter summarizes all advanced settings for the SmartConnect app and SmartConnect. Only administrators are authorised to administer user administration and schedules as well as to edit advanced settings such as network configuration or resetting to factory settings.
The advanced settings and the administration area are explained in more detail below.
For more information about the general settings of the Smartconnect app and SmartConnect, please refer to the chapter User settings.
Administration
The Administration area is reserved for administrators only. Once you log in as an administrator, you will be able to manage user lists and schedules and edit the advanced settings of the SmartConnect in this area.
Login as administrator
Tap Settings in the main menu and then tap Administration.
Enter your administrator password and tap Login.
You are now logged in as an administrator. At the bottom of the content area of the app, you will now see a green bar indicating that you are currently in admin mode.
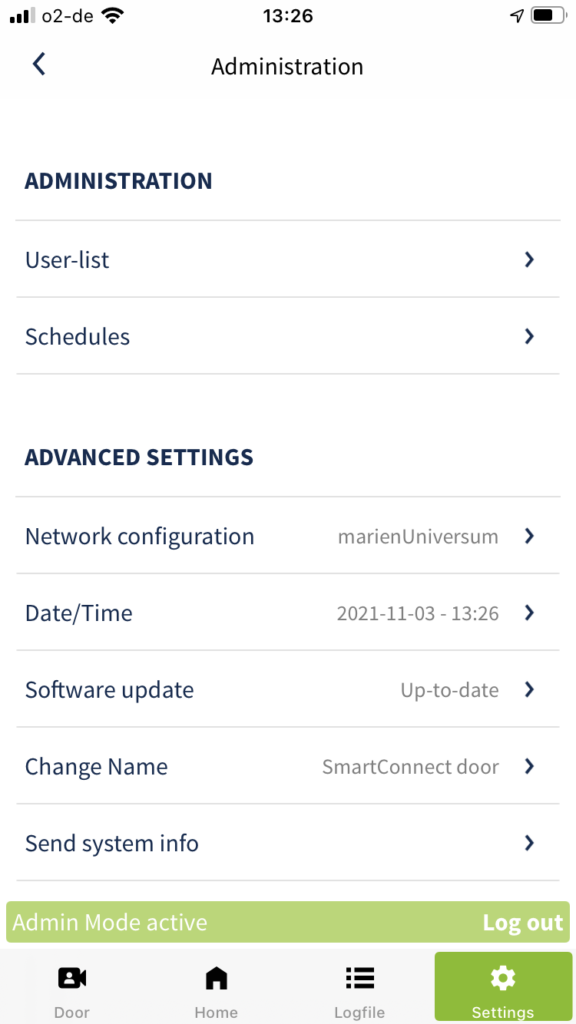
Administration
User-list
You can learn how to edit user-lists or manage users in the chapter User administration.
Schedules
You can learn how to create or edit schedules in the chapter Schedules.
Advanced settings
Network configuration
Option 1: Wi-Fi integration
Recommended operation of the SmartConnect easy.
Tap Settings in the main menu and then tap Administration.
Enter your administrator password and tap Login.
Tap Network configuration.
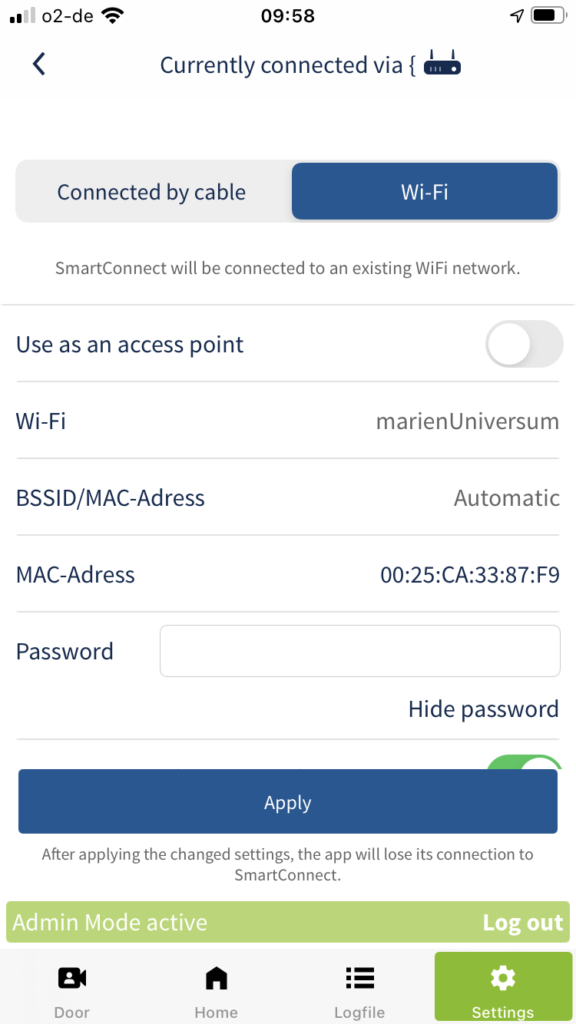
Select Wi-Fi in the header area.
Make sure that the Use as an access point switch is deactivated.
Select your personal Wi-Fi. Leave the assignment of the BSSID / MAC address to Automatic and enter the password of your personal Wi-Fi.
If you want remote access to your SmartConnect via the Internet, activate the corresponding switch.
Confirm your details by tapping Apply.
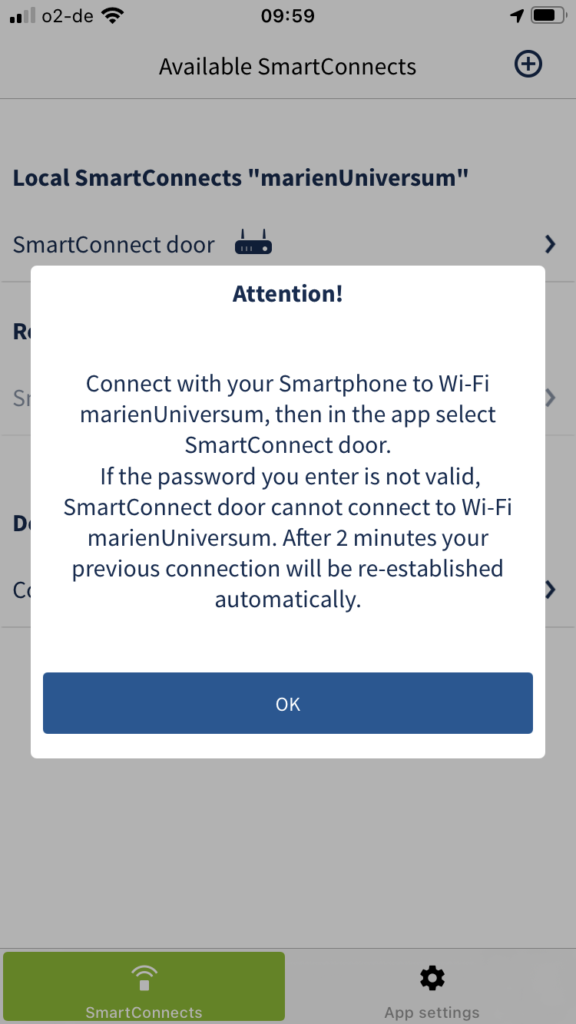
Connect your smartphone to the previously defined Wi-Fi and then select the appropriate SmartConnect in the SmartConnect app.
Option 2: Network cable (only SmartConnect door)
Recommended operation of the SmartConnect door.
Tap Settings in the main menu and then tap Administration.
Enter your administrator password and tap Login.
Tap Network configuration.
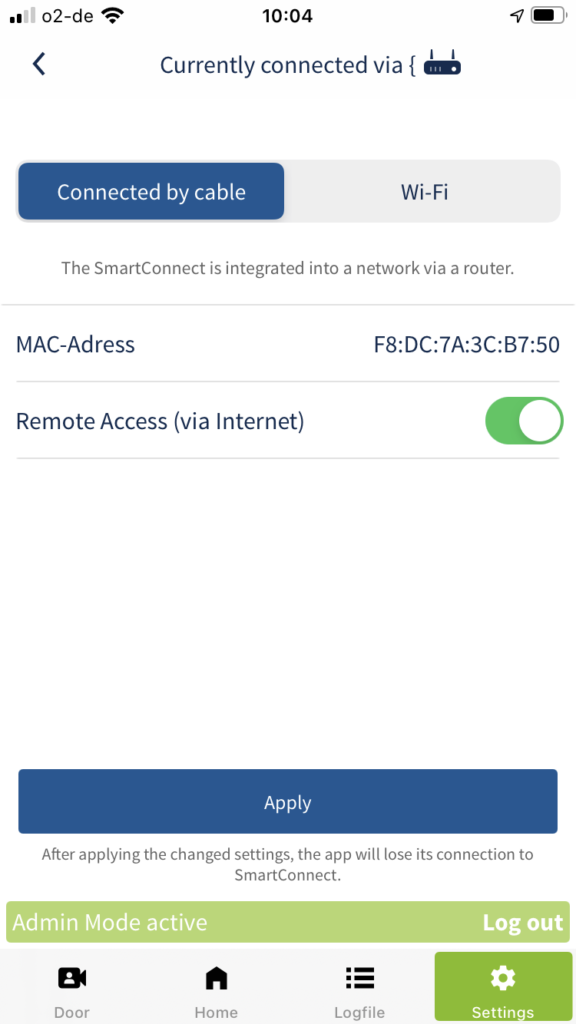
Select Connected by cable in the header area.
Warning: the network cable can be used to gain unintentional access to the network!
If you want remote access to your SmartConnect via the Internet, activate the corresponding switch.
Confirm your details by tapping Apply.
Connect your smartphone to your home network and then select the appropriate SmartConnect in the SmartConnect app.
Option 3: Access point mode
If a home network is not available, a direct connection can be established between the smartphone and SmartConnect.
Tap Settings in the main menu and then tap Administration.
Enter your administrator password and tap Login.
Tap Network configuration.
Select Wi-Fiin the header area.
Activate the Use as an access point switch.
Assign a secure password for the Wi-Fi of your SmartConnect.
Confirm your details by tapping Apply.
Connect your smartphone to the Wi-Fi “SmartConnect-XXXX” and then select the corresponding SmartConnect in the SmartConnect app.
Edit Date/Time and time zone
To set the date and time of the SmartConnect, tap Settings in the main menu and then tap Administration.
Tap Date/Time.
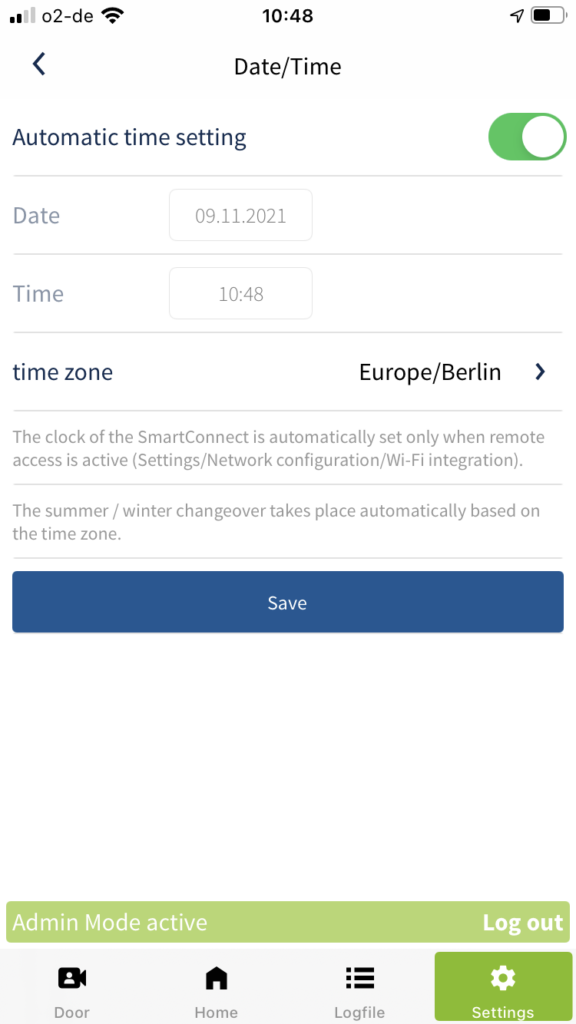
If the SmartConnect is connected to the Internet, it automatically retrieves the time via a time server.
For manual setting, deactivate the Automatic time settingswitch.
Enter the correct data and select the applicable time zone. Check the time of the SmartConnect regularly. This is the only way to correctly track which user has used an application and when in the logfile.
Confirm your entries by tapping Save.
Software update
The software of your SmartConnect and the SmartConnect app should always be up-to-date to ensure maximum security. The SmartConnect app is usually updated automatically via the App Store.
To update the SmartConnect software manually, tap Settings in the main menu and then tap Administration.
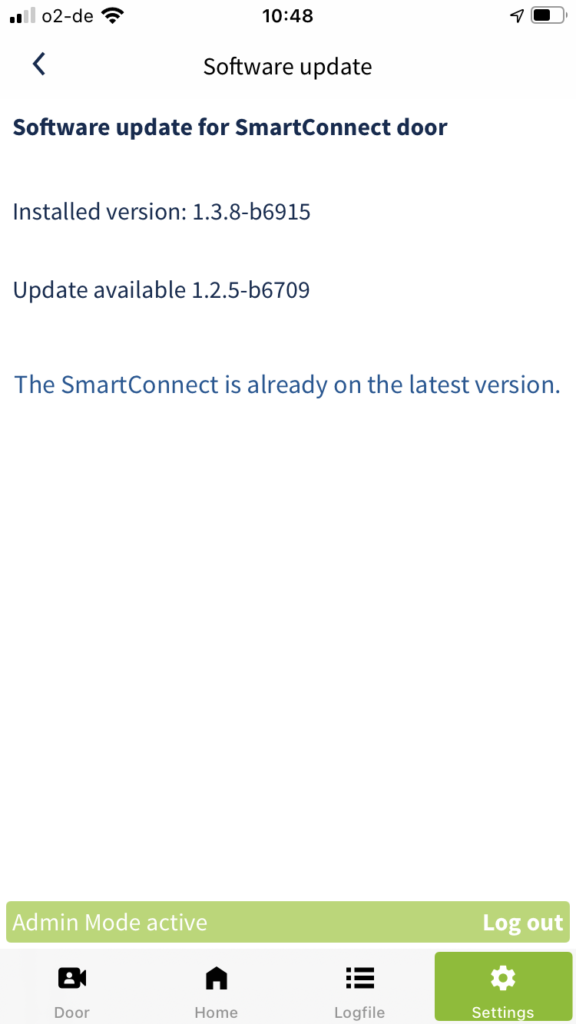
Tap Software update.
Now you can check whether an update is available for your SmartConnect. If necessary, tap Download & Install to start the update. The update is first loaded to the smartphone and then transferred to the SmartConnect and installed. Depending on the size of the update, it may take several minutes to complete. If the LEDs of the SmartConnect are flashing, the process is not yet complete; the installation can take up to 20 minutes.
Never disconnect the SmartConnect from the mains during the update process. This may damage it so that it needs to be sent to the support unit.
Online software update
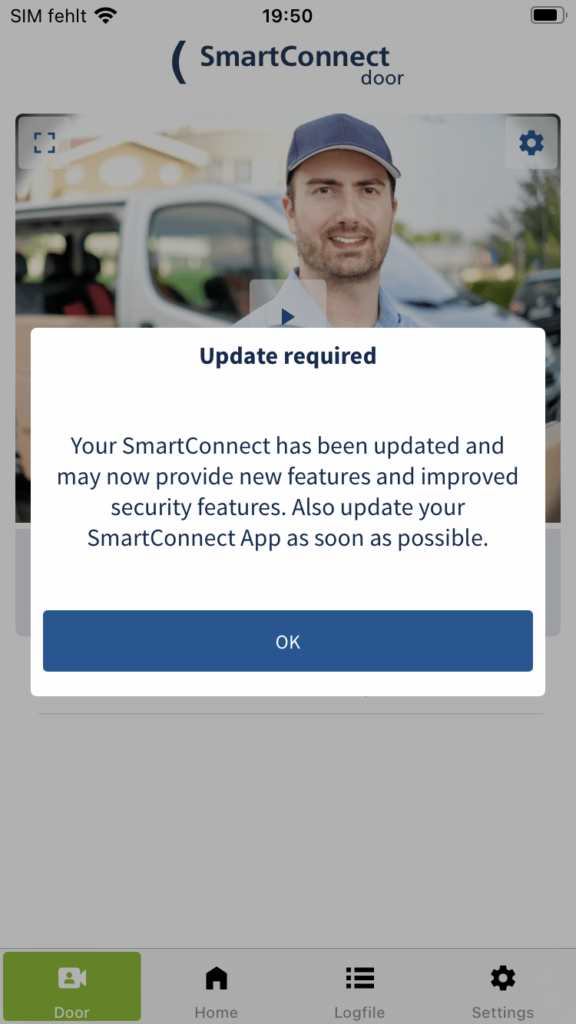
If your SmartConnect has an internet connection, it checks for updates on a daily basis. If an update is available, the administrator receives a pop-up notification in the SmartConnect app to approve the execution of the update. A red dot at settings in the main menu indicates that an update is available. You will learn how to perform an online software update in the following.
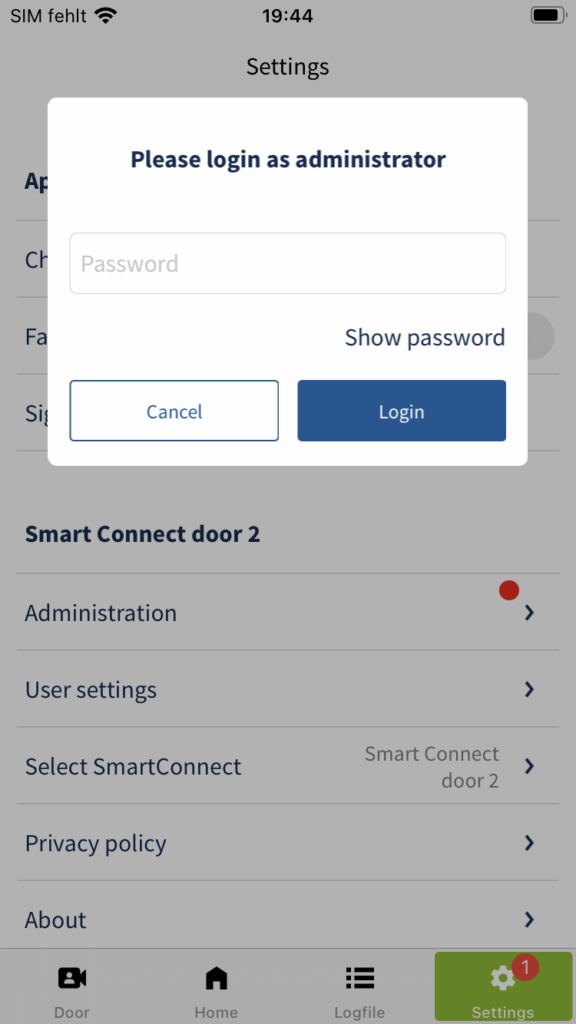
Tap Settings in the main menu and then tap Administration.
Enter your administrator password and tap Login.
Tap Software update.
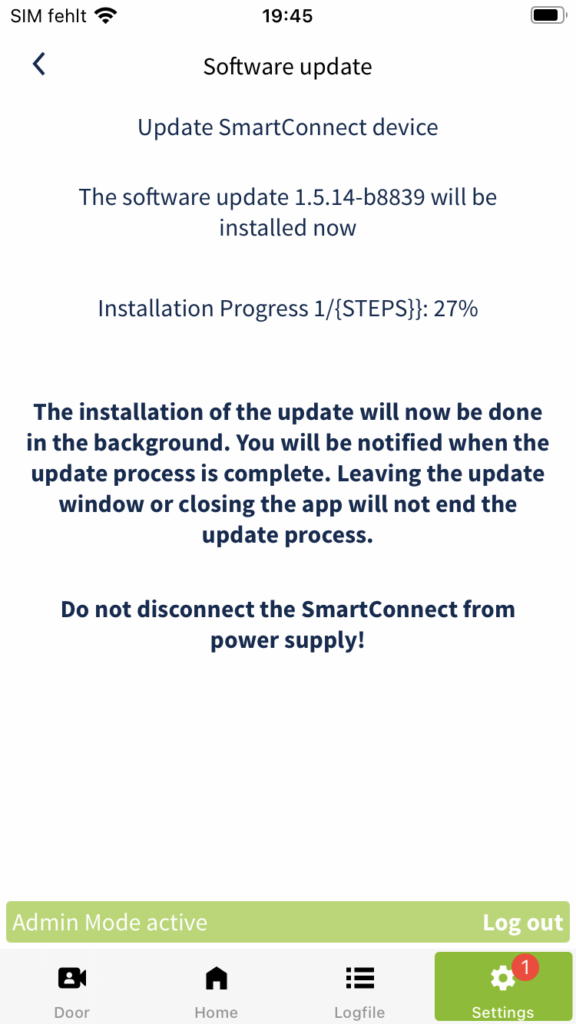
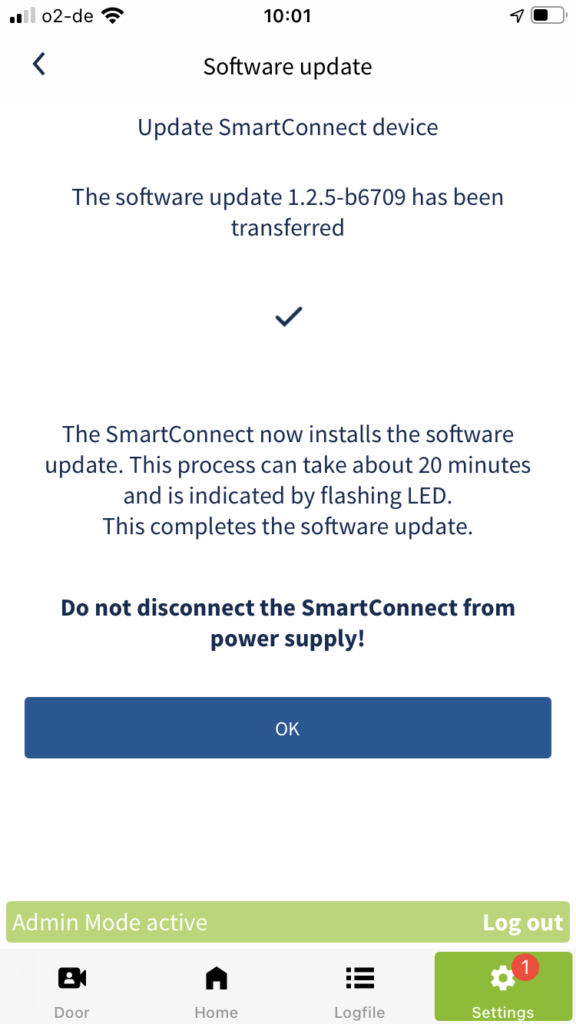
Tap the button Update SmartConnect device at the top to perform an online software update.
The SmartConnect will now install the update. This process can take a few minutes and is indicated by flashing LEDs. Wait until the update is complete.
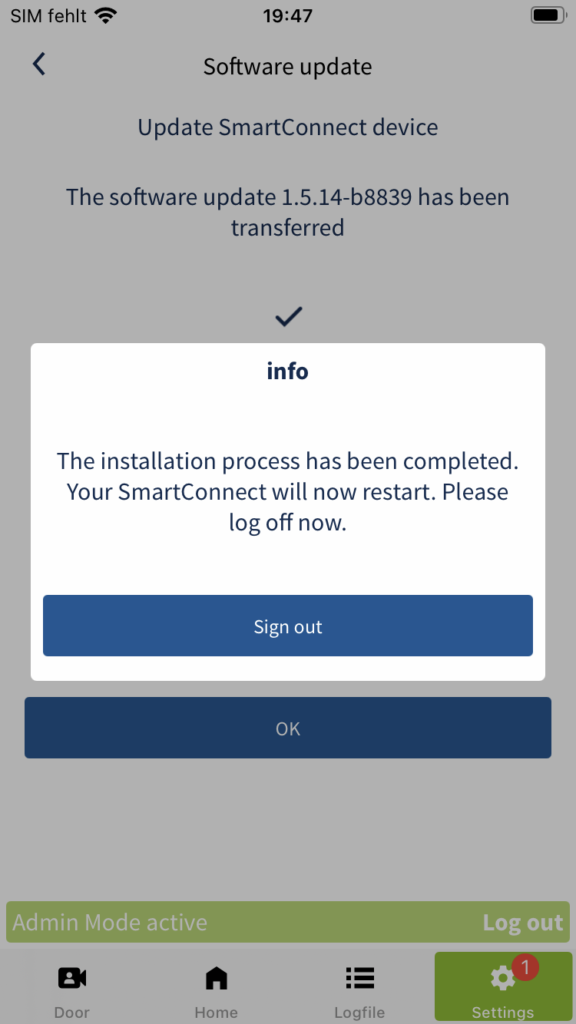
The installation process has been completed. Confirm the pop-up by tapping Sign out.
The SmartConnect will now restart. This can take a few minutes. When the reboot is complete, your SmartConnect will appear under local SmartConnects. Select your SmartConnect.
Enter your username and password and tap Login.
Confirm the pop-up by tapping OK.
The online software update has been successfully completed. The red dot at Settings in the main menu has now disappeared.
Offline software update
If your SmartConnect does not have an Internet connection, updates can also be performed offline. To do this, make sure that the SmartConnect app is not connected to a SmartConnect. You can find out how to log out of your SmartConnect in the chapter User settings.
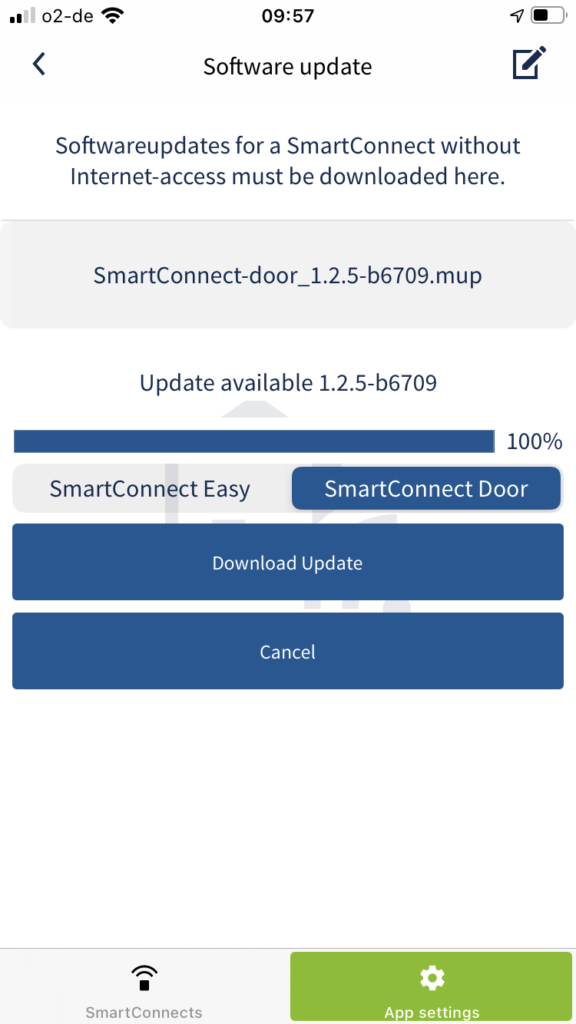
Tap App settings in the main menu and then tap Software update.
Select whether you want to download an update for a SmartConnect easy or a SmartConnect door. Then tap Download Update.
When the update is finished (100%) click on SmartConnects in the main menu at the bottom to connect to the appropriate SmartConnect.
Select the SmartConnect on which you want to install the update. You are now connected to the SmartConnect.
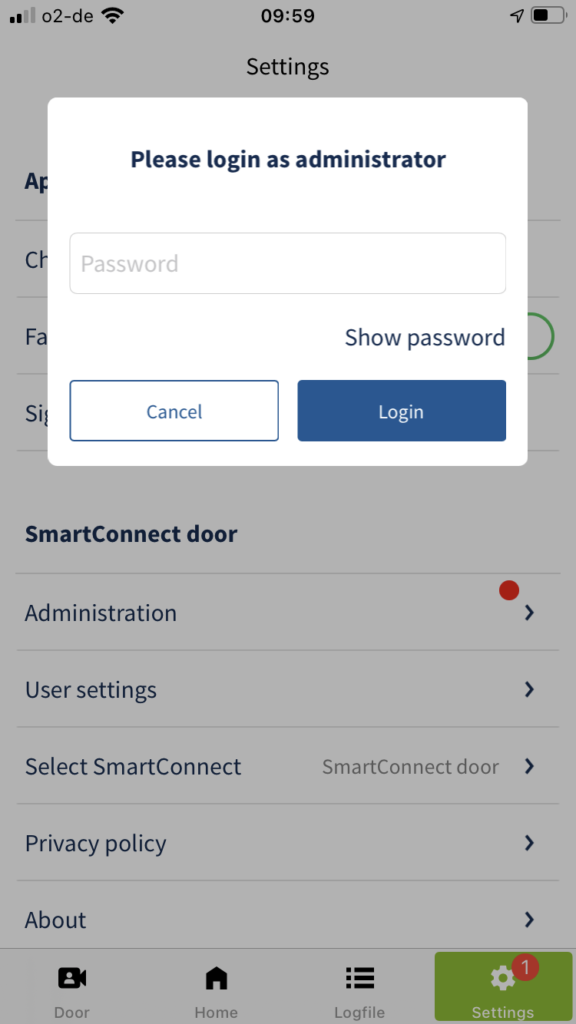
Tap Settings in the main menu and then tap Administration.
Enter your administrator password and tap Login.
Tap Software update.
The previously downloaded update is displayed in the lower part of the content area. To install the update, tap Update SmartConnect device.
When the update has been transferred to your SmartConnect, tap OK.
The SmartConnect will now install the update. This process can take a few minutes and is indicated by flashing LEDs. Wait until LED 2 on your SmartConnect lights up again permanently.
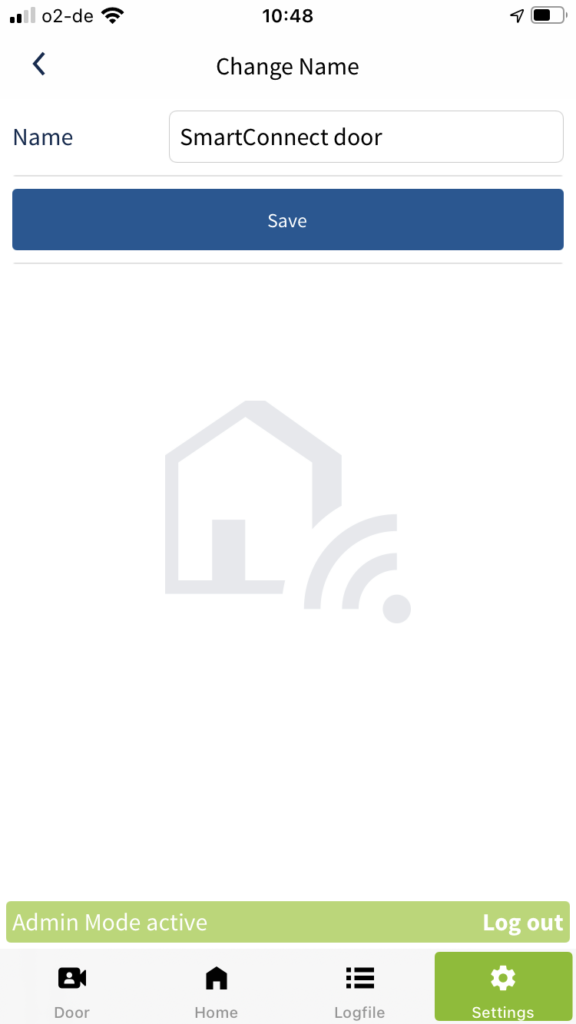
Change name
You can change the name of your SmartConnect in the Settings. When using multiple devices, it makes sense to use as accurate a description as possible to differentiate the SmartConnect, for example SmartConnect Home or SmartConnect Practice.
To change the name of your SmartConnect, tap Settings in the main menu and then tap Administration.
Tap Change Name.
Enter the new name and confirm your entry by tapping Save.
If you change the name of the SmartConnect, the name of the Wi-Fi network (SSID) that the SmartConnect uses in access point mode remains unchanged.
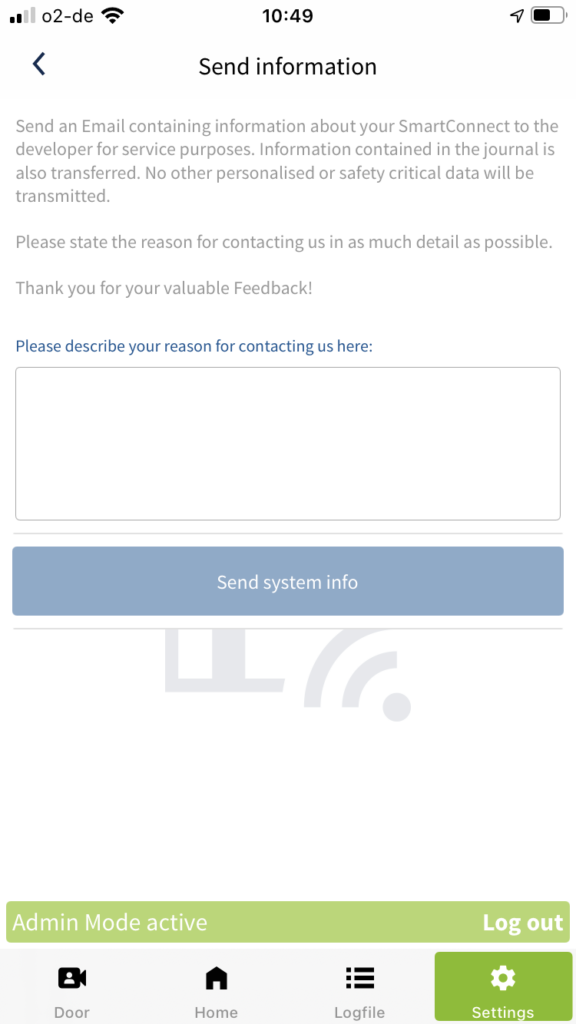
Send system info
If a service case occurs, you can send information about your SmartConnect to the manufacturer via e-mail. Information contained in the logfile is also transmitted. In addition, no personal or security-critical data is transmitted.
To send system information to the manufacturer, tap Settings in the main menu and then tap Administration.
Tap Send system info.
Describe your concern as precisely as possible in the text field.
By tapping Send system info, the e-mail client of your smartphone opens and generates an Email – if this has been set up. Check your details and send the e-mail with the attached log file to the address already entered.
Factory settings
Using the factory settings you can reset the SmartConnect to the delivery state. All applications, users and settings are deleted. The settings of the smartphone, such as the language of the app, are not reset.
To reset the SmartConnect to the delivery state, tap Settings in the main menu and then tap Administration.
Administrators can grant or revoke rights to users at any time. To manage the general rights of users, please follow the steps below. Rights include access to the camera of the SmartConnect door or the use of Alexa to operate applications.
General settings (rights)
Tap Settings in the main menu and then tap Administration.
Enter your administrator password and tap Login.
Tap User-list.
Select the user whose rights you want to edit.
Set the rights of the user by activating the corresponding switch. A list with explanations of the respective rights can be found below.
Confirm your selection by tapping Save.
You will now see the overview of the users again. The icons next to the username indicates which rights the user has.
In this area you also have the option to delete already created users. To do this, tap delete at step 5.
Administrators can set the following rights for each user:
Administrator: Activate this switch if the user is to be granted administrator rights. These rights may be granted or withdrawn at any time.
Blocked: Activate this switch if you want to temporarily lock the user. He can then neither log on nor operate applications.
Logfile access: Activate this switch if the user is allowed to read the logfile entries.
Push: Activate this switch if the user is allowed to receive push notifications.
Alexa access: Activate this switch if the user is allowed to use Alexa.
Door: Activate this switch if the user is allowed to access the camera.
Manage Access rights
In addition to the general rights, administrators can grant users permission to access specific applications at any time. This can be, for example, opening the front door or the possibility to switch a radio socket. To manage authorisations on user applications, please follow the steps below.
Tap Settings in the main menu and then tap Administration.
Enter your administrator password and tap Login.
Tap User-list.
Select the user whose rights you want to edit.
Tap Access rights.
Select the application for which you want to authorise the user.
To grant the user permanent access to an application, activate the switch Access right granted and confirm your selection by tapping Save. To add a time-restricted authorisation, select Add access right.
Enter the conditions Name, Beginning, End and Frequency in the window and confirm your entries by tapping Save. Further information on the different terms and conditions is provided below.
Tap Save again.
You will now see the overview of the users again. A check mark and clock icon indicates that the user now has time-restricted authorisation to use the application.
Note: Make sure that the Access right granted switch at the top is always active. If this switch is disabled, the time-restricted rights are also inactive and the user cannot switch applications.
Terms and conditions of time-restricted rights:
Name: Unique name of the separate authorisation, e.g. “Cleaning lady”.
Beginning: Time from which the user is authorised to use this application.
Ende Time when the user no longer has rights to use the application.
Frequency: Interval of how often the user is authorised to use this application: once in the set time window, repeated weekly, monthly or annually.
You can also assign authorisations through the application itself. To do this, follow the instructions described in the chapter Authorisations for Applications.
Schedules
By setting up time schedules, applications can be switched automatically at certain times. For example, the light in the hallway can be switched on automatically from sunset to sunrise. In the following steps you will learn how to set up and edit schedules.
Create a new schedule
Tap Settings in the main menu and then tap Administration.
Enter your administrator password and tap Login.
Tap Schedules.
Tap the plus icon below the schedule list.
Enter a name for the schedule and then tap the plus icon to set the rules.
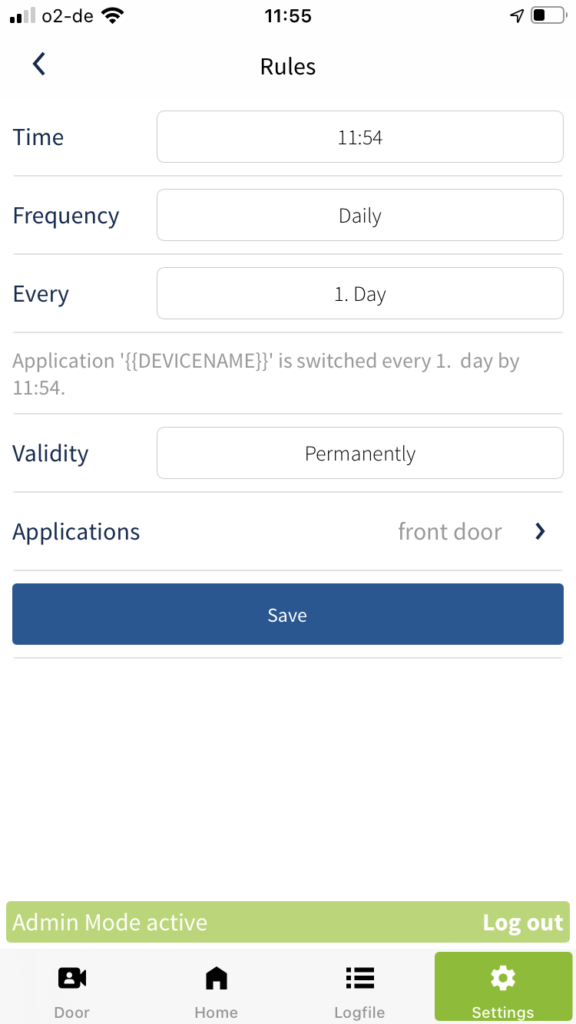
Set the rules Time, Frequency, Every and Validity. A table with explanations of the individual rules can be found below. Then tap Applications to specify which application should be switched.
Select the appropriate application from the list. You can also activate multiple applications. Return to the overview of the rules by tapping the arrow in the top left corner.
Check your rules again and confirm your selection by tapping Save.
Make sure that the Active switch is activated and create the new schedule by tapping Create.
Your previously created schedule is now displayed in the list. The small arrow next to the name indicates that the schedule is active. A crossed circle indicates that the schedule is currently deactivated.
Explanations of the rules of schedules:
Time
Specifies the time at which the application should be switched.
Frequency
Specifies whether the application should be switched daily, weekly, monthly or yearly.
Every (Interval)
Depending on which selection you have made with frequency, you now have the option to define the interval or specific days precisely.
Validity
Specifies how long the schedule is valid. You have the option to activate the schedule forever, up to a date or based on the number of repetitions. If you set the validity up to a date or based on the repetitions, the schedule is disabled after the date or the defined number of repetitions expires.
Edit schedules
To edit already created schedules, please follow the steps below.
Tap Settings in the main menu and then tap Administration.
Enter your administrator password and tap Login.
Tap Schedules.
Select the schedule you want to edit.
You now have the option to make changes to the schedule. For example, you can change the name, activate or deactivate the schedule by tapping the Active switch, or edit the rules. When you are finished editing, confirm your changes by tapping Save.
To permanently remove the schedule, tap Delete.
LED signals
You will find two LEDs on your SmartConnect easy, which signal a specific device status depending on the colour and flashing status:
LED 1 flashes for approx. 60 seconds while the device starts up and then lights up permanently.
LED 2 lights up in different colours during the Wi-Fi connection.
State
LED 1
LED 2
Device start
flashes red
off
Normal operation, no WLAN connection
lights up red
off
Normal operation, WLAN access point mode
lights up red
lights up blue
Normal operation, WLAN integration
lights up red
lights up green
Normal operation, Internet connected
lights up red
lights up orange
Normal operation, WLAN connected, Radio to an application
lights up red
flickers
Reset (Factory Settings)
Factory settings
Factory settings allow you to reset the SmartConnect to the delivery state. All applications, users and settings will be deleted. The settings of the smartphone, such as the language of the app, are not reset.
Tap Settings in the main menu and then tap Administration.
Enter your administrator password and tap Login.
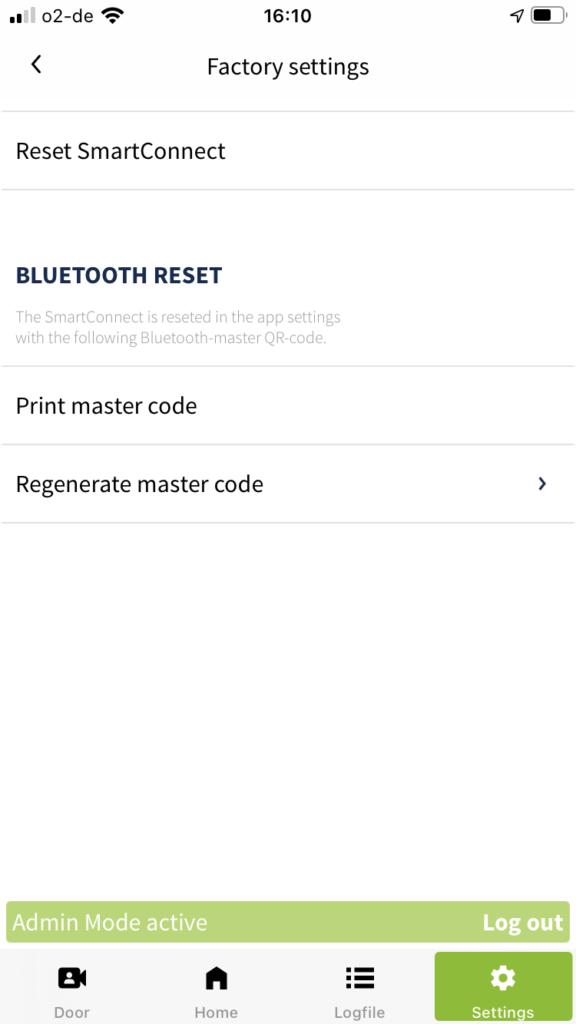
Scroll down and tap Factory settings.
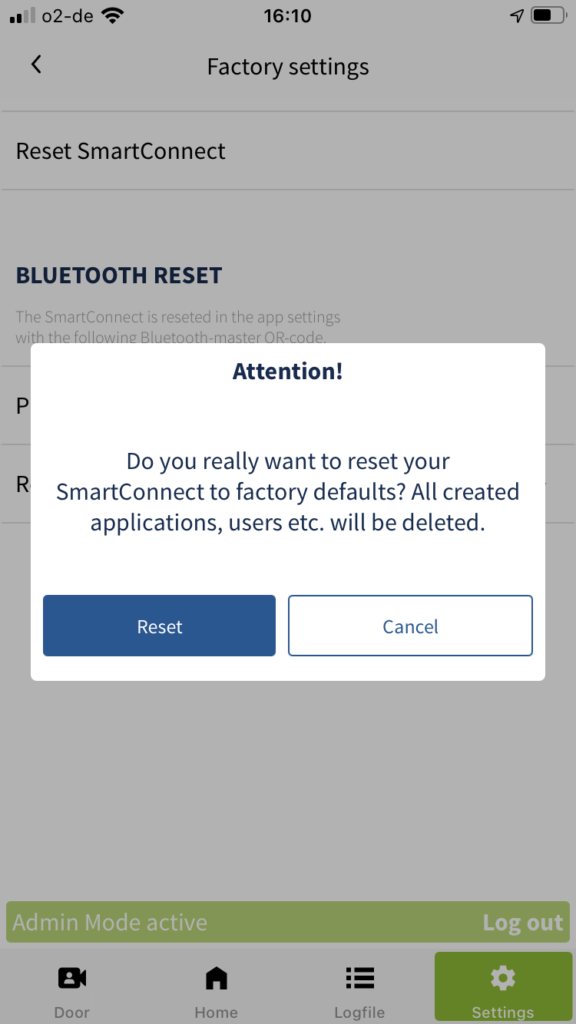
Tap Reset SmartConnect.
Confirm the pop-up by tapping Reset.
This action cannot be undone!
Factory reset on the SmartConnect easy
The factory reset clears all stored data on your SmartConnect easy. For example, if you have lost the administrator’s log in data, you can re-set all the data. See chapter Set Up the SmartConnect.
To perform the factory reset, pick up an approx. 1mm thin object, such as a paperclip. There is an antenna symbol on the front of the housing of your SmartConnect easy. In the middle of this symbol is a small opening behind which the reset button is located. The illumination of the two LEDs indicates the reset state (see table below). For a complete factory reset, press the reset button min. 21 seconds until LED 1 lights up and LED 2 flashes.
Note
LED 1
LED 2
Normal operation
on
The reset button is pressed under 3 sec.
off
off
The reset button is pressed for 3-10 sec.
WPS button * of the SmartConnect easy
off
on
The reset button is pressed for 10-20 sec
Reset of the WLAN connection
on
off
The reset button is pressed for 20 sec.
complete factory reset
on
flashes
The reset button is released after factory reset
Device start
flashes
off
Reset the Wi-Fi connection on the SmartConnect easy
With a connection reset you can reset the Wi-Fi connection. This can be helpful, for example, if a connection to the SmartConnect easy can no longer be established after a faulty change of the network configuration. The SmartConnect easy then activates the access point mode again (see chapter Set up the SmartConnect). Already configured applications and users are retained during this reset.
Example of a complete factory reset
Press the reset button for at least 20 seconds.
After 3 seconds, LED 1 will light up (signalling for the WPS button).
After 10 seconds LED 2 starts to light up and LED 1 goes out (connection reset).
After 20 seconds, LED 2 goes out and LED 1 starts to flash (factory reset).
Release the reset button now. All information is now deleted.
Why is the pairing of the SmartTouch application unsuccessful?
Check the order of your pairing process: First, confirm the Pair now button in the SmartConnect app and then place the SmartTouch receiver pairing mode (see chapter Set up and pair an application and the operation manual of the SmartTouch receiver on www.fuhr.de).
Does the data remain in the SmartConnect in the event of a power failure?
Yes, all data is permanently retained. Thanks to an internal energy storage, the clock of the Smart Connect will continue to run for up to 4 weeks after a power failure.
How safe are my applications when operated over the Internet?
All data is SSL-encrypted, comparable to the security level of online banking.
Can unauthorised persons connect to the Wi-Fi of my SmartConnect?
No, no connection is possible without the necessary WLAN password. When assigning the passwords, ensure sufficient security.
If the Wi-Fi password is known, can an unauthorised person operate my applications?
No, without knowledge of the login data (administrator, user) it is not possible for unauthorised persons to operate applications in the app. When assigning the passwords, ensure sufficient security.
Can several applications be created that operate the same device?
No, you can only create one application for one device at a time. As soon as there is a duplication, an error message appears.
What happens after incorrect entry of the password?
If you have entered the password incorrectly, re-entry is only possible after a time delay of 2 seconds. If you make another mistake, the delay increases to 4 seconds, then to 8 seconds, and so on. A complete lockout does not occur.
What settings can a user without administrator rights change?
A user without administrator rights is only allowed to set and change his password. The administrator can unlock his applications and extend his rights (see chapter Authorisations for applications and User administration).
Can a user log in with different devices (smartphone/tablet)?
Yes, you can log in to the SmartConnect with any device on which the SmartConnect app is installed with your username and password.
Can multiple smartphones access the SmartConnect at the same time?
Yes! For example, you can access the SmartConnect with your smartphone and tablet at the same time.
How do I know if the smartphone is connected to a Wi-Fi network?
Data can only be transferred from the smartphone when connected to the SmartConnect. If this is done via Wi-Fi, it makes sense to check the Wi-Fi connection. If the mobile connection is active, this is no longer visible in the upper status line of the smartphone. To check the Wi-Fi connection status, turn on Airplane mode, and then only Wi-Fi. Alternatively, you can check in the Wi-Fi settings whether and with which Wi-Fi the smartphone is connected.
I lost my smartphone, what should I do?
You can log in from any smartphone with an administrator account and make any changes. Assuming you are near the SmartConnect and have the SmartConnect app installed.
Use the administrator account to lock the user who is logged in to the lost smartphone. Afterwards, applications can no longer be accessed by this user. At best, also change the passwords of your home Wi-Fi network or SmartConnect (in access point mode).
How do I ensure the best security of my applications?
The SmartConnect uses the latest encryption methods. In addition, the security of data transmission is ensured by a secure Wi-Fi password. Only assign secure passwords.
SmartConnect door
What can I do if the app reports that the “connection to the server cannot be established”?
Make sure you have a very good WLAN connection to the SmartConnect door. The wireless access point (router/repeater) should not be more than 2 meters away from the SmartConnect to ensure reliable data transmission. To optimize the connection quality, you can also use the options described in chapter Set up the SmartConnect.
SmartConnect easy
Is it possible to open my door after a factory reset of the SmartConnect easy by unauthorised persons?
Yes, individual applications (those without status message to the SmartConnect easy) can also be taught in again without a master key. Please make sure to install your SmartConnect easy within a building and protect it from unauthorised access.
Why is the LED 2 of my SmartConnect easy not lit?
LED 2 indicates the connection to the network. If you have not yet connected your SmartConnect easy to the smartphone or Wi-Fi router of your home network at the start of setup, LED 2 does not light up. As soon as your SmartConnect easy is connected to the network, LED 2 flashes green (= connection) or lights up orange (= connection successful).